October 26, 2024
Are you trying to figure out how to bulk upload products in a WooCommerce store?
Manually adding products to your WooCommerce store can be quite a time-consuming task. Imagine you had to set up a new online store, update your product inventory, or even migrate your marketplace to a new platform. The last thing you want to do is carry out these tasks manually per product because it will take ages to complete. This is where bulk uploading products becomes necessary.
This step-by-step guide will show you how to import products in bulk in WooCommerce, making your store operations more efficient.
WooCommerce provides a built-in importer that allows you to bulk import products from a CSV file into your store. To use it, first prepare your product data CSV file using WooCommerce’s provided template.
Once your product data is ready, go to your WordPress admin dashboard and navigate to Products › All Products › Import › Choose File. Upload the product CSV file that you prepared and click Continue. Map the CSV fields to WooCommerce’s product fields and click Run the importer.
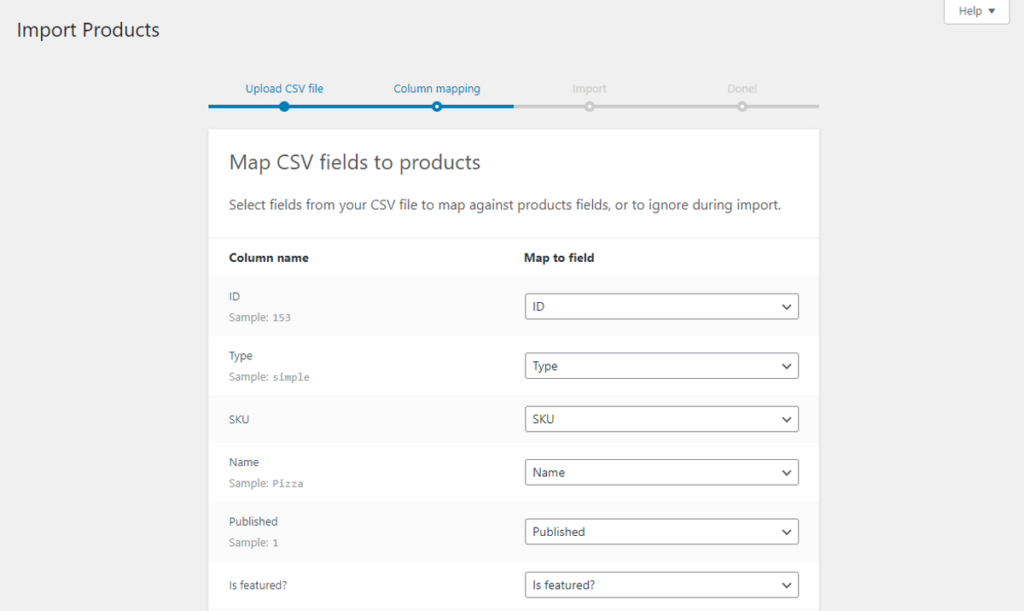
The import process will immediately begin to run and once completed, you can click the View Products button to view the imported products.
While WooCommerce’s native importer tool is handy for carrying out basic product imports from CSV files, its functionality is limited. Some of its limitations include:
These limitations, amongst many others, are why using a third-party plugin like WP All Import to bulk upload products in WooCommerce might be a more convenient option.
WP All Import is a best-in-class WooCommerce and WordPress import plugin that allows you to easily import all types of WooCommerce and WordPress data within minutes.
The plugin features a drag-and-drop interface that makes the import process quick and easy for users at any experience level. It offers many advanced import features that the native WooCommerce importer lacks. Some of these include:
WP All Import’s robust features make it a no-brainer why it is the best product import plugin for WooCommerce. It is a more convenient choice for carrying out WooCommerce imports; for this reason, we will use the plugin to bulk import WooCommerce products in this guide.
We’re now at the exciting part of the article, where we will walk you through how to import products into WooCommerce in bulk using the WP All Import plugin.
Ready? Let’s go!
The first step is to purchase and download the WP All Import plugin. You’ll also need its WooCommerce Import Add-On to import WooCommerce products. The add-on ensures you can seamlessly import all WooCommerce product types and their data.
After downloading the plugin, head over to your WordPress admin dashboard and navigate to Plugins › Add New Plugin › Upload Plugin › Choose File › Install Now › Activate to install it on your site. Follow the exact steps to install the WooCommerce Import Add-On as well.
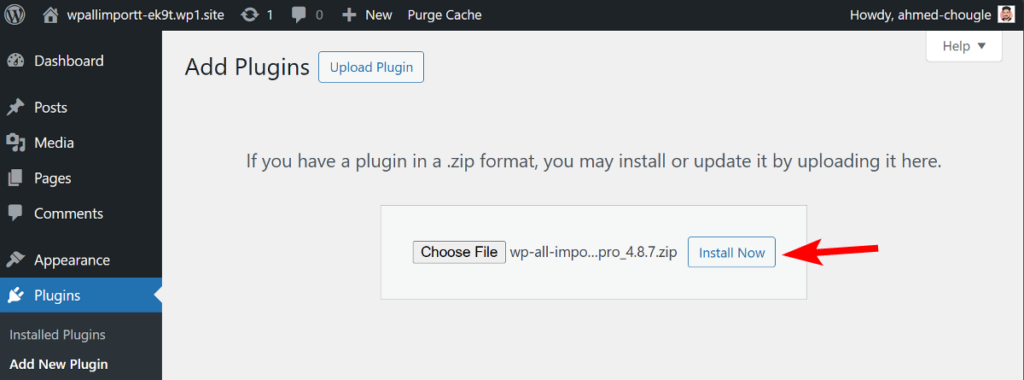
Once both the plugin and the add-on have been installed and activated, you can start to bulk upload products in WooCommerce.
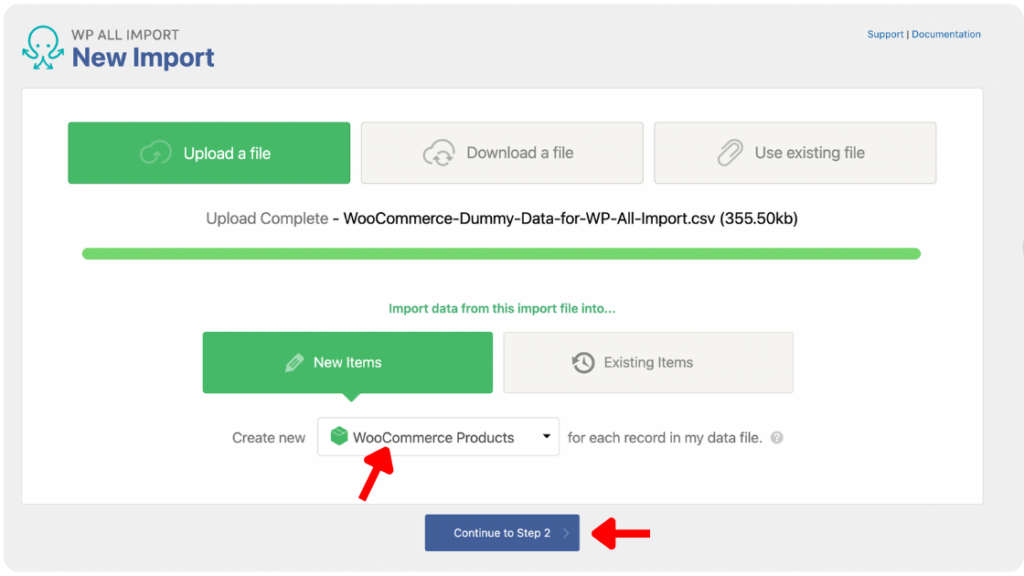
To create a new import, navigate to All Import › New Import and decide how you want to import your bulk product data.
WP All Import provides options to Upload a file from your PC, Download a file from a URL or FTP/SFTP, or Use an existing file you previously uploaded.
After loading your import file using any of the provided options, under New Items, select WooCommerce Products as the import type and click Continue to Step 2 to proceed.
The Review Import File screen appears next. Here, you will see a summary of the number of records that will be imported and you can review the product data you uploaded to ensure that WP All Import detected all fields correctly. You can use the left and right arrows to navigate between records and review until you are pleased.
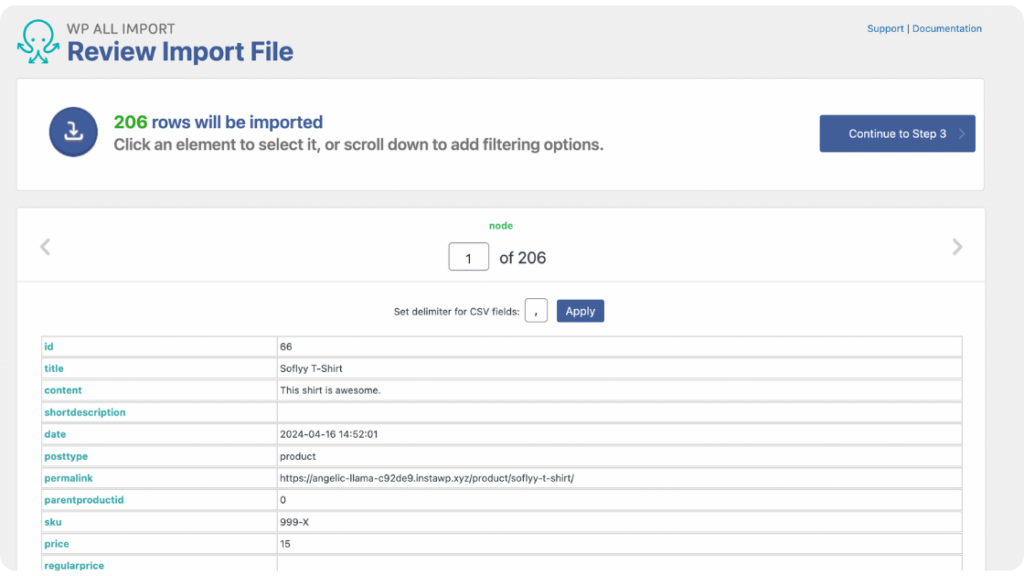
Scroll down the screen to see the Manage Filtering Options panel. WP All Import provides this powerful feature to enable you to add filter rules to import only selected products from your import file.
You can add a single filter or multiple filters depending on your import needs. To add a filter, simply select an Element from your import file, choose a Rule that applies, and input a Value.
See the example below of multiple filters applied to a bulk import of WooCommerce products. Only products with an ID greater than 50 and a price equal to or less than $100 will be imported.
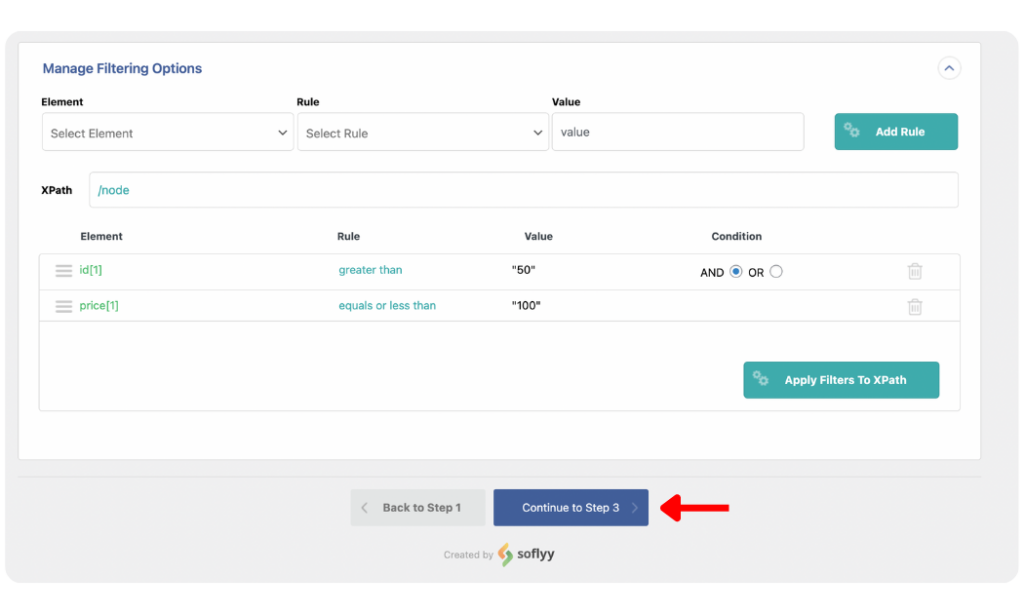
Once you have reviewed your import file and added filters as relevant, click Continue to Step 3.
The Drag & Drop screen is where the most important steps of the import process take place.
WP All Import provides a user-friendly drag-and-drop interface to make mapping data in your import file to WooCommerce standard and custom fields easy.
Let’s get started.
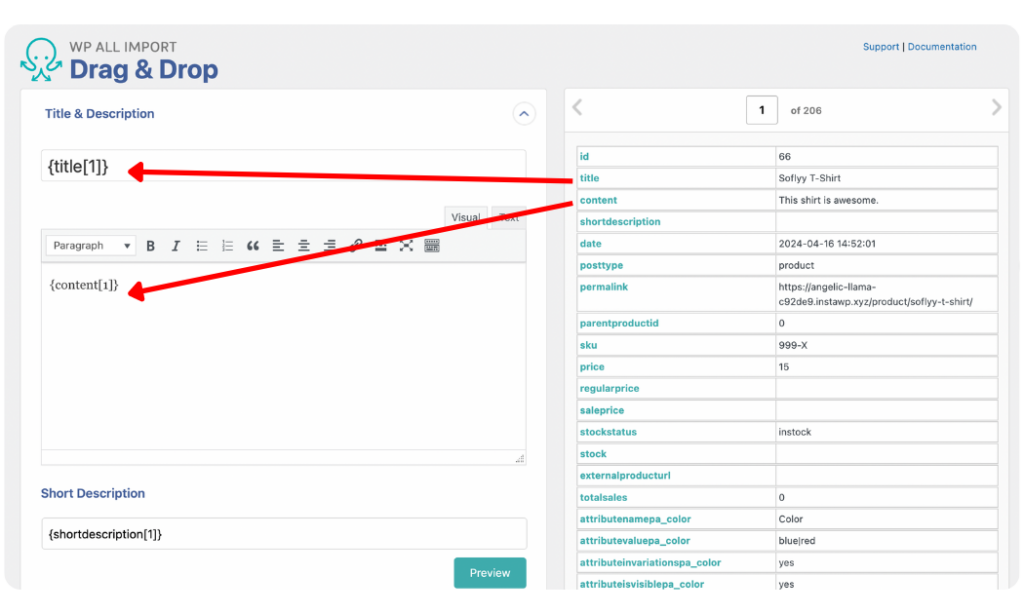
Within the Title & Description panel, you are provided with fields to map the Title, Description, and Short Description elements from your incoming data file. Simply drag them from the incoming data table on the right into the fields on the left.
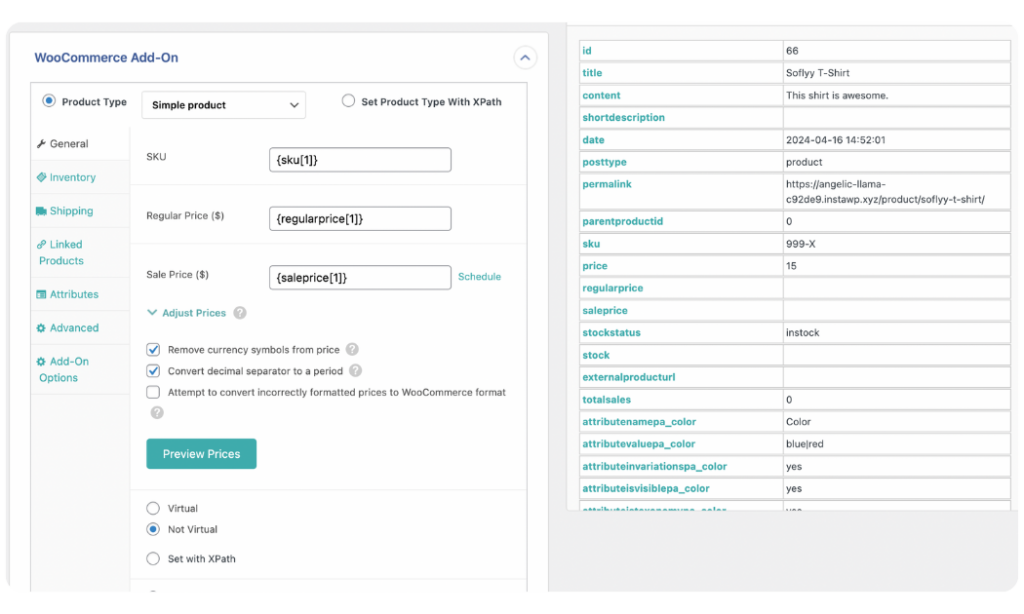
The WooCommerce Add-On panel houses all the standard WooCommerce product data fields. It has the same layout as WooCommerce’s default Add New Product page, making mapping the fields intuitive and straightforward.
The first thing to do on this panel is to set your Product Type. You can choose between Simple Product, Grouped Product, External/Affiliate Product, and Variable Product. You can also select Set Product Type With XPath if your products are being imported from an XML file.
After setting your Product Type, the General tab will display fields relevant to your selected product type. Map the SKU, Regular Price, and Sale Price (if applicable) and leave the other options within the tab with their default selection or tweak as needed.
The Inventory tab allows you to configure settings for your products’ inventory. It provides the fields to map the Stock Qty and Low stock threshold. To complete the mapping of this section, drag and drop the relevant inventory elements from your incoming data table into the provided fields.
Repeat the drag-and-drop mapping process for the Shipping, Linked Products, and Attributes tabs to finish mapping all sections of the WooCommerce Add-On panel.
The next panel is the Images panel, which provides options and input fields for managing the import of product image files.
WP All Import offers three ways to import your WooCommerce product images. You can either Download images hosted elsewhere (e.g. Google Drive or Dropbox), Use images currently in Media Library, or Use images currently uploaded in wp-content/uploads/wpallimport/files/ (images within a folder in your website’s backend).
Select the best option for your import, and map the image URL element in your incoming data file to the provided input field. If your products have multiple images, separate them with a comma (,) or enter one per line.
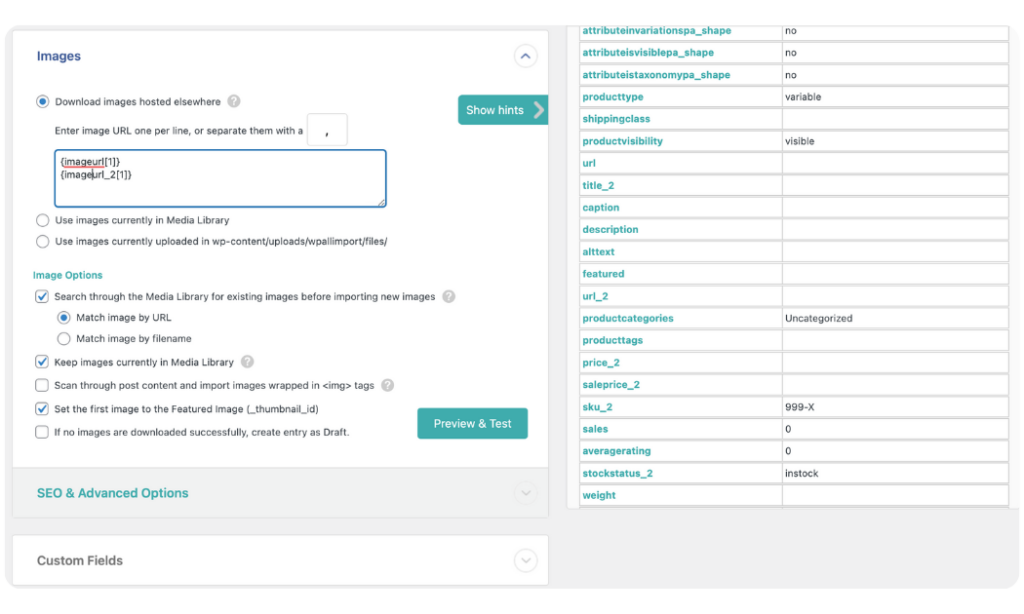
The Image Options section of the panel provides additional image import settings that you can leave as default or change as needed.
You can also click the Preview & Test button to run a test and be certain that WP All Import can access your image files.
WP All Import provides many other panels to ensure you can import all custom fields, categories (including hierarchical categories), and tags for your WooCommerce products, or even add custom PHP functions if needed. Some additional panels provided include Custom Fields, Taxonomies, Categories & Tags, and Function Editor. However, we will not discuss them in detail in this article.
Once you have completely mapped your product data on the Drag & Drop screen, click Continue to Step 4 to proceed to the next step of the import process.
The next screen that appears is the Import Settings screen. This screen provides additional options to optimize your product import process.
The first section of the screen displays an input field for a Unique Identifier. The Unique Identifier is a feature that helps WP All Import prevent duplicate product entries by correctly linking records in the current import with records in an updated file if the same import is run in the future.
To generate a Unique Identifier, click the Auto-detect button or drag and drop unique elements from your import file into the provided field.
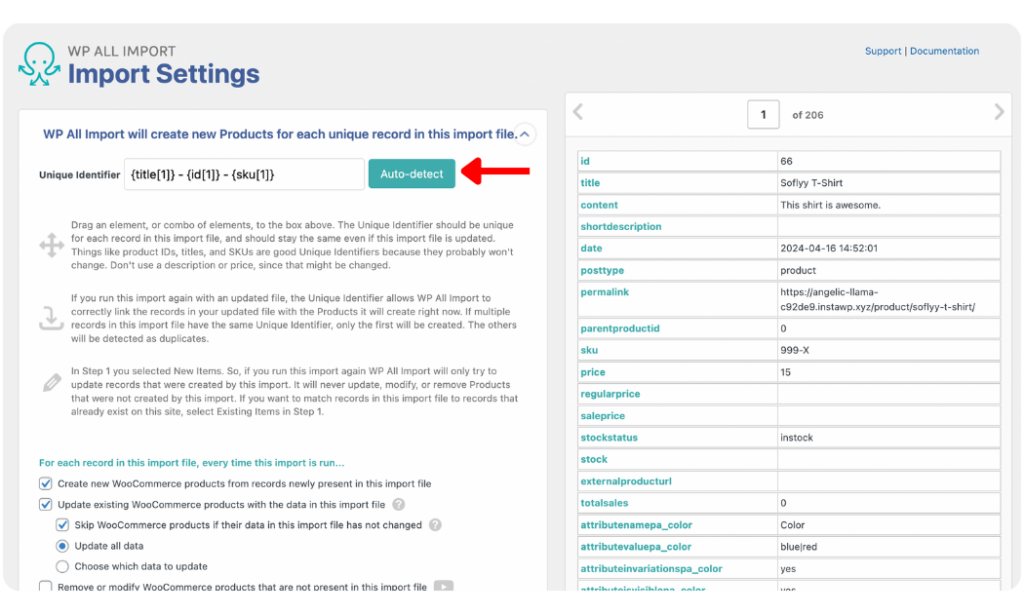
You can also configure the additional options to specify what should happen to each record in your import file every time the import is run. The default settings work fine, but you can update them to suit your import needs.
Scroll down the page to access the Scheduling Options panel. This panel contains settings for WP All Import’s powerful scheduling options, which help you save time and bring efficiency to your store operations. There are two scheduling options provided: Automatic Scheduling & Manual Scheduling.
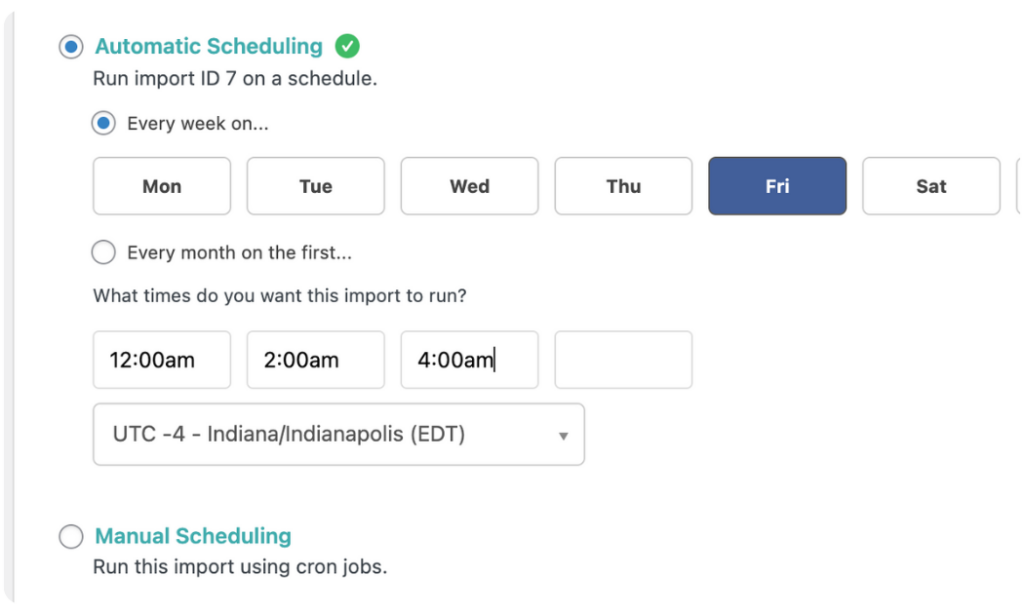
The Automatic Scheduling option allows you to schedule your bulk product import to run automatically on specific days of the week at a predefined time in just a few clicks. The Manual Scheduling option, on the other hand, lets you manually create cron jobs on your website’s server to automate your product imports. Our detailed guide provides more information about automatically importing products into WooCommerce.
WP All Import also provides a panel to Configure Advanced Settings with options to optimize the speed of your import. Keep the default settings or update them if relevant.
Click Continue to move to the next step.
We’re now at the final step of the import process!
On the Confirm & Run screen, WP All Import summarizes all your import settings. This allows you to double-check that you have applied all the right settings to ensure your import will run smoothly.
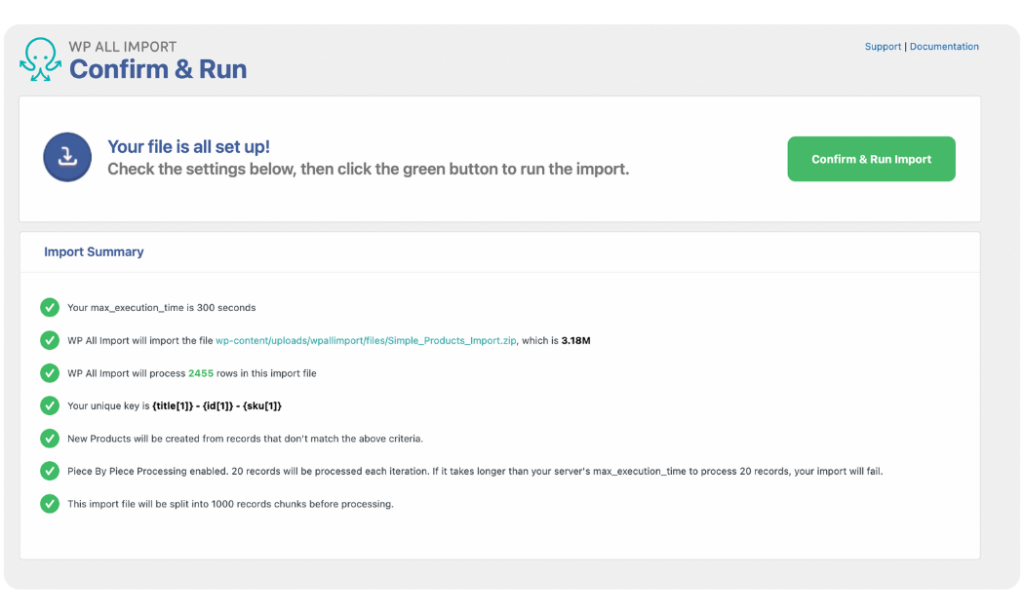
Review the settings closely. If you notice any mistakes, simply go back and fix the issue before running the import. If there are no issues, click the Confirm & Run Import button to start the WooCommerce bulk product import process.
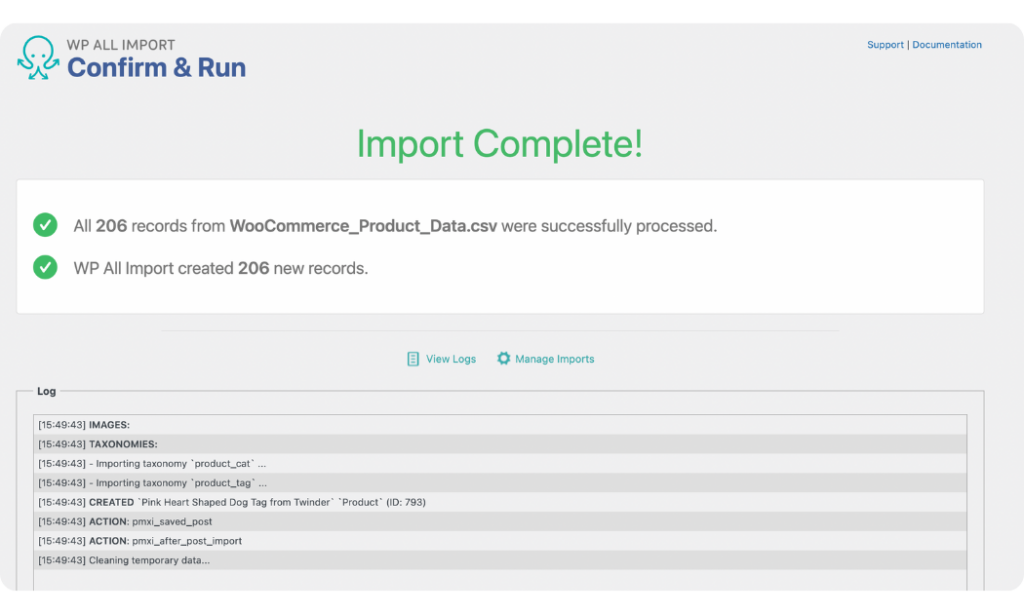
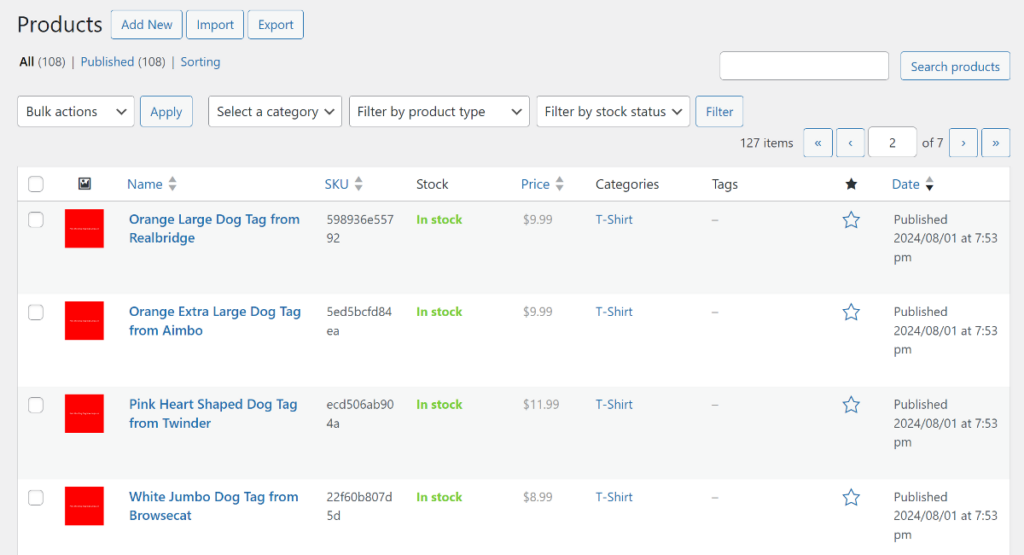
Once the import process is completed, an Import Complete notification will be displayed. Navigate to Products › All Products to check the imported products. Click the product data tab of a few products to confirm that all product details were imported successfully.
WooCommerce’s native importer tool is quite limiting for most store owners, especially since it does not support importing complex products like variable products. Additionally, it does not allow you to filter your product import file, schedule imports to run automatically, or even import product data from other file formats outside CSV. These reasons, among others, make it a poor choice for bulk importing WooCommerce products.
On the other hand, WP All Import is equipped with all the necessary advanced features that make it the ideal option to bulk import products, and other WooCommerce data types, within minutes.
The plugin makes the import process easier with its intuitive drag-and-drop interface and many other advanced import functionalities, including:
You should get the WP All Import plugin today if you want to seamlessly import bulk products into your WooCommerce store and run your store operations more efficiently.
To add multiple products at once in WooCommerce, download and install the WP All Import plugin. Navigate to All Import › New Import and upload the file containing the data of all the products you want to add to your WooCommerce store. Choose WooCommerce Products as the file type, review your import file, map the product data using the drag-and-drop interface, and run your import. All your products will be imported to your WooCommerce store at once.
The best way to bulk edit thousands of WooCommerce products is to use the combination of WP All Export and WP All Import plugins. Navigate to All Export › New Export in the WP All Export plugin and select WooCommerce products as your export post type. Select the columns you want to export and run the export. Once the export process is completed, download the file and open it using spreadsheet software to bulk edit your WooCommerce products. Once done, you can import the products back into WooCommerce with the WP All Import plugin.
To import products from Excel to WooCommerce, download and install the WP All Import plugin. Navigate to All Import › New Import and upload the Excel file. The plugin will automatically recognize the file and adjust the interface accordingly. You can then map the incoming data elements to the WooCommerce product fields and run the import. Your products will be added to your WooCommerce storefront as soon as the process is completed.
The WP All Import and WP All Export plugins are your best bet for exporting and importing products in WooCommerce. The plugins work together to make it easy to import all kinds of WooCommerce products from multiple sources and export them in various file formats e.g. Excel, CSV, or XML, to make bulk edits or for other use cases.
Get maximum flexibility with unlimited licensing and domain activations.
Get your money back within 60 days of purchase, no questions asked. It's risk-free!
We offer premium support to ensure the ultimate customer experience.
For a limited time, we're offering an unlimited site license for just $199.99/year. Buy now to lock in this price.