November 2, 2024
Are you looking for a reliable way to import WooCommerce product categories? We have the perfect WooCommerce product import solution for you.
Importing WooCommerce products with categories, or simply product categories in general, can be a tricky task. This is true especially when you have a complex hierarchy with thousands of products.
In this article, we’ll explain how to import WooCommerce products with categories using WP All Import. We’ll discuss two methods, directly importing the product categories or importing them as part of the WooCommerce product import.
WooCommerce comes with a built-in product import feature. It can come in very handy if you want to run a simple import with a few products. However, for more complex and customized imports, the built-in tool is not very convenient.
The major problem with WooCommerce’s built-in product import tool is that you need to structure the categories in a certain way for the import to be successful. This is really inconvenient, as it may take a while to structure the categories. In addition, there is no support for custom fields or complex product types.
However, there are many third-party plugins available that can easily import complex products with deep product category hierarchies. One such plugin is the WP All Import plugin.
Among all the WooCommerce product import plugins, WP All Import stands out as the best by a margin. This feature-packed, easy-to-use, and powerful plugin can import product categories in minutes.
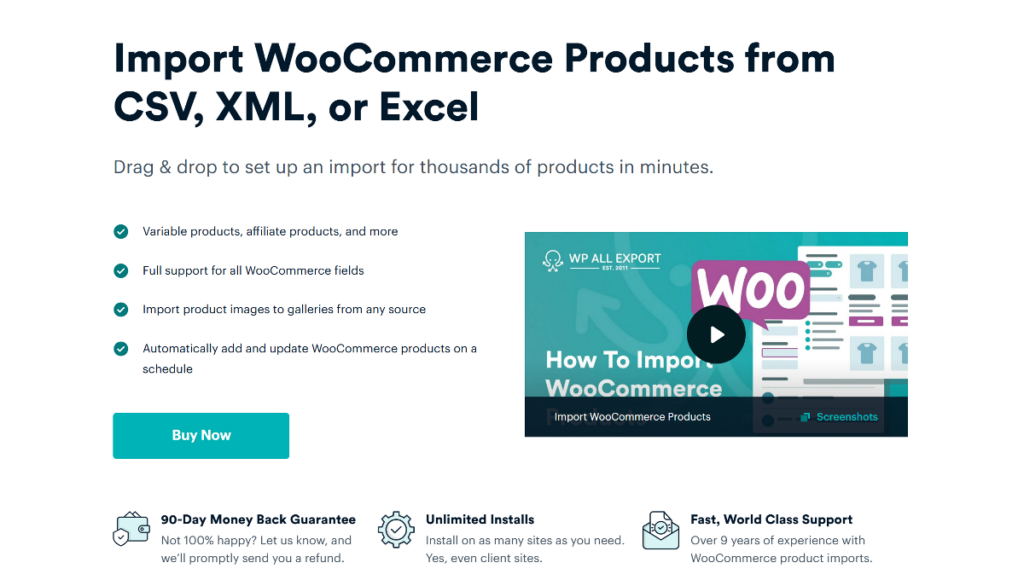
WP All Import comes with a drag-and-drop interface to import product data, including categories, just the way you want. With its powerful filtering, automatic scheduling, and customizability, WP All Import can deal with even thousands of WooCommerce categories.
Here are the key features of WP All Import:
As now you have a better understanding of what WP All Import can do, we’ll move on to guiding you on how to install this plugin. Then we’ll provide you with two methods to import WooCommerce product categories.
You need to install WP All Import and its WooCommerce Import add-on to follow along in this tutorial. Purchase the Import Pro Package from WP All Import’s website, which costs $199/yr and comes with unlimited installs. The WooCommerce Import add-on is included in this package.
Once you are done making your purchase, download the latest version of the plugin from WP All Import’s customer portal.

Now it’s time to install it on your website. Login to your WordPress dashboard and navigate to Plugins › Add New. Select Upload Plugin and upload the Zip file you just downloaded.
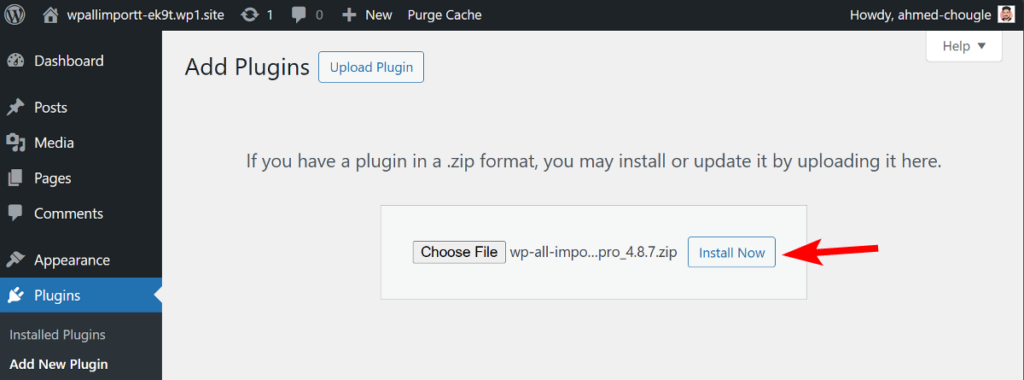
Then simply click on the Install Now button. Activate the plugin, and then follow the same process to install the WooCommerce Import add-on as well. Now, you can start importing your product categories!
In this method, we are going to import WooCommerce product categories as WordPress taxonomies. Let’s take a look at the steps!
From your WordPress dashboard, navigate to All Import › New Import. Then select your import file. WP All Import supports CSV, XML, Excel, Google Sheets, and more. Choose New Items as the import type, and then select Taxonomies as the import post type, and Product Categories as the post subtype.
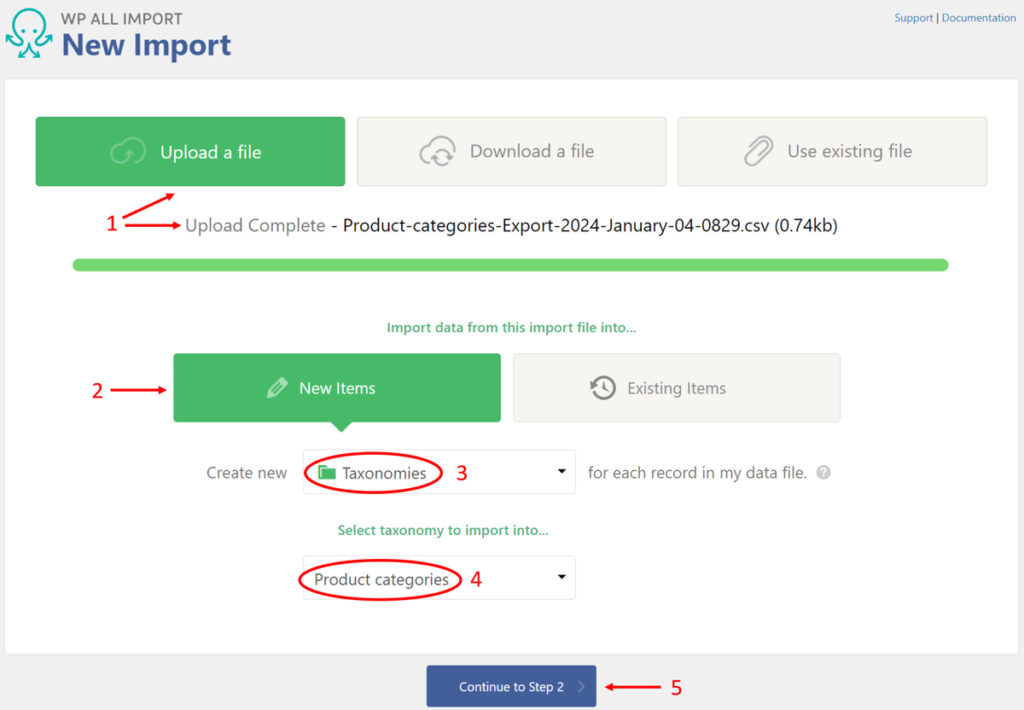
Once you are done, click Continue to Step 2.
The Review Import File screen lets you do a final check on whether your import file has been correctly parsed. You can also add filter rules to import only the specific categories you want.
To learn more, read our documentation on filtering your WooCommerce imports.
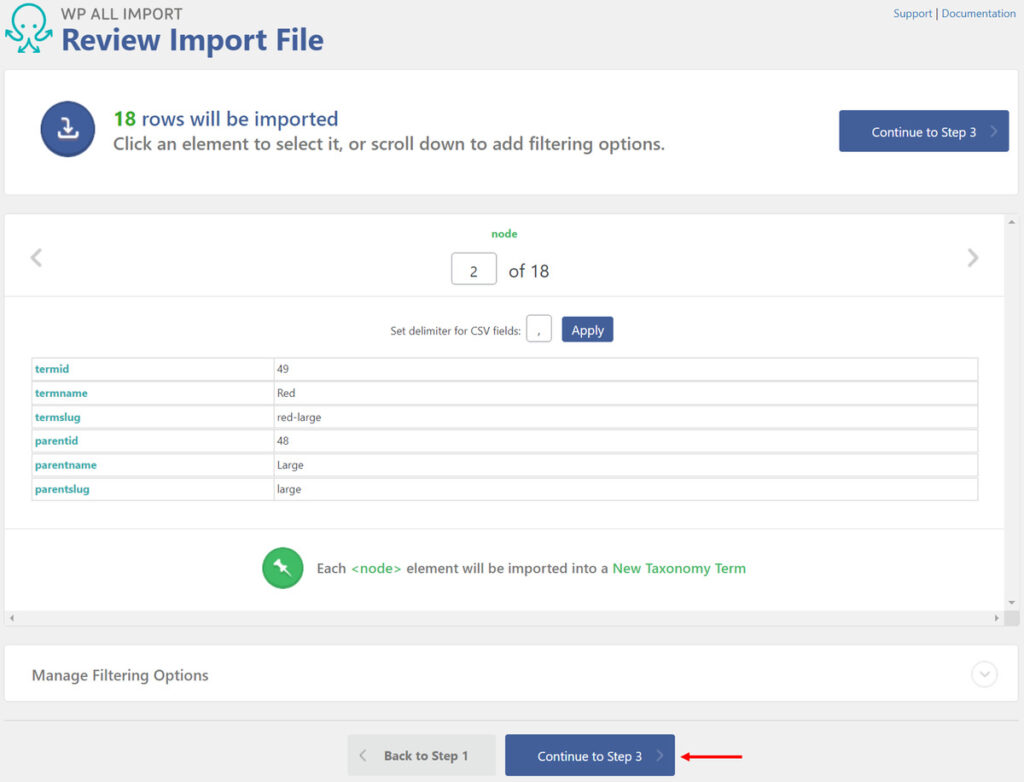
Click Continue to Step 3.
You’ll land on the Drag & Drop screen. This step is the most crucial to import product categories. In the Name & Description section, drag and drop the Category name element from the panel on the right to the Name field.

Then scroll down to the Other Category options section and expand it. Here, you can drag & drop suitable elements from the panel on the right to respective fields.
In this example, we dragged & dropped the parentname element to the Parent Term field.
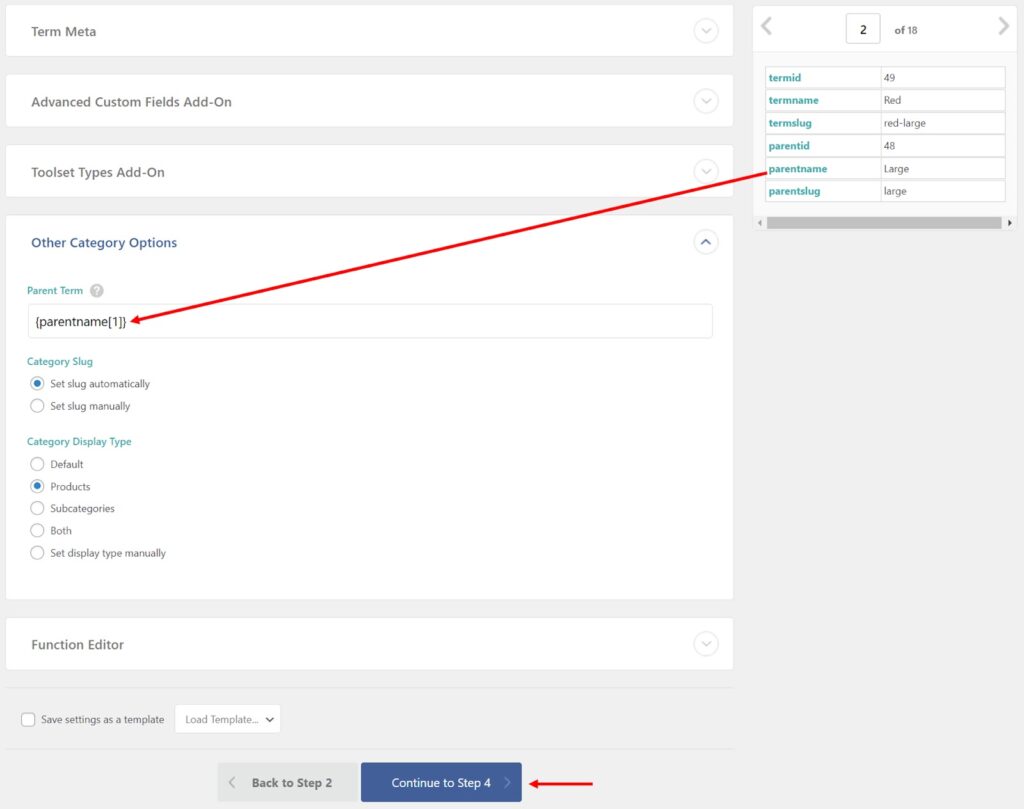
This way, you instruct WP All Import on how to relate product categories to their parent categories.
Click Continue to Step 4.
Next, we’ll see the Import Settings screen. You can configure your import settings here. We’ll address the configuration process in detail when discussing the second method to import product categories to WooCommerce. For now, click Continue.
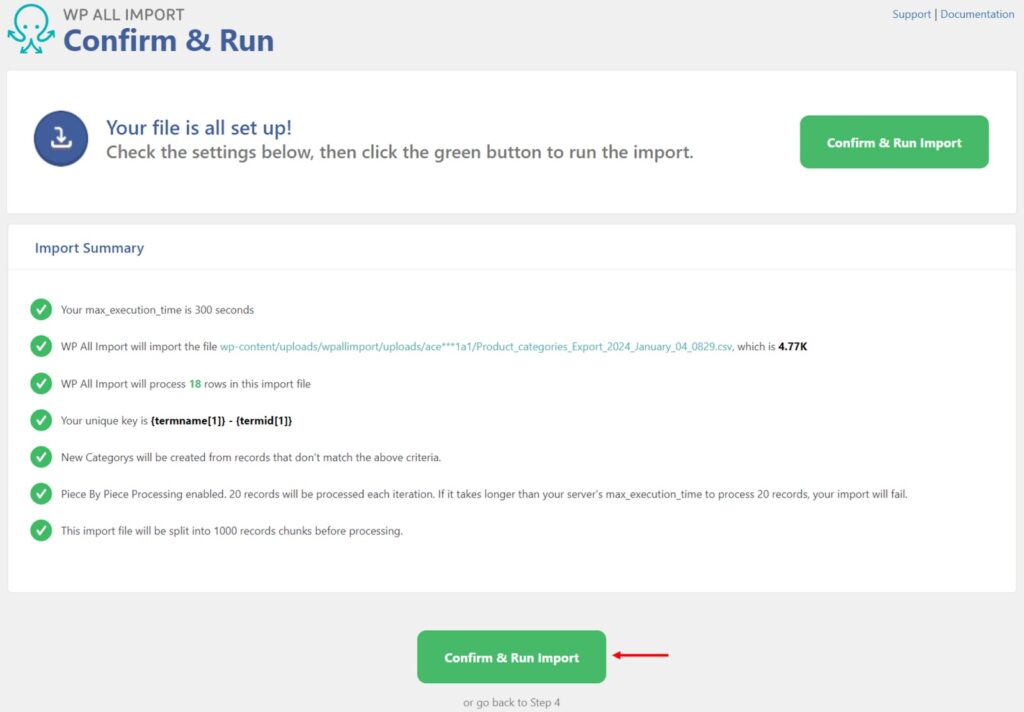
Now you’ll land on the Confirm & Run page. Here, you will see a summary of the import you are about to run. If everything looks fine, click Confirm & Run Import.
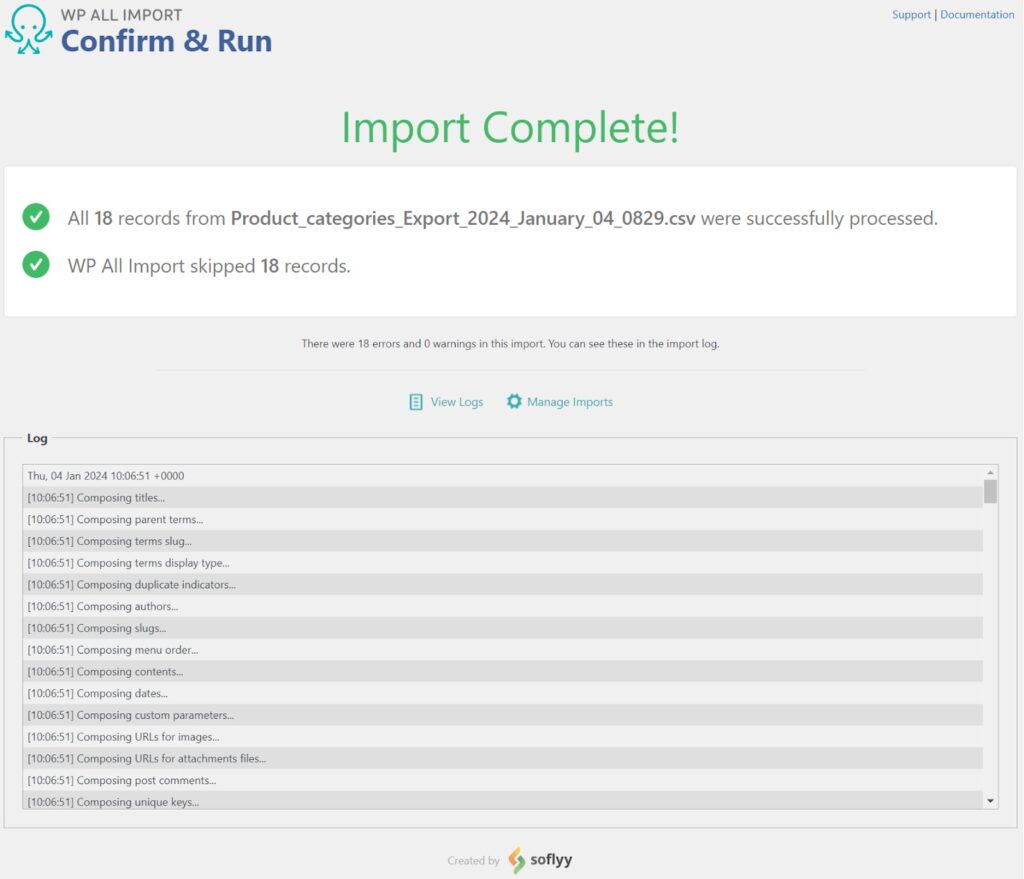
You’ll get the Import Complete message once the import is finished.
Navigate to Products › Categories in the WordPress main menu to check if your data was imported as expected.
There you go! You’ve successfully imported product categories to WooCommerce!
If you want to import WooCommerce products with categories, not just categories themselves, you need to follow a different method. We’ll discuss it in the following section.
WP All Import lets you import WooCommerce products with categories without having to make massive changes to your import file.
Let’s take a look at how you can do that!
Navigate to All Import › New Import from the WordPress dashboard.
You’ll see multiple options to import your WooCommerce product data. For this demonstration, we’ll select Upload a file.

There are two more options– Download a file and Use existing file. The Download a file option allows you to add a file from a URL or an FTP/sFTP server. This option is suitable if you want to import your products from Google Sheets or any other cloud services. The Use existing file option lets you use an existing file you previously uploaded.
Upload your import file, and choose WooCommerce products in the dropdown below. WP All Import supports CSV, Excel, or XML files.
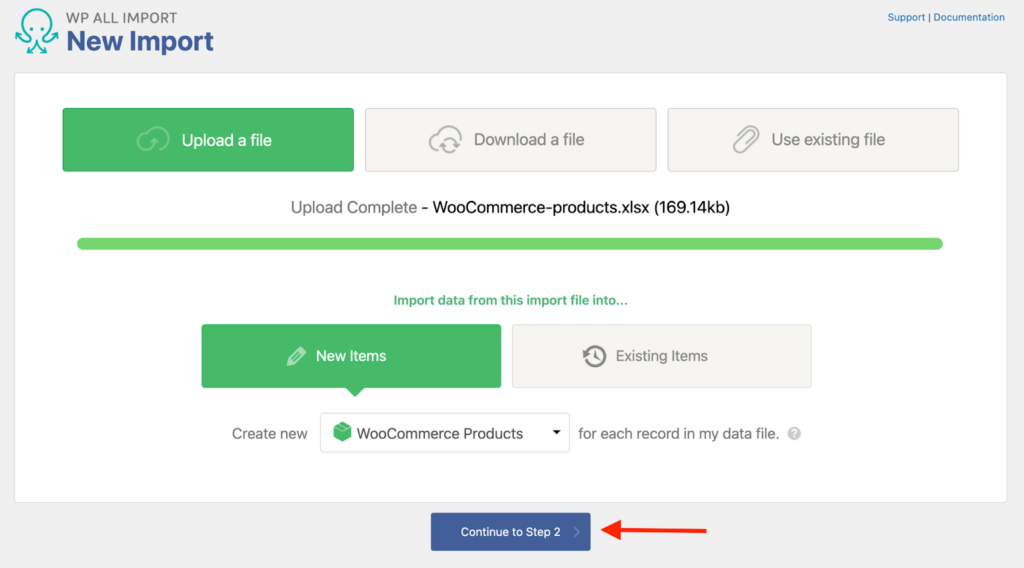
Click Continue to Step 2 to move to the next step.
This will take you to the Review Import File Screen where you can apply filters to import only selected products to your store.
As an example, let’s filter products from a certain category.
The first step is to select the column based on which you want to filter the products. In the following example, we want to import products that fall into the Accessories category.

You have to set up filtering rules in the Rule selection box to import the exact products you want. For our example, we’ll select contains. This means that we’ll import products where the Categories element contains the value Accessories.

Click the Add Rule button.
The filter you created will then appear in the lower section. Click Apply Filters to XPath.
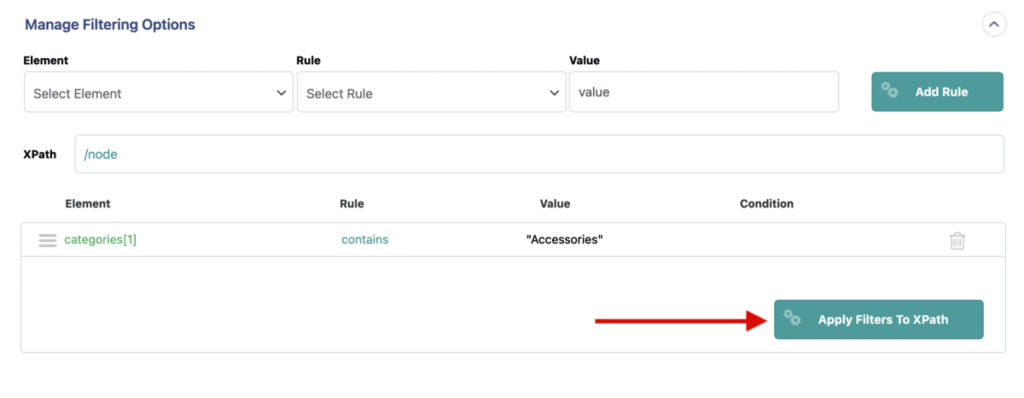
Your filter will then be applied to your import.
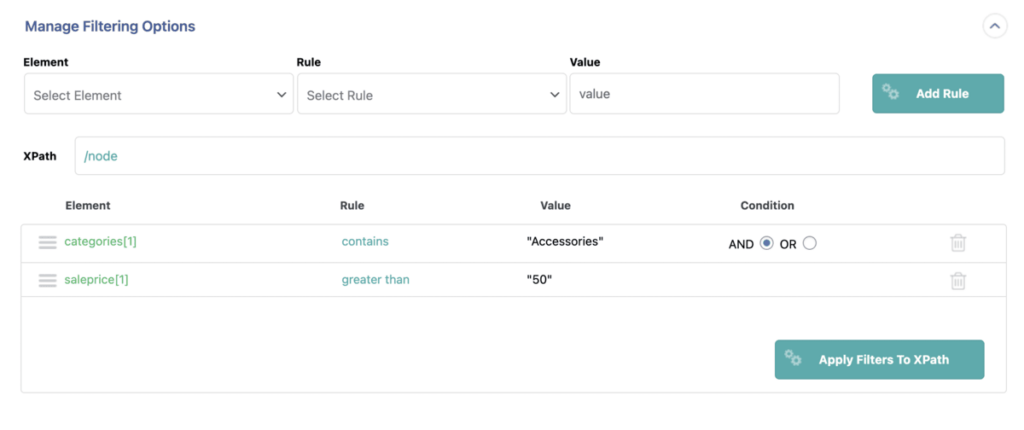
You can add more than one filter rule by connecting them using the logical operators AND(&&) and OR(||).
The AND(&&) operator filters out the products that satisfy both rules, and the OR(II) operator filters out the elements that satisfy either of the rules.
Here’s an example where we filtered products in the Accessories category that cost more than 50.
Click Continue to Step 3.
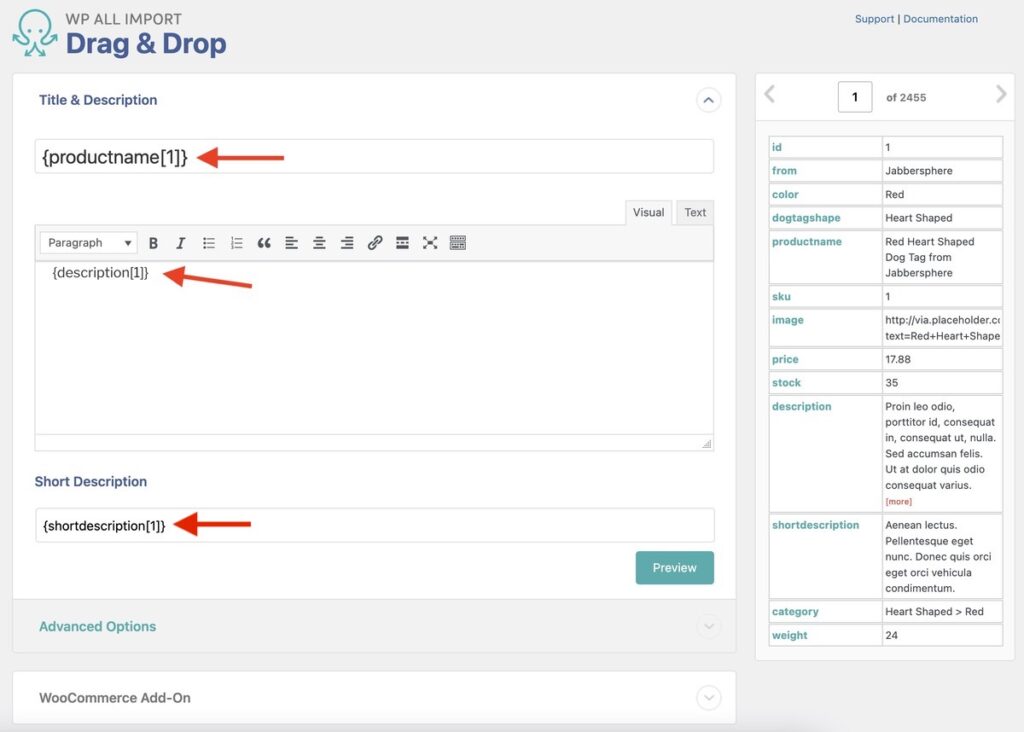
The Drag & Drop screen will appear. Here, you need to drag and drop the product data elements from the right of the screen to the relevant WooCommerce product fields on the left.
Now we’ll look at some different panels to map WooCommerce product information, including product categories.
With this section, you can map product names, descriptions, and short descriptions.
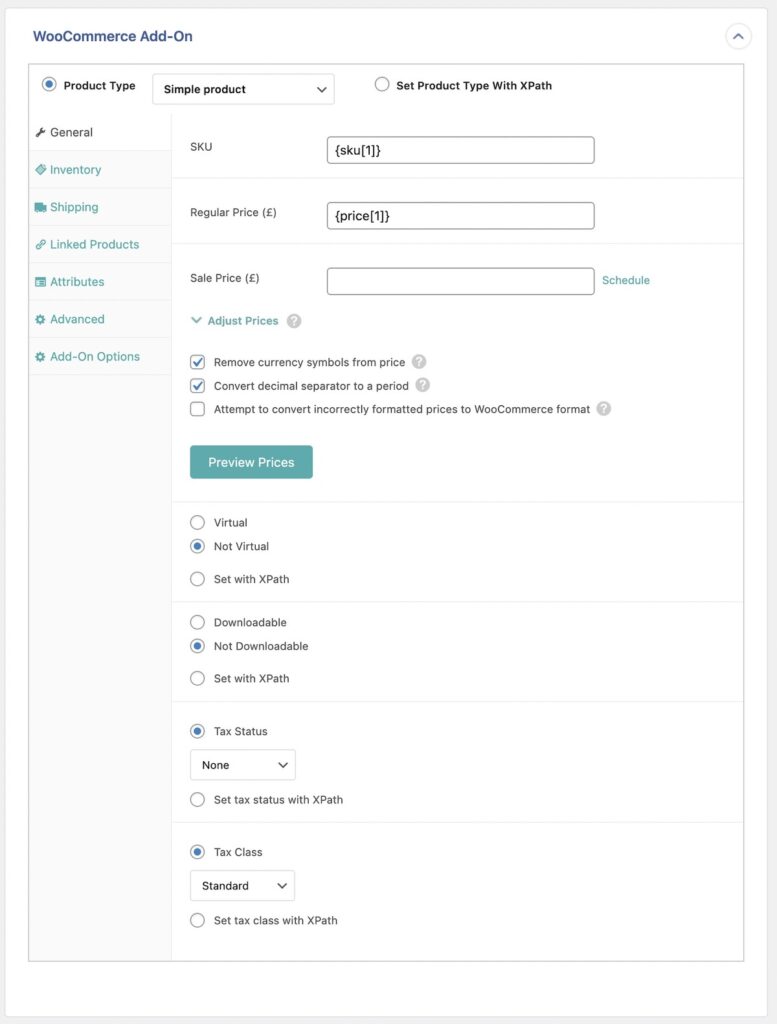
Below the Title and Description section, you’ll find the WooCommerce Add-On section.
Expand the WooCommerce Add-On section next.
Define the Product Type first. It’s set as Simple Product by default, but you can change it to different product types, including grouped, external, and variable products.
Below Product Type, there are several tabs to configure your import. We’ll describe some of the most frequently used tabs.
The General Tab includes general product information such as SKU, sale price, regular price, tax status, and more.
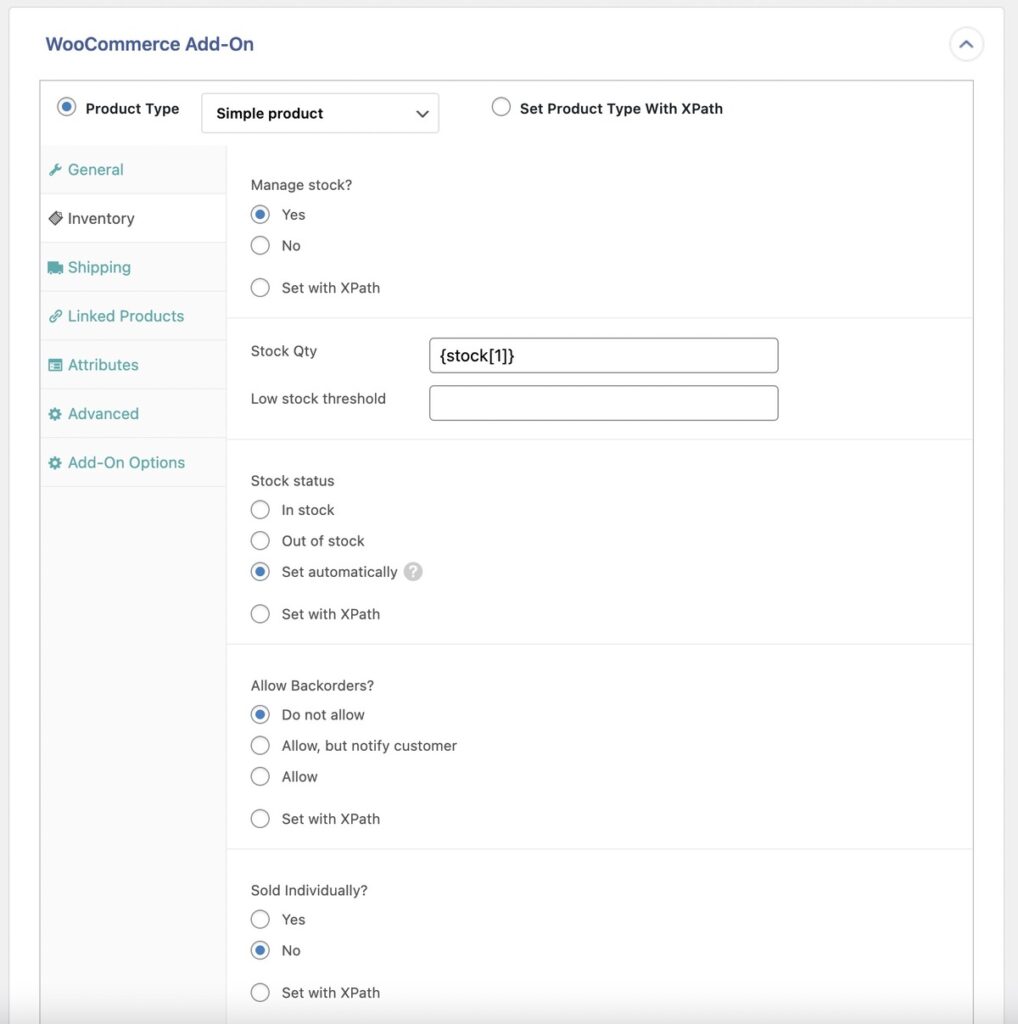
The Inventory tab includes the settings related to stock availability.
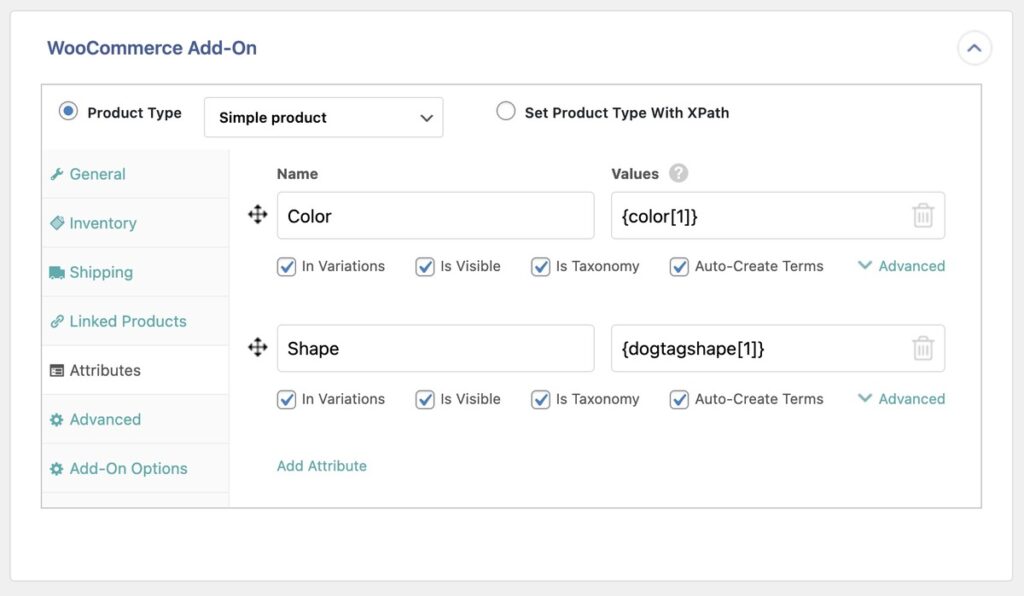
The Attributes tab lets you add different attributes like color, size, shape, etc.
The other tabs let you configure shipping, linked products, and advanced settings.
You can learn more about configuring the WooCommerce Add-On for variable products from this documentation: Import variable products to WooCommerce.
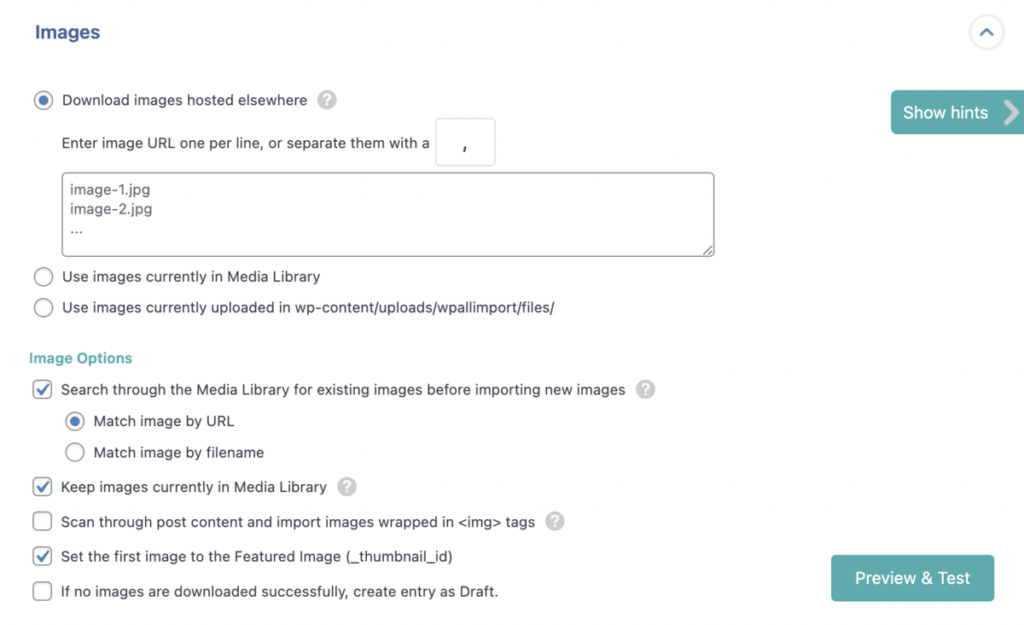
The Images section lets you set up how you want to import the product images. You can import images from multiple sources — images hosted elsewhere, images currently in the Media Library, and images currently uploaded in wp-contents/uploads/wpallimport/files/.
This panel lets you map your product categories and tags.
Click the Product Categories checkbox, and a drop-down menu will appear. For this example, we used a simple hierarchical structure for the categories.
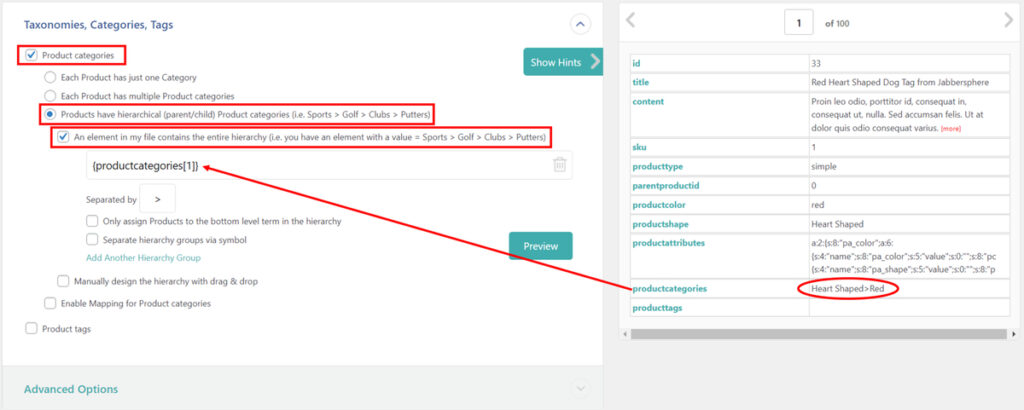
If you have hierarchical product categories, choose the Products have hierarchical (parent/child) Product Categories (i.e. Sports › Golf › Clubs › Putters) option.
Also select the An element in my file contains the entire hierarchy (i.e., you have an element with a value = Sports › Golf › Clubs › Putters) checkbox if you have an element in the import file containing the whole hierarchy. In this example, the productcategories element on the right panel contains the whole hierarchy. Simply drag & drop this element from the panel to the respective field.
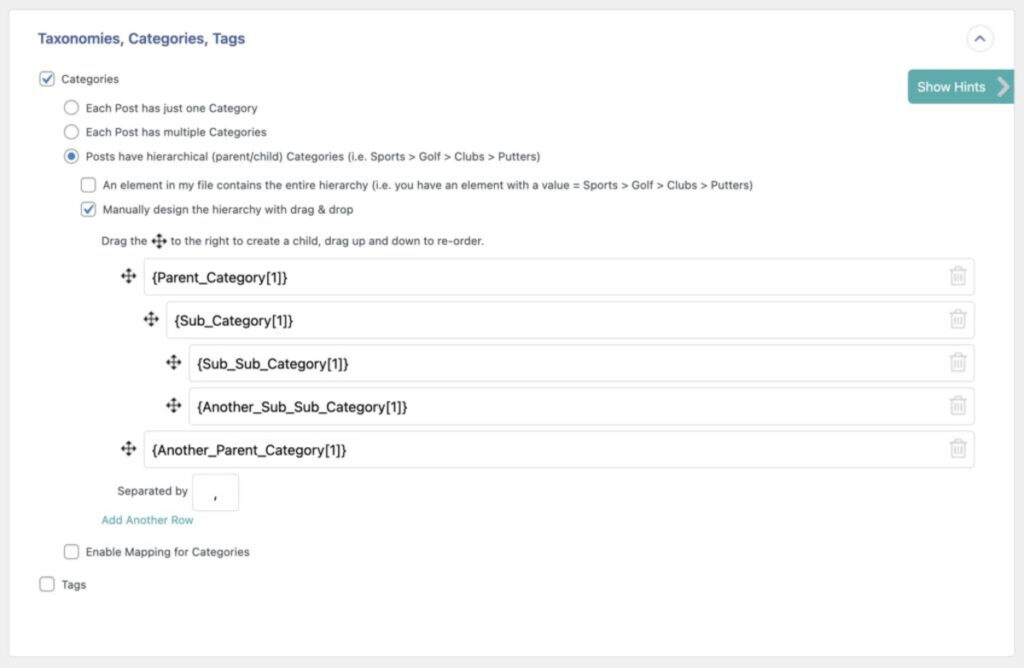
However, mapping product categories is not going to be so simple all the time, especially if you don’t have elements with the entire hierarchy. If the hierarchy data is spread across multiple columns in your import file, you need to manually identify those fields and how they relate to each other.
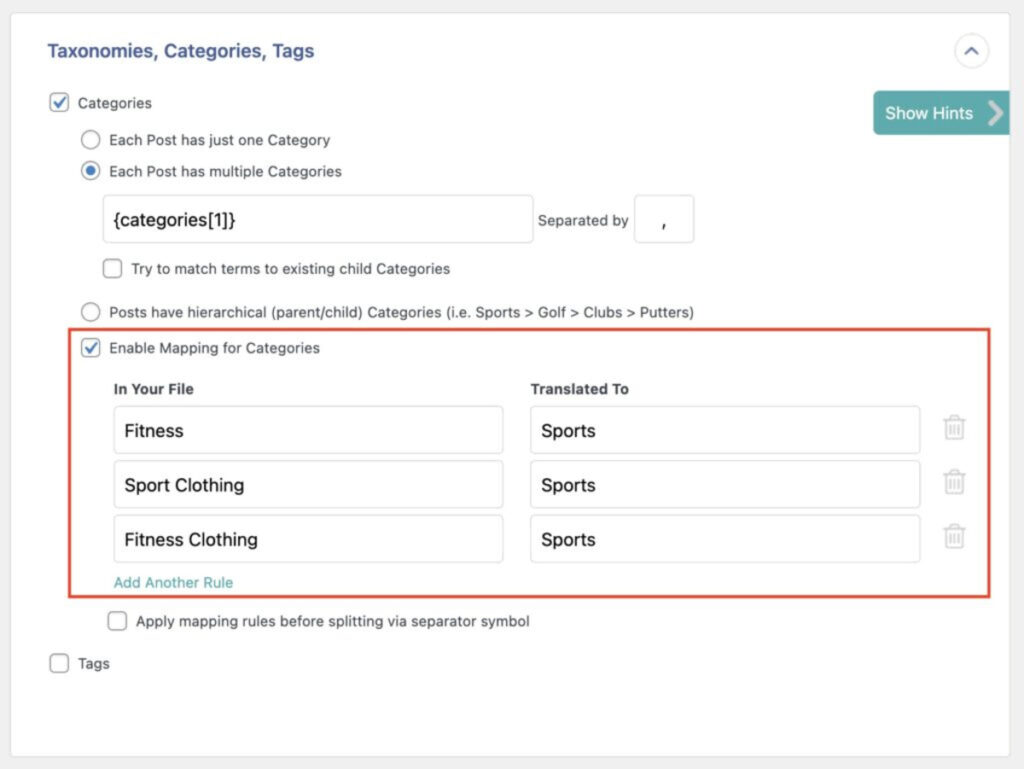
For other situations, you may map the incoming product category values to different category values in your WooCommerce store by translating them.
Once you are done setting up the template, Continue to Step 4.
Now you’ll see the Import Settings screen. We’ll discuss some additional settings to further optimize your import.
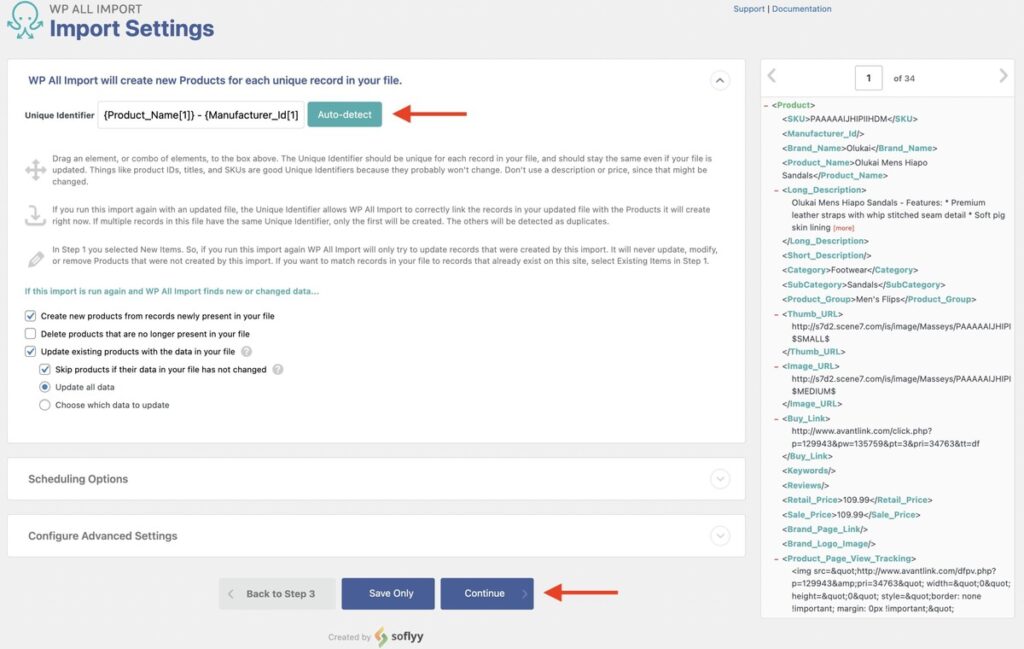
Here, you need to set a unique identifier for your import to prevent duplicate entries. A unique identifier is an element that’s unique for every product. For example, if every product in your Excel file has a unique SKU, then the SKU is a unique identifier.
WP All Import can automatically detect your unique identifier. Click the Auto-detect button to automatically select it. You can also use the drag-and-drop interface to set it manually.
There are two more panels – Scheduling Options and Configure Advanced Settings.
You can automatically run your import on a daily, weekly, or monthly basis with the Scheduling Options. WP All Import’s automatic scheduling features are really powerful, and you can keep your store updated with the latest product data with automatic imports. You need to pay an additional $19/month to have access to automatic scheduling. Alternatively, you can manually schedule your imports using cron jobs for no extra cost.
With Configure Advanced Settings, you can control how WP All Import splits your file into chunks and processes your import.

Click Continue and move to the final step.
This screen allows you to check your import summary on the Confirm and Run screen.
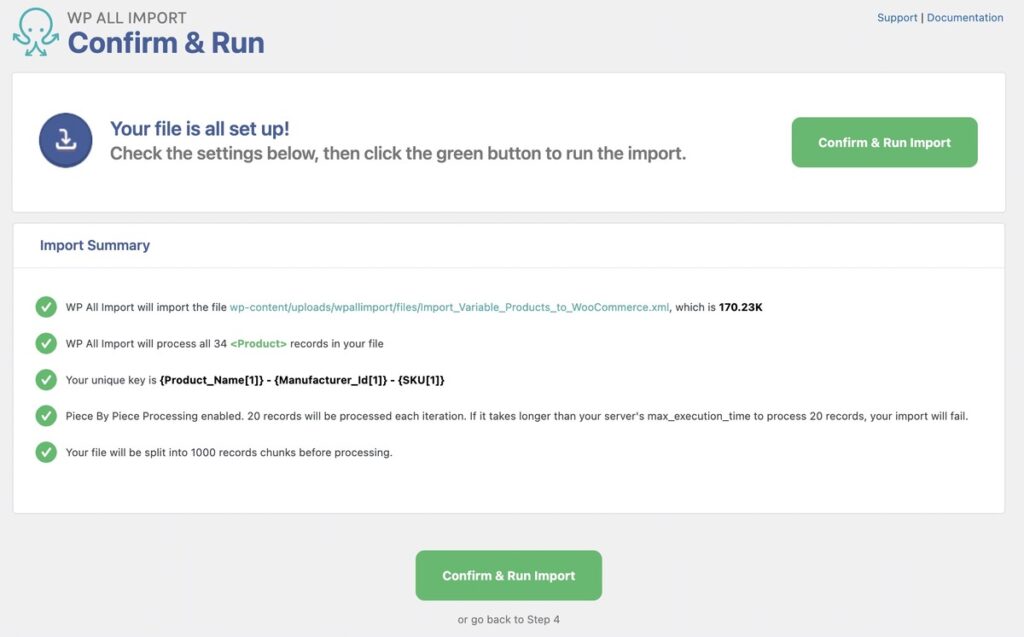
If everything seems fine, click Confirm & Run Import to start the import.
Once the import is done, WP All Import will show you a summary of the new products that have been created, or if any of the existing products got updated.
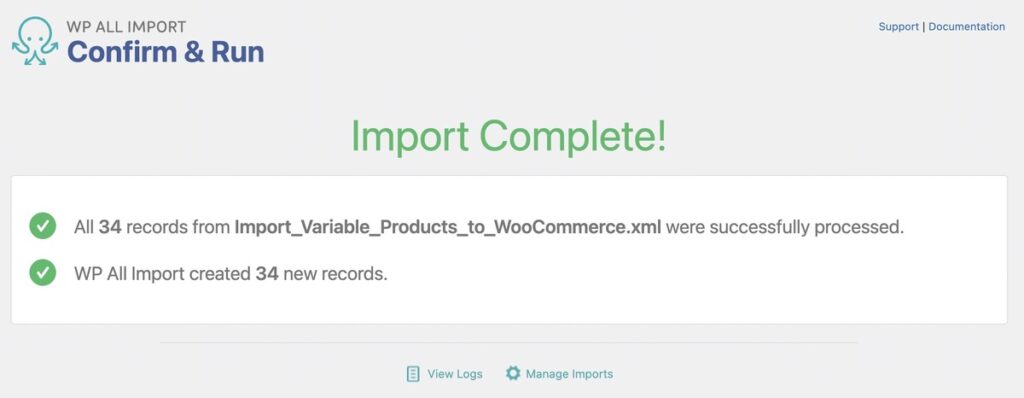
To finish things off, go to Products › All Products in the WordPress menu. You should check the product data tab of some products at random to confirm the import. Don’t forget to check categories by navigating to Products › Categories.
There you go! You imported products to WooCommerce with categories!
To seamlessly import WooCommerce products and any type of WordPress data, get WP All Import today!
You can import categories from CSV to WooCommerce with WP All Import. Follow these steps:
Importing categories in WordPress is easy with WP All Import. Follow these steps:
Here’s how to add categories to all products in WooCommerce with WP All Import:
You can use WP All Import to add categories and subcategories in WooCommerce with WP All Import. Here’s how:
Get maximum flexibility with unlimited licensing and domain activations.
Get your money back within 60 days of purchase, no questions asked. It's risk-free!
We offer premium support to ensure the ultimate customer experience.
For a limited time, we're offering an unlimited site license for just $199.99/year. Buy now to lock in this price.