September 19, 2024
Are you looking to transfer users between WordPress sites or update your user data efficiently?
There are many reasons why you might want to export and import WordPress users. Whether you’re migrating to a new site, consolidating user data, or simply updating your user base with new information, these tasks can often feel challenging without the right plugin.
In this article, we will explore how to use the powerful combination of WP All Export and WP All Import plugins to simplify the migration of user data.
When migrating users in WordPress, you’ll find that there is a built-in option for exporting users, but no native option for importing them. This limitation leaves us with no option but to rely on a third-party plugin to carry out the migration process.
Among the various third-party plugins, the combination of WP All Export and WP All Import stands out as the most effective solution. These plugins integrate seamlessly and allow you to transfer WordPress users in just a few straightforward steps. The WP All Export plugin gives you the user data and generates a template file for the WP All Import plugin to do automatic field mapping.
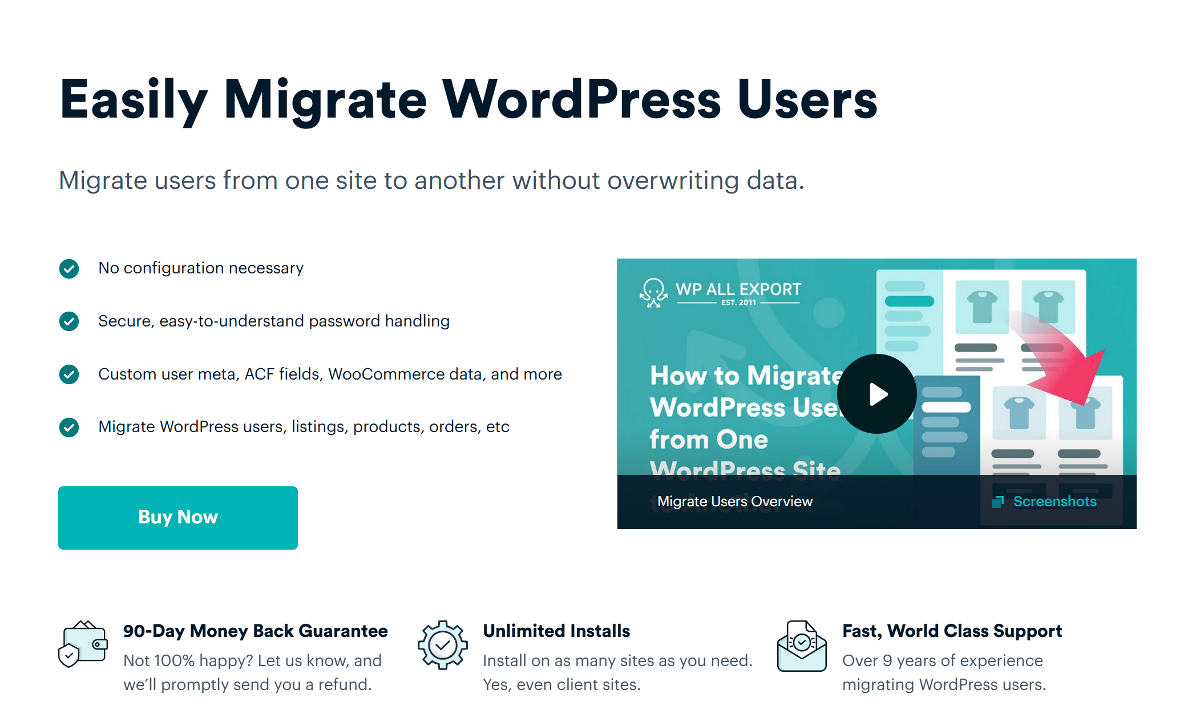
Another advantage of using these plugins is that you only need to learn the process once, as both the export and import processes are quite similar. When used as a user migration plugin, they both include features such as:
Now that we know which plugins to use, let’s look at the migration process in detail.
Before starting the migration process, you need to install WP All Export on the source site and WP All Import on the destination site. If you haven’t got the plugin files yet, you can get the premium version here.
To install the WP All Export plugin on the source site, navigate to Plugins › Add New and click the Upload Plugin button. Select the plugin’s zip file and proceed to install and activate it. Additionally, you will need to install the Export User add-on file.
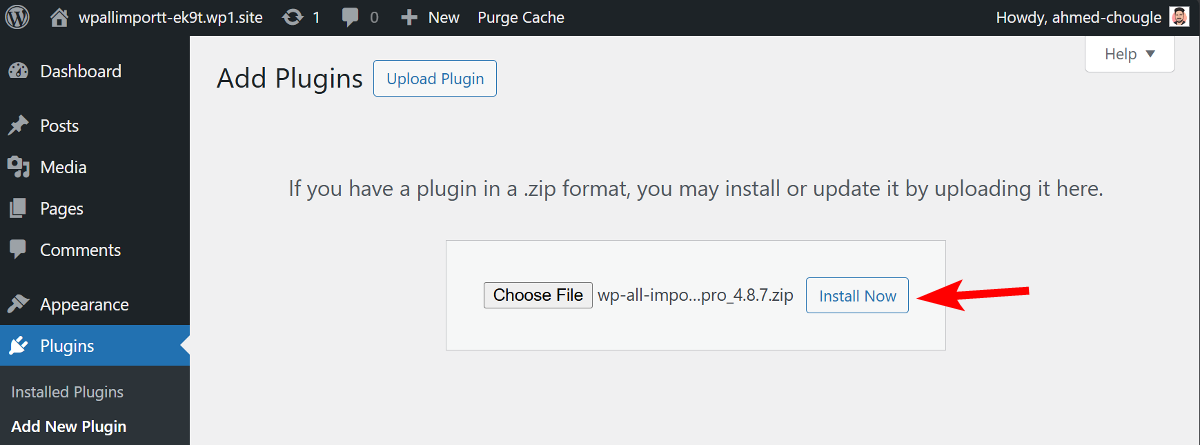
Similarly, on the destination site, install the WP All Import and the User Import add-on. Once you have the plugins set up on both sites, we can begin the export process.
To initiate the migration process, go to All Export › New Export and select Users as the export type from the dropdown menu.
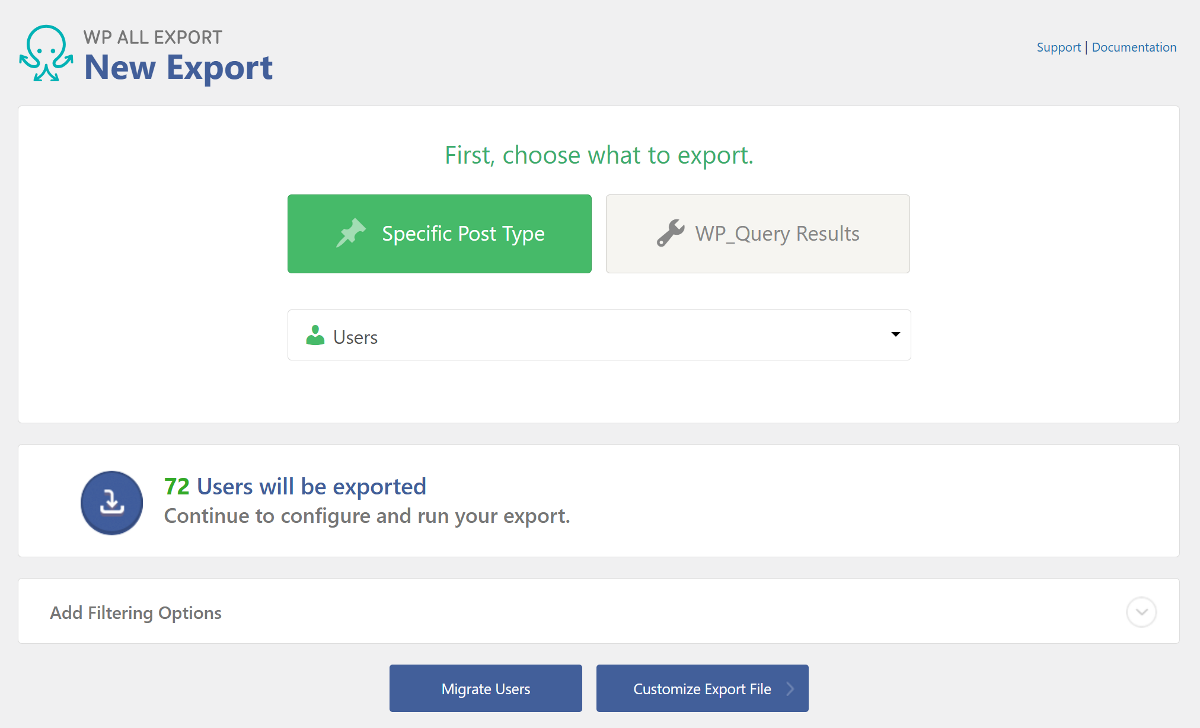
WP All Export will display the total number of users on your website. To export all users, click the Continue to Step 2 button to proceed.
WP All Export features a user-friendly drag-and-drop interface that allows you to choose specific fields to include in your export file. The user fields are organized into different tabs located in the Available Data section on the right. You can expand these tabs to view which user fields are available for export.
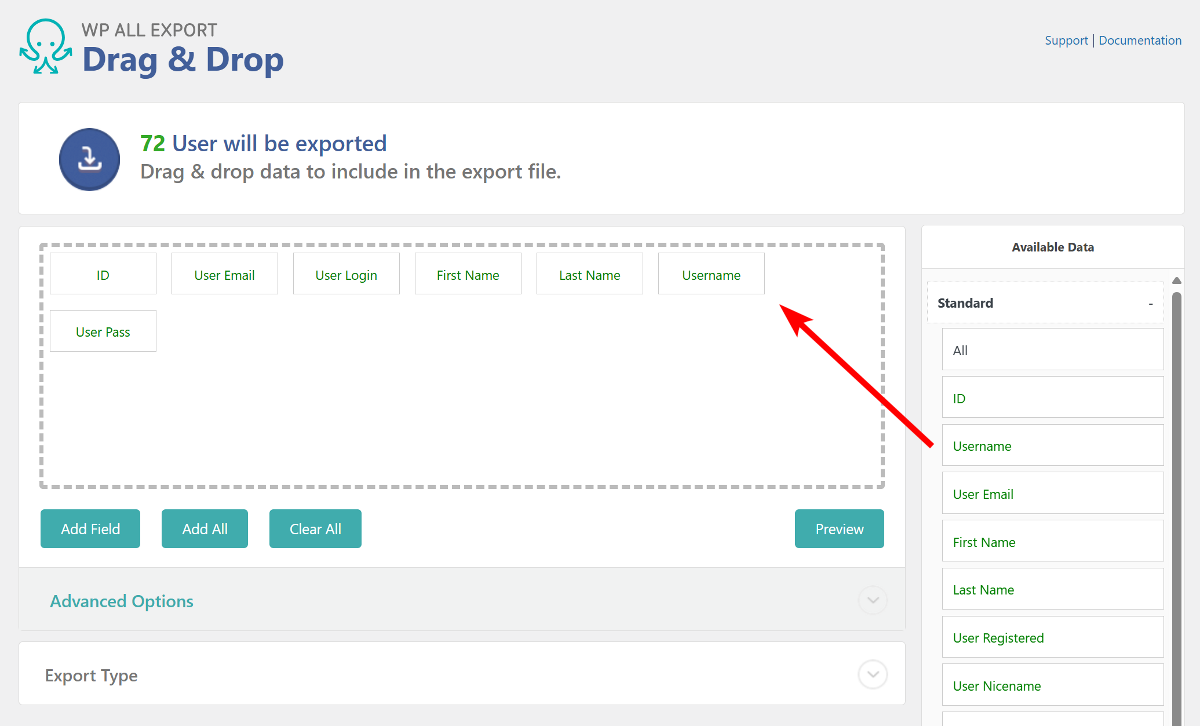
To add a specific field to your export file, simply drag it and drop it into the selection area on the left. If you want your export file to include all fields from your source site, click the Add All button below the selection area.
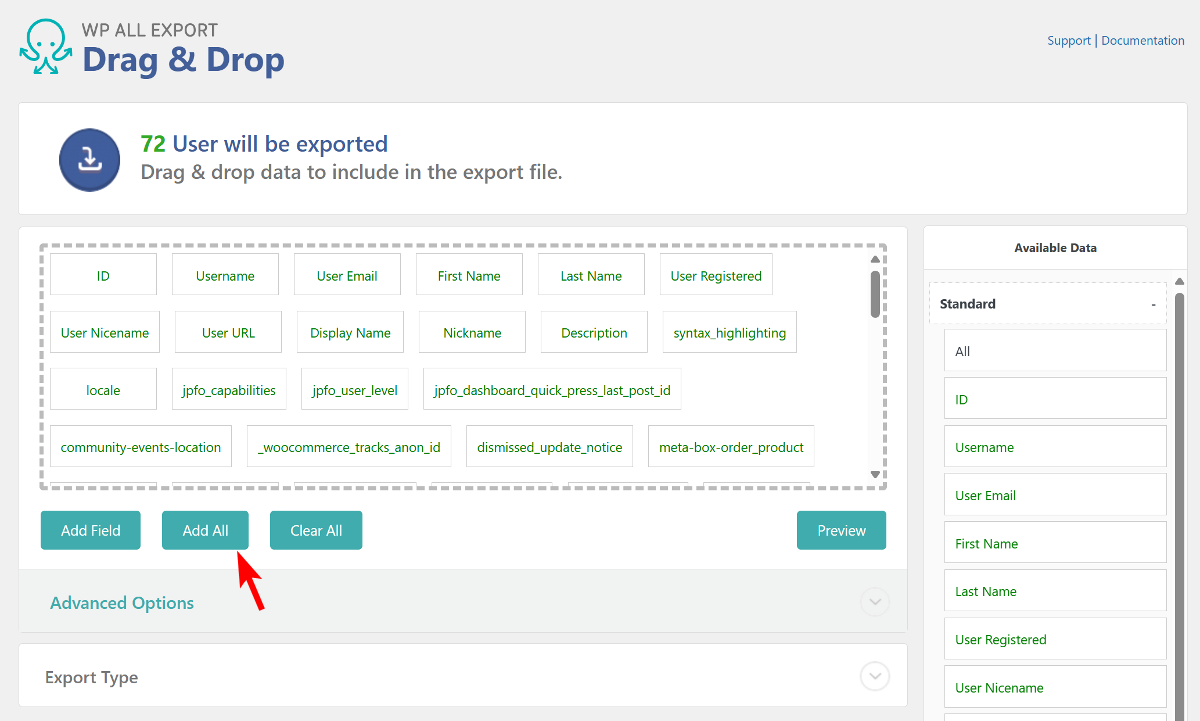
After adding all the desired fields, click the Continue button to proceed to the next step.
Before running the user export, WP All Export allows you to apply additional settings to optimize the export process. These settings consist of simple checkboxes and can be enabled with just a click.
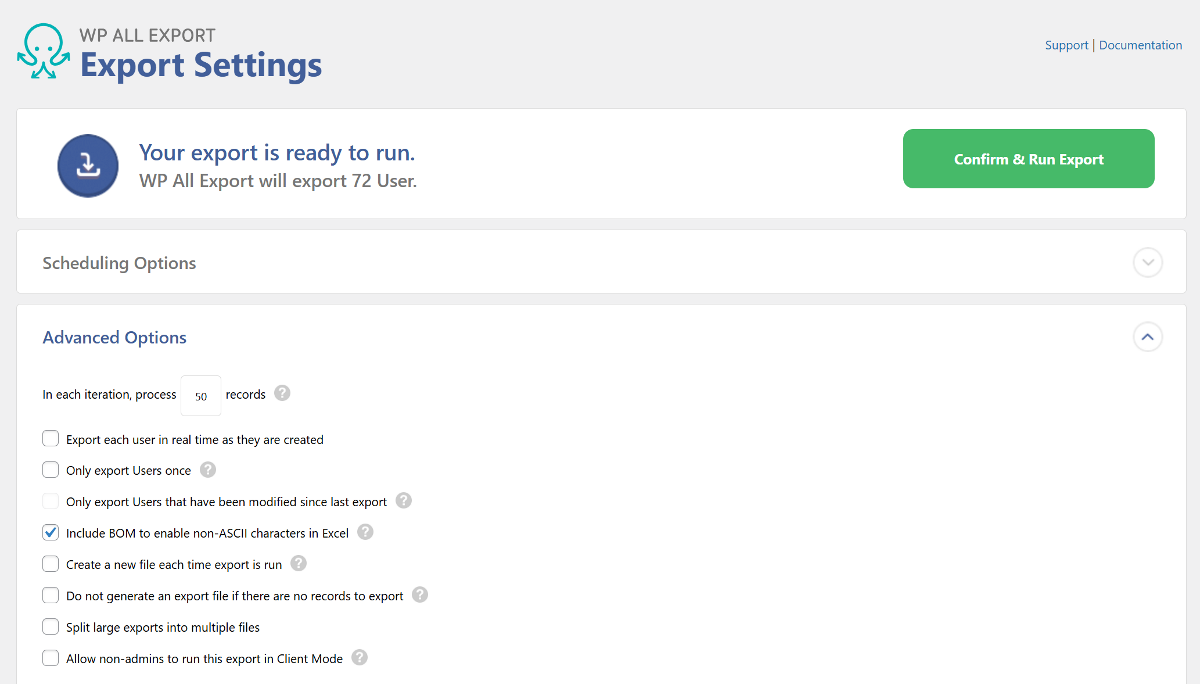
These settings options include options for processing the export in multiple batches with a specified number of users, splitting large exports into multiple files, and options for re-running the same export.
This page also includes a Scheduling Option that allows you to automatically export user data at a fixed time. We will explore this feature in detail later in the article.
Once you’ve configured the advanced options, click Save & Run Export at the bottom to continue.
WP All Export will automatically run the export process, which may take a few seconds to complete. Upon completion, it will provide you with two options to download the user export file. By default, WP All Export downloads the user data as a CSV file. You can click the CSV button if you wish to download the user data for editing before importing it to another site.
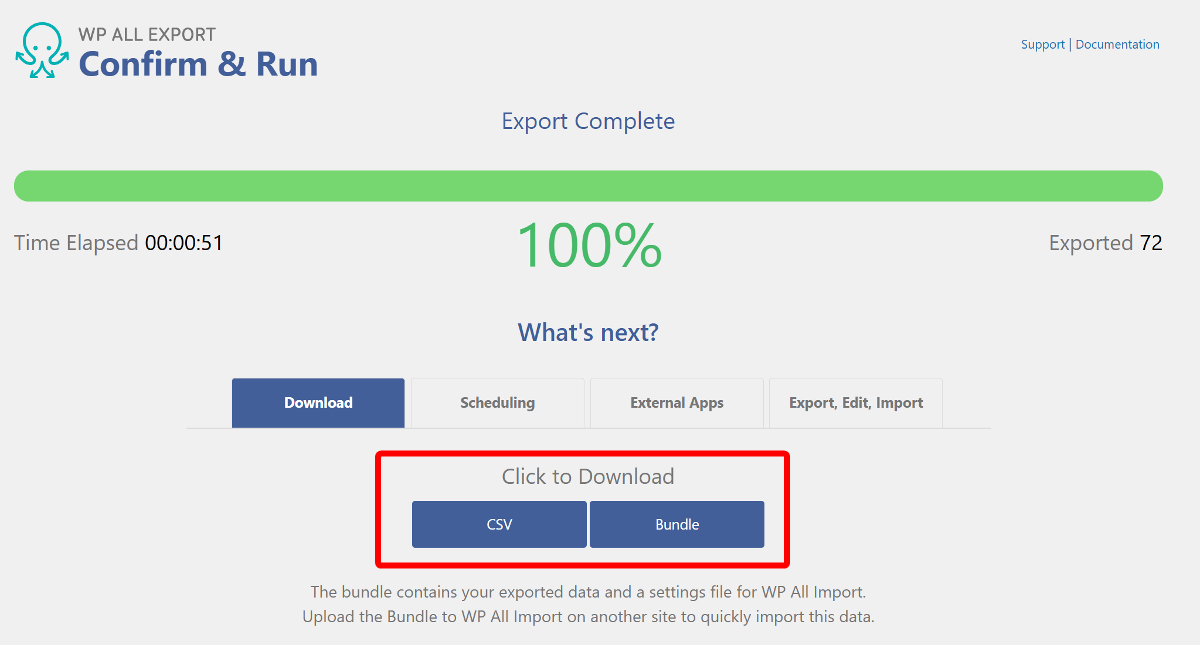
There’s also a Bundle option that includes the user data and an import template file for WP All Import. This allows for automatic mapping of user fields on the new site. For this tutorial, we will download the Bundle zip file.
Now that we have the user data, let’s explore how to import it to another website.
To begin the import process, go to All Import › New Import and upload the zip file that you downloaded from the source website. WP All Import also allows you to load user data by downloading the file from a URL or selecting an existing file on your server.
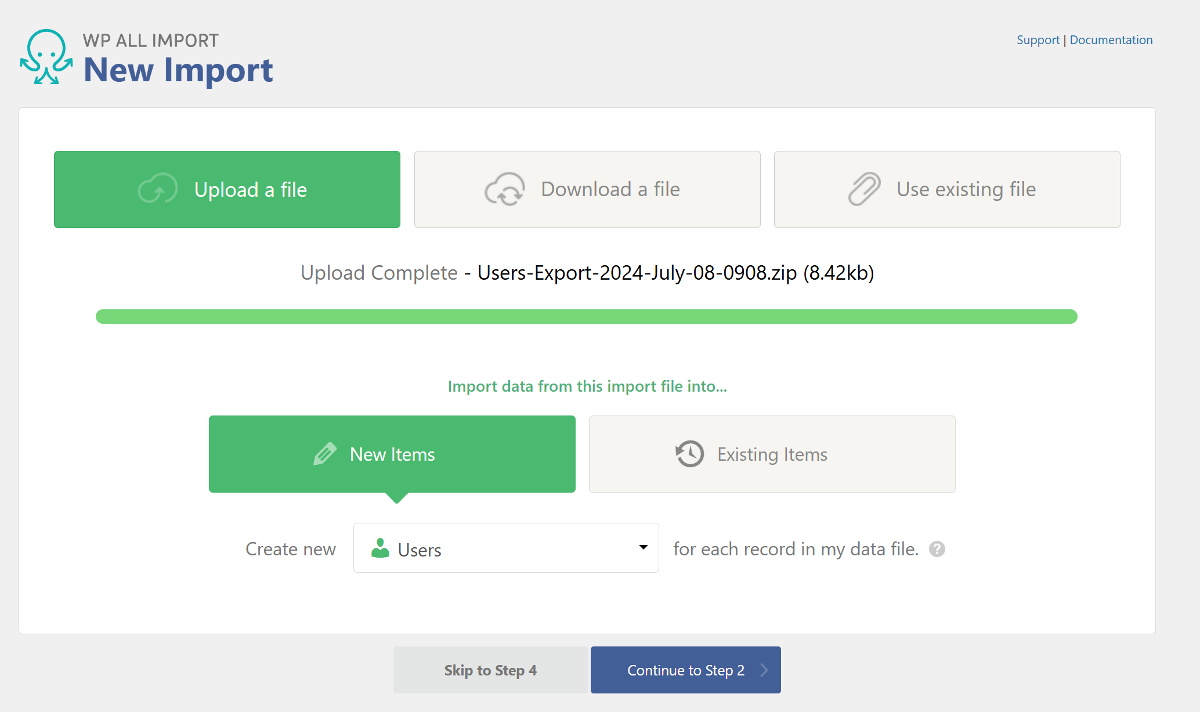
Once the file is added, WP All Import will automatically select Users as the import type under New Items. Once done skip Step 2, and then move to Step 3 of the import process.
WP All Import provides a drag-and-drop interface to map fields from your uploaded file to the WordPress user fields. However, since we uploaded the Bundle file, this process will be done automatically for you.
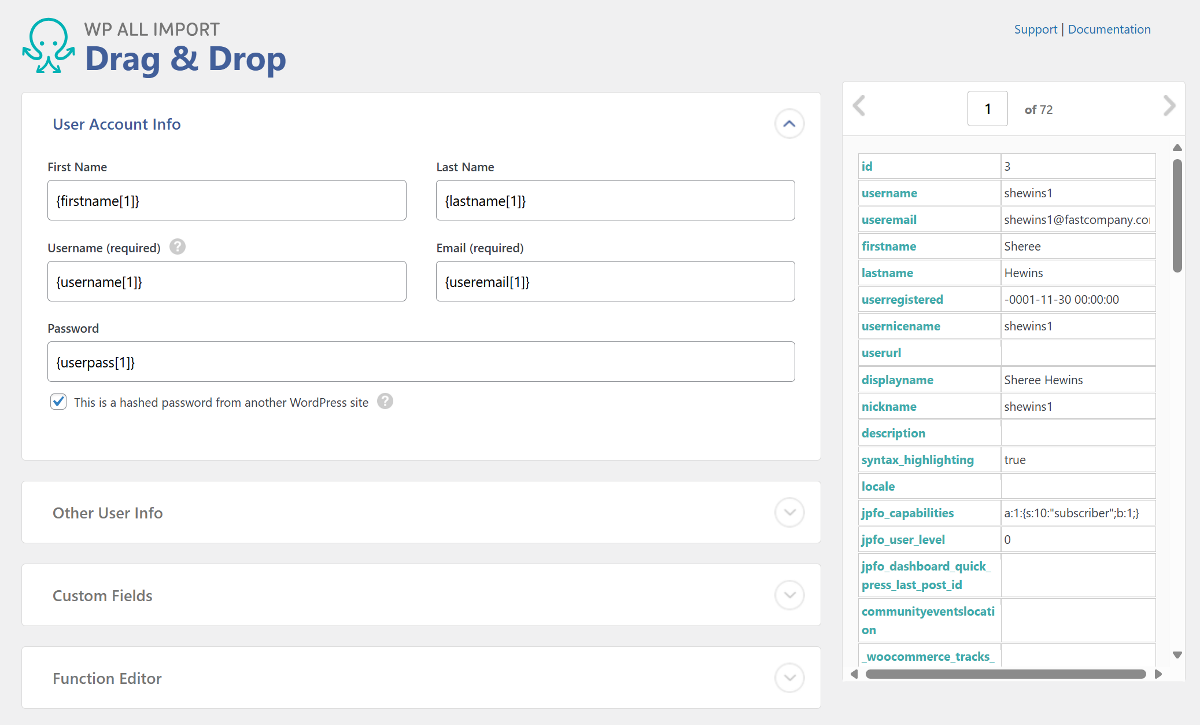
Expand the various field panels and verify that the import user fields are properly mapped using the template file. Once you’ve confirmed the mapped fields, click Continue to Step 4 to proceed.
On the next page, the Unique Identifier will be automatically set. This helps WP All Import differentiate between users and avoid importing duplicates.
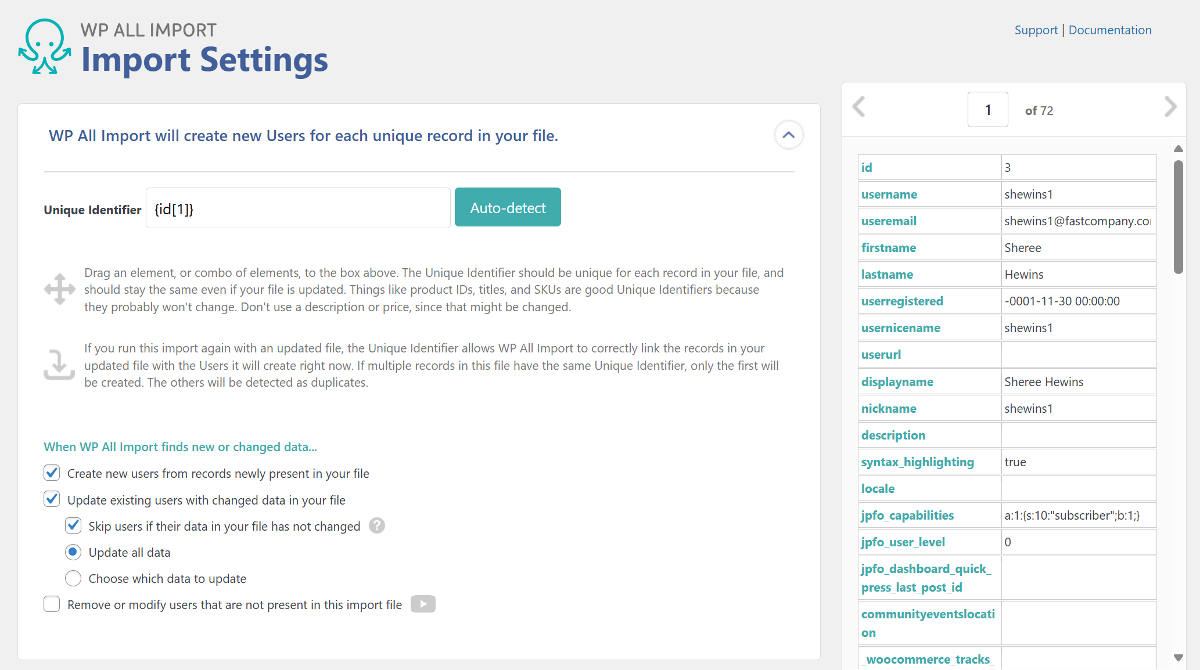
The next panel on the page allows you to block sending email notifications containing password reset links to imported users.

There are additional import settings similar to those in the WP All Export wizard. Once you have configured all settings, click the Continue button to move to the final step.

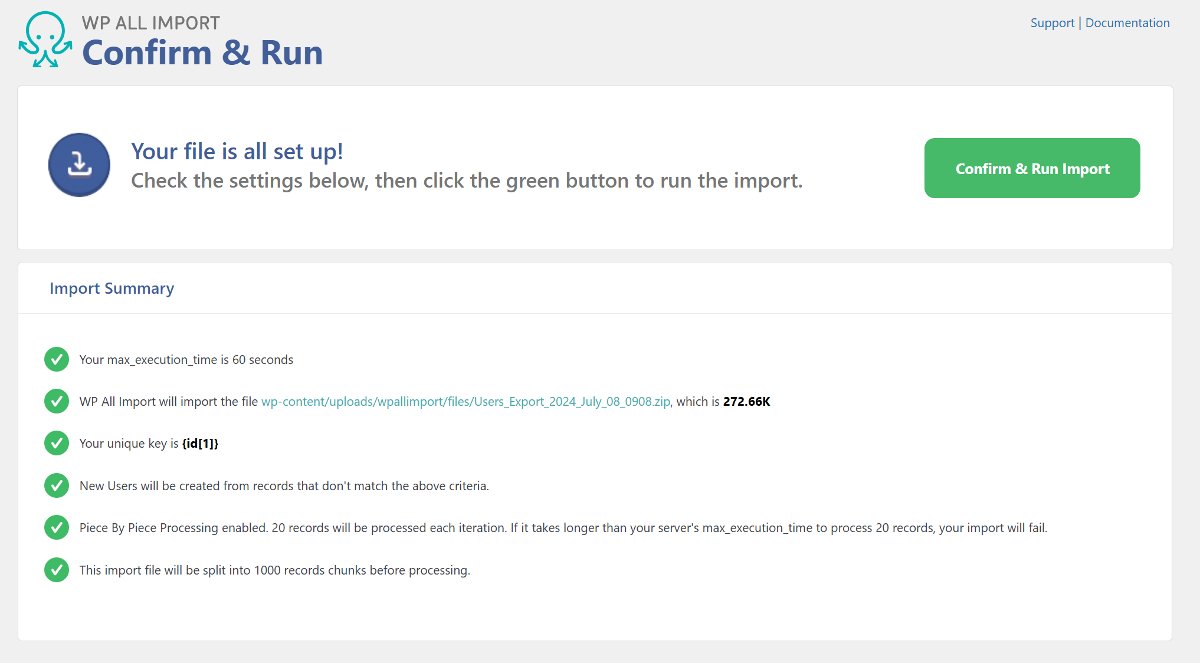
Before running the import, WP All Import provides a summary of all the settings applied so far. Review each setting, and once you have verified that everything is correct, click the Confirm & Run button. This will initiate the import process, which will take a few seconds to complete.
Upon completion, WP All Import will provide a summary of how many users were imported and if any existing users were updated from the data in the import file.
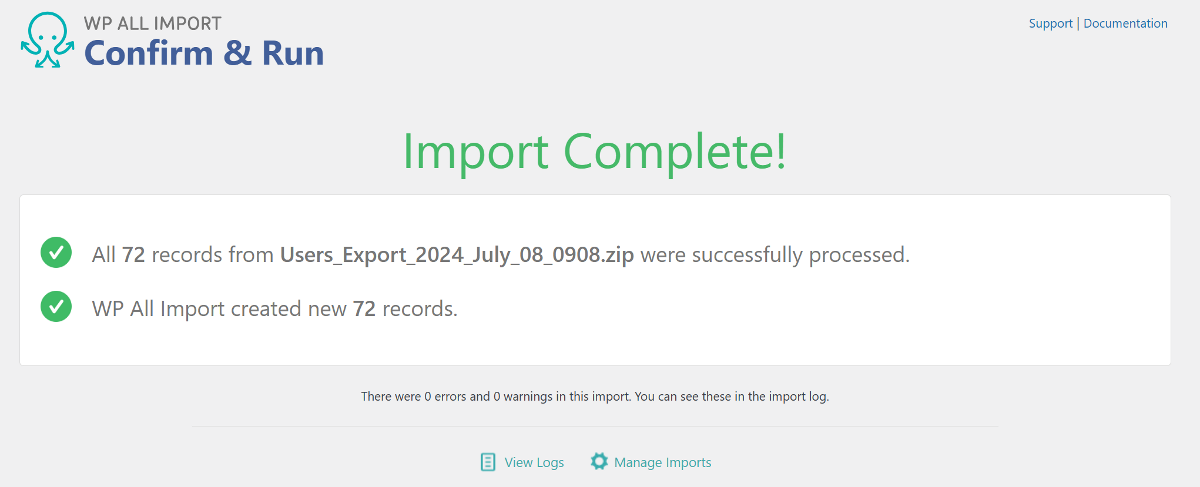
That’s it! You have successfully completed the export and import of WordPress users using the WP All Export and WP All Import plugins.
Both the WP All Export and WP All Import plugins include several additional features that allow you to further customize both processes. Let’s explore these features in detail.
Both WP All Export and WP All Import offer filtering options that allow you to filter out users and only export or import selected specific users.
To add filters on the export website, expand the Add Filtering Options panel in the first step of the export process. Each filter rule consists of three values, with the first two selected from dropdown menus. For the third field, enter the actual value you wish to filter users by.
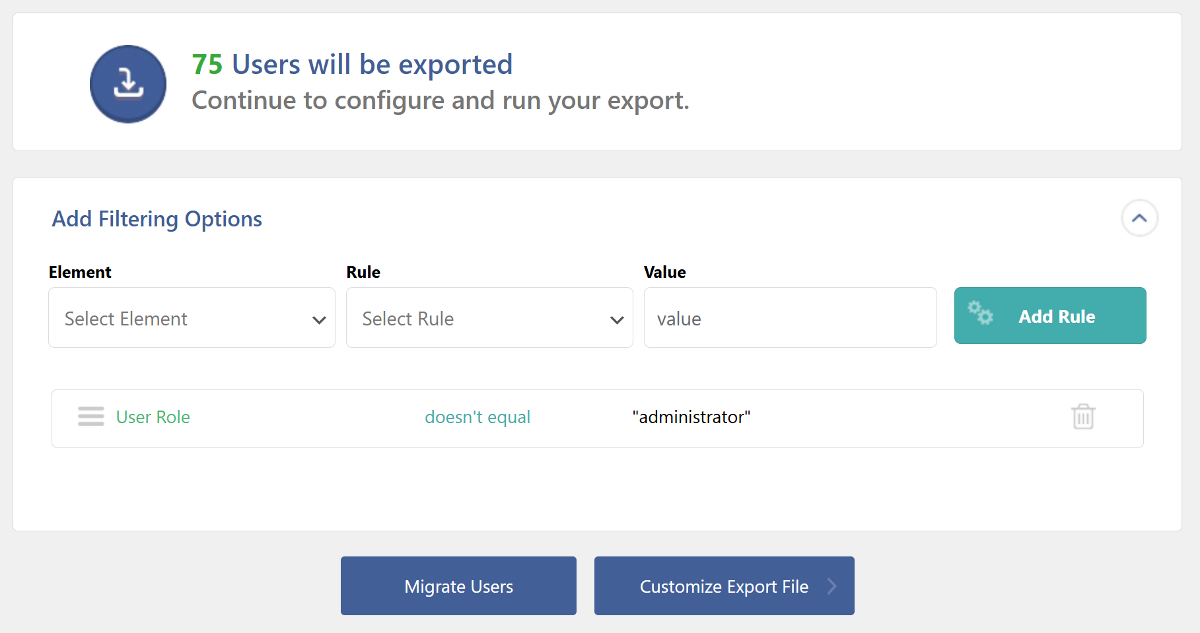
Once you have added all three components, click the Add Rule button to apply the filter. This will update the user count available for export.
A similar filtering feature is available in WP All Import, allowing you to filter specific users for import to the new website. The filtering option is present in the Review Import File step of the import process and works similarly to WP All Export’s filtering option, with the only difference being in how it is applied.
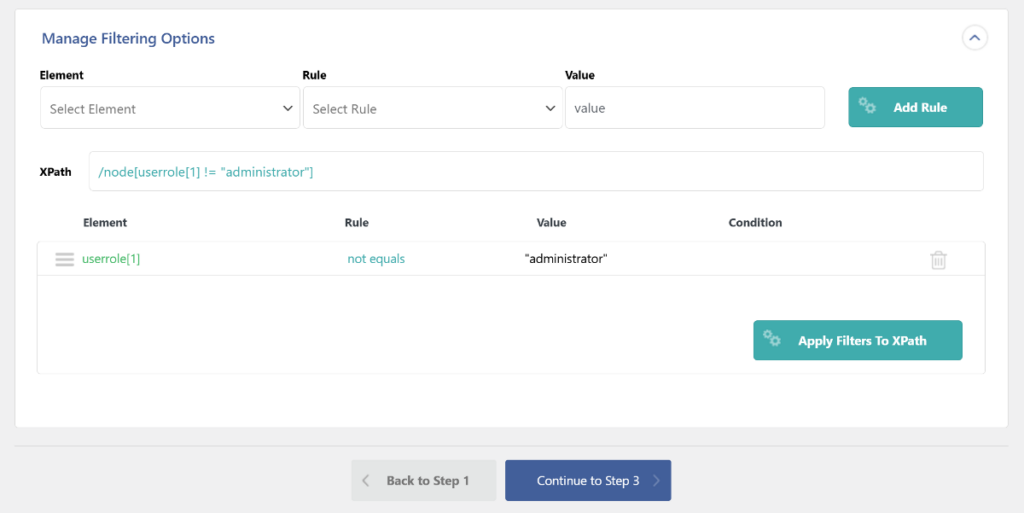
Since the import file is stored outside the WordPress database, WP All Import uses XPath to add filters. After clicking the Add Rule button, you need to click Apply Filters to XPath to apply filters to your import file.
Another advanced feature of WP All Export and WP All Import is the ability to schedule both processes to occur automatically without any manual intervention.
This is a valuable feature for those who regularly need to export and import WordPress users between two sites. The scheduling feature on both the export and import sites function similarly. We will show you how to configure it on the export site, but the same steps can be applied to the import site.
In the Export Settings page, expand the Scheduling Options panel. WP All Export provides two options for scheduling your export.
You can choose the automatic paid option, which requires no setup, or the manual option which requires setting up cron jobs on your server.
We will select the Automatic Scheduling option and then specify the exact days of the week or month for the export to occur.
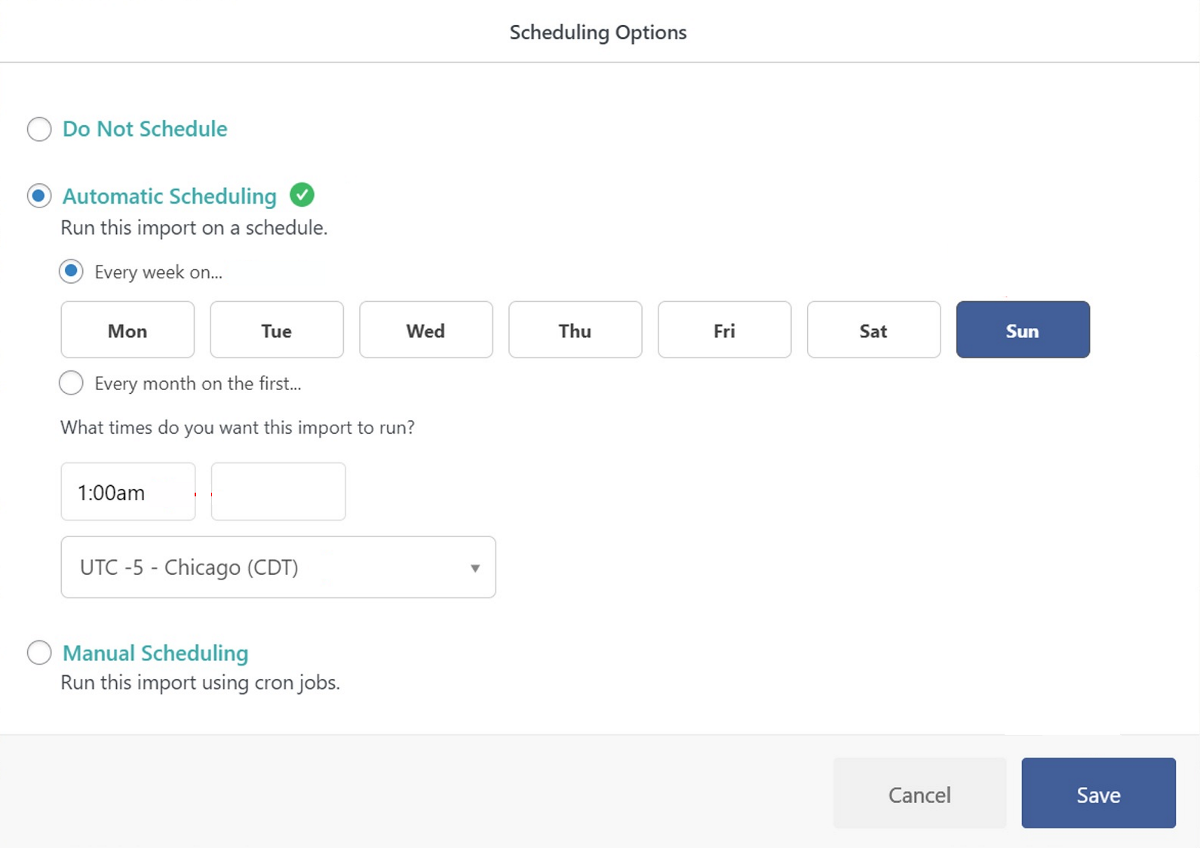
Next, select the specific times and select your time zone. Now, the export process will occur automatically at your chosen time, and you can download the new user data without any manual effort.
The scheduling feature on the import site only works if you select to load user data from a URL or use an existing file on your server. You can configure it on the Import Settings page during the import process.
One of the standout features of WP All Export and WP All Import is their ability to modify outgoing and incoming data.
This allows you to export or import user data precisely as you want it. Both plugins offer multiple methods for modifying data, including combining multiple fields into one, adding static text to fields, or using custom PHP functions. Let’s look at these options in detail.
The feature for combining multiple fields is particularly useful when data on your export site is organized in two separate fields that you wish to present as a single field on the import site.
For example, if you manage a business website that has separate custom fields for a user’s job title and the company they work for, you might want to combine these two fields into one on the import website.
You can achieve this in two ways. You can either do it on the export site by clicking the Add Field button below the selection area, choosing Custom Export Field, and then dragging and dropping the two fields you wish to combine.
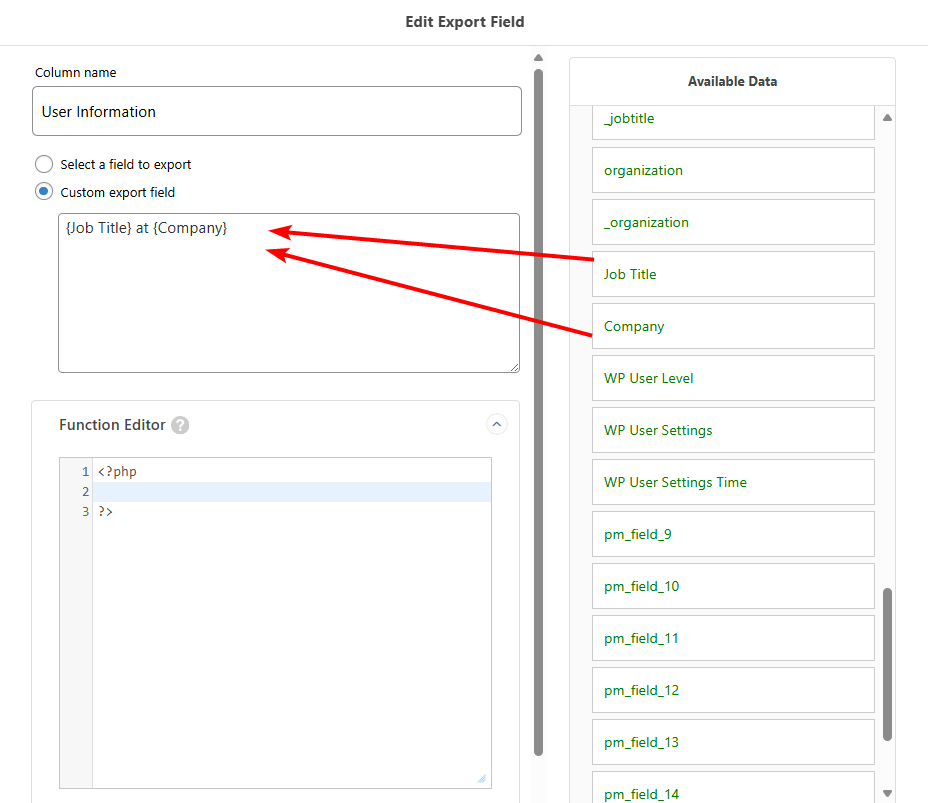
Or if you have already exported them as two separate fields, you can drag and drop the two fields into a single user field box using WP All Import and combine them during the import process. Additionally, you can insert static text between the two fields to create a complete custom field.
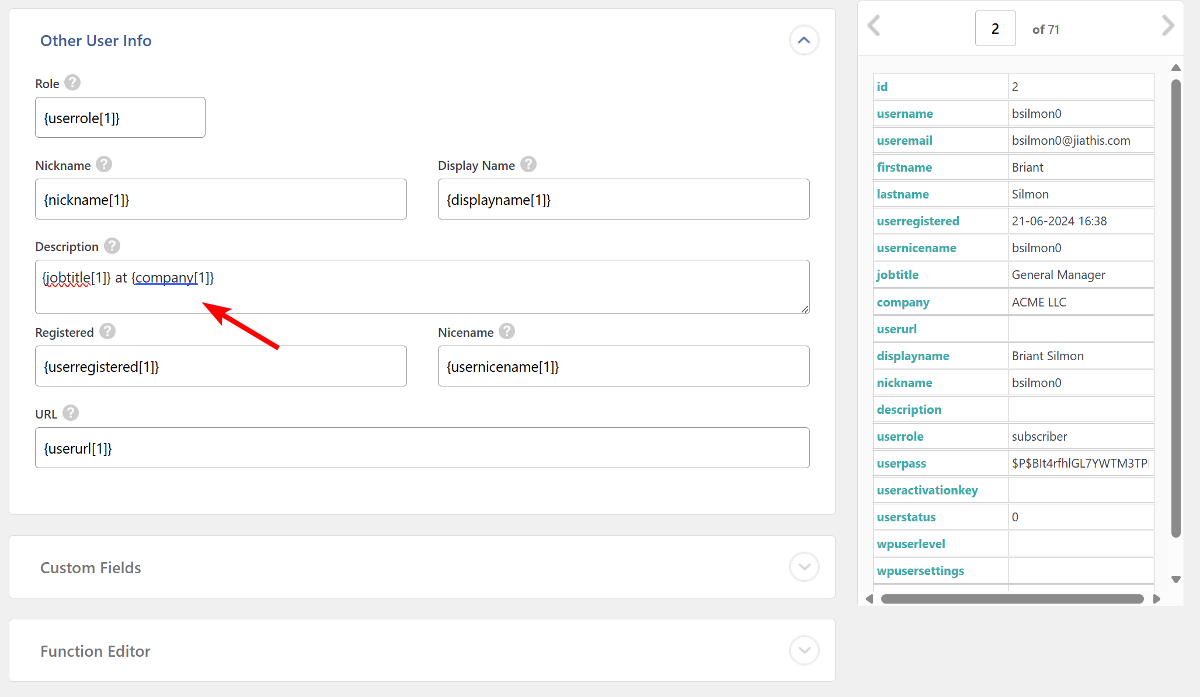
Both WP All Export and WP All Import also offer various custom PHP functions that provide further customization of the data. While this may be a bit technical, there are pre-created snippets for common use cases are available in the WP All Import documentation.
In addition to the standard CSV file format, both WP All Export and WP All Import support exporting and importing data in Excel and XML formats.
To change the export file format, expand the Export Type panel in the Drag & Drop page of the export process. Here, you can select either the Spreadsheet format (which includes CSV, Excel XLS, and Excel XLSX) or choose the Feed format (which includes Simple XML and Custom XML).
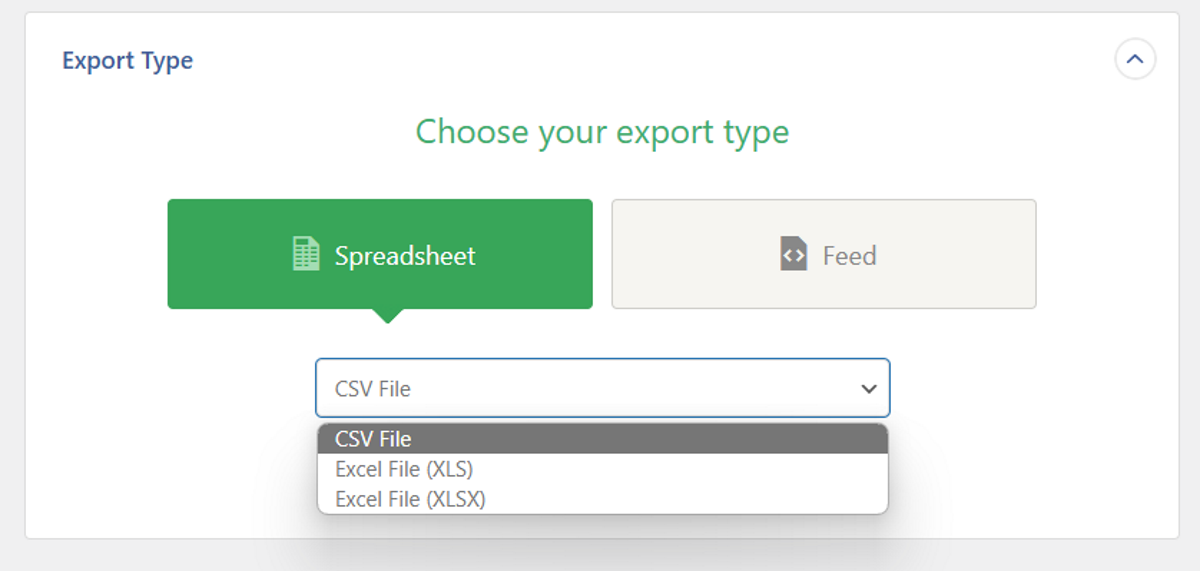
For the import site, you can upload files in any of the three formats, and WP All Import will allow you to map fields in the subsequent steps.
That’s all! These advanced customization features truly set WP All Export and WP All Import ahead of user export and import plugins.
You can use the WP All Export plugin to export all users from WordPress. Here are the steps to follow:
WP All Export lets you export all user data including user roles. You can use the drag-and-drop interface to add the user role field from the Available data section to the export selection area.
WP All Import supports importing both users and customers. Follow these steps to import customers:
The combination of WP All Export and WP All Import works seamlessly to export and import data in WordPress. Here are the steps to follow:
Get maximum flexibility with unlimited licensing and domain activations.
Get your money back within 60 days of purchase, no questions asked. It's risk-free!
We offer premium support to ensure the ultimate customer experience.
For a limited time, we're offering an unlimited site license for just $199.99/year. Buy now to lock in this price.