
The Best Way to Update WooCommerce Product Prices
Most requests to update WooCommerce product prices arrive as an email attachment. A supplier sends next quarter’s price list, or someone on the team shares a spreadsheet of sale prices, and those numbers now have to be updated for the specific products before customers check out at the old prices. Typing them into WooCommerce one product at a time is how wrong prices go live.
We import the file instead. WP All Import updates WooCommerce product prices, variations included, directly from a spreadsheet by matching each row to an existing product’s SKU and changing only the price fields you select. We’ll walk you through that import step by step, along with two price changes it can make while a file imports, once we’ve covered what WooCommerce handles without it.
In This Guide
Where WooCommerce’s Built-In Price Editing Stops
Bulk Edit is the closest WooCommerce comes to a built-in bulk price update mechanism. It applies one change, such as a 5% increase, to every simple product you select. A supplier’s price list rarely works that way, since each product moves by its own amount and some don’t move at all. Each of WooCommerce’s built-in tools stops at a different point.
WP All Import sets each WooCommerce product to the exact price in its own row of the file, so every product can change by a different amount in a single import. Variations are handled the same way, matched by their own SKUs, and the file can stay in the Excel or XML format the supplier sent.
How to Update WooCommerce Product Prices From a Supplier File
The only columns a price file needs are the SKU and the new regular price, plus a sale price column if the supplier sends one. Anything else in the file can stay where it is, since WP All Import changes only the WooCommerce fields you select during setup.
Step 1: Hand the Price List to Automatic Setup
Go to All Import › New Import and click Set up automatically at the top of the screen. Upload the price file, or paste its link under Download from URL if the supplier hosts it online, then choose WooCommerce › Products.
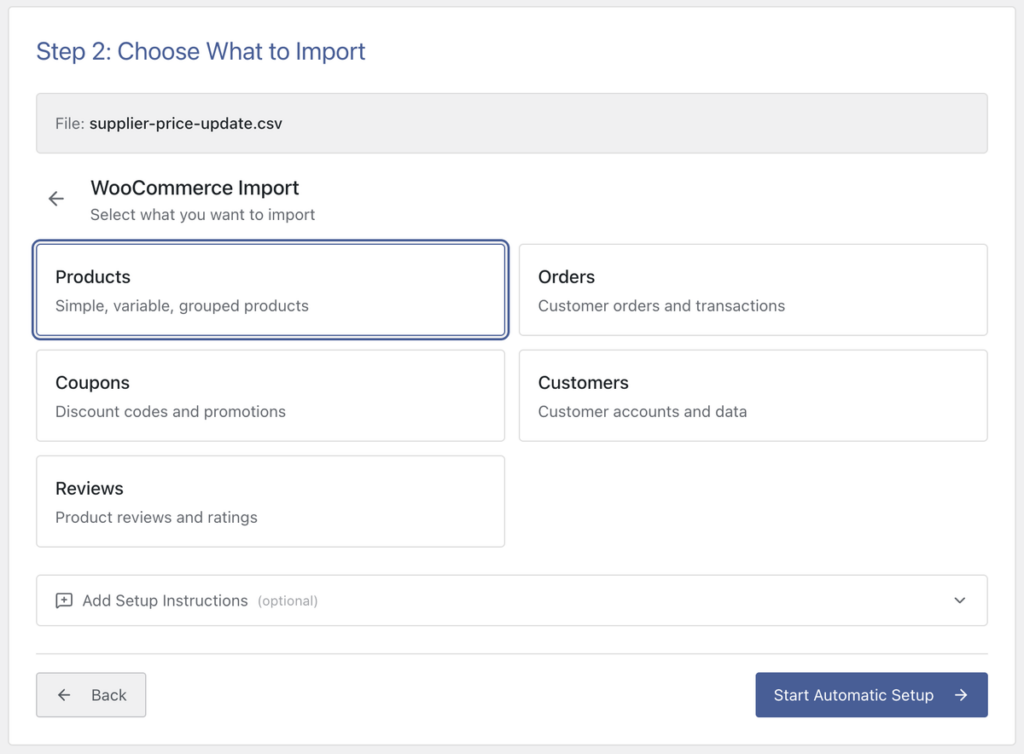
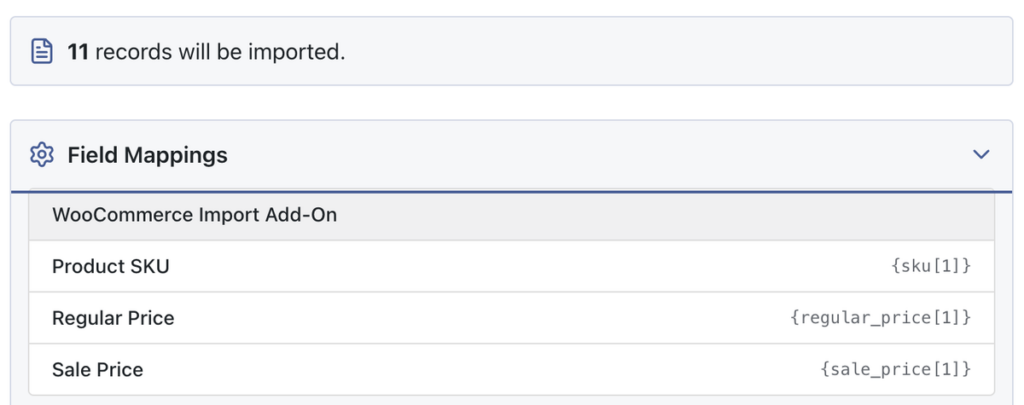
WP All Import’s Automatic Setup reads CSV, Excel, XML and JSON price files and maps their SKU and price columns to WooCommerce fields without any dragging and dropping. On the Your Import Is Ready screen, open Field Mappings and check the WooCommerce Import Add-On group to confirm each price column sits in the right field.
Step 2: Limit the Import to Prices
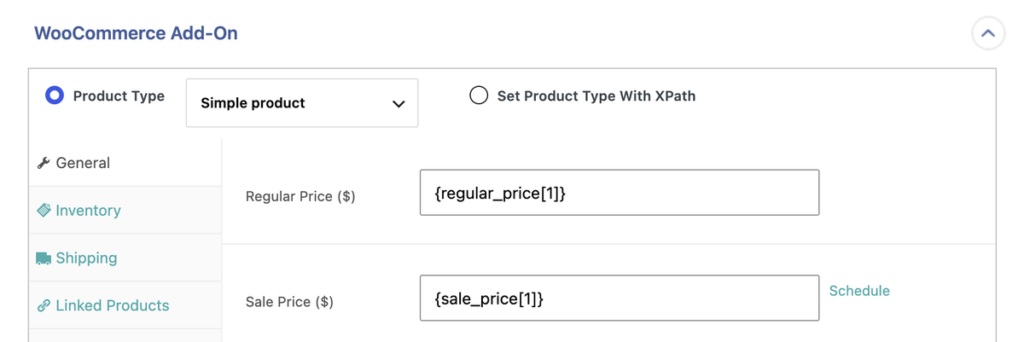
Click Manual Setup to open WP All Import’s drag-and-drop mapping screen, where every field Automatic Setup mapped is already filled in. The price columns need no changes, so click Continue to Step 4.
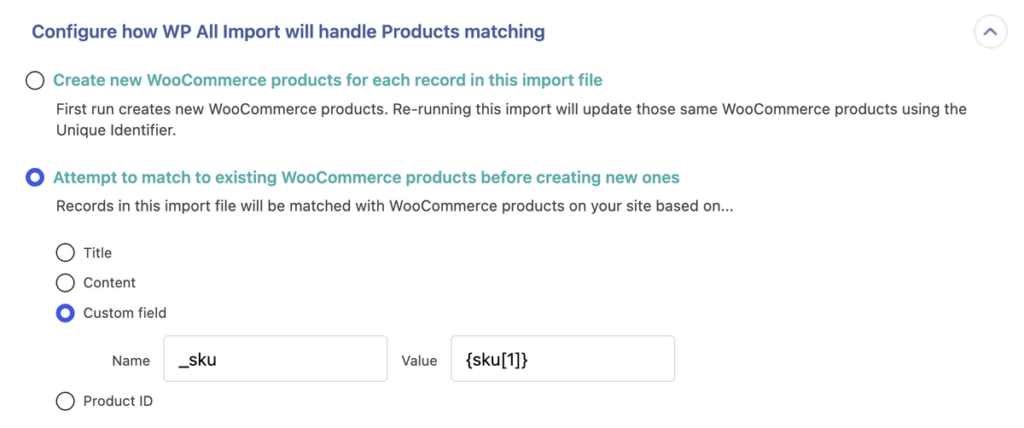
On the Import Settings screen, start by telling the import how to find your existing products. Select Attempt to match to existing WooCommerce products before creating new ones, choose Custom field, and drag the SKU column from your file into the Value box. WP All Import fills in the _sku field name for you.
Under When WP All Import finds new or changed data…, untick Create new WooCommerce products from records newly present in your file, so a SKU your store doesn’t carry never turns into a half-empty listing. Leave Update existing WooCommerce products with changed data in your file ticked, then select Choose which data to update. Every option in that list starts out ticked, so untick Select All to clear them, then tick Regular Price under Price & Stock, plus Sale Price if your file includes sale prices.
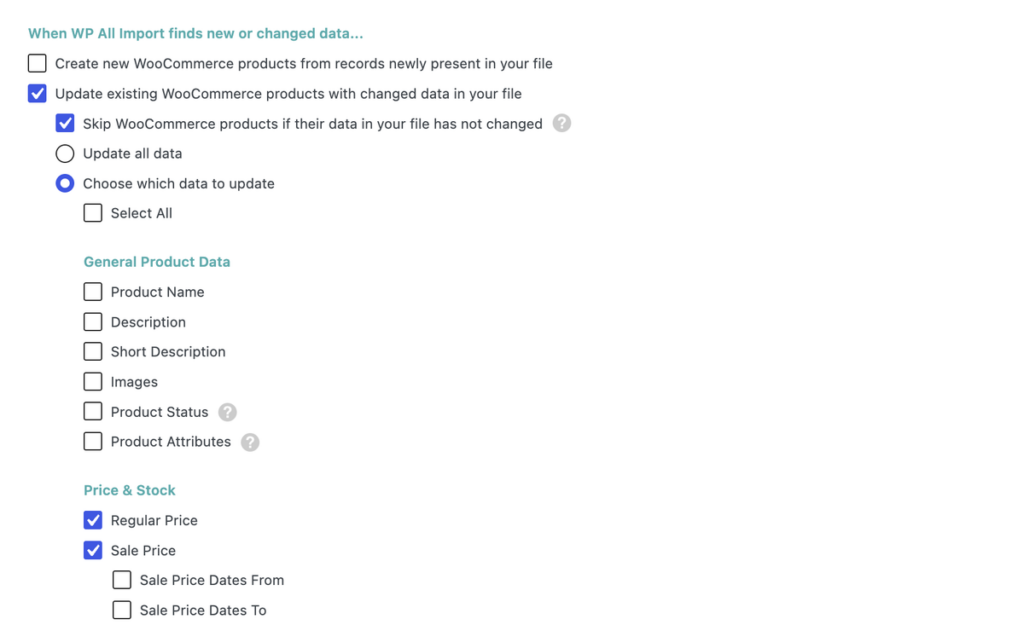
With only those two boxes ticked, WP All Import updates WooCommerce product prices and leaves titles, descriptions, images, and stock exactly as they are on the live store.
Step 3: Run the Import and Spot-Check the Store
Click Continue to reach the Confirm & Run screen, which lists the regular and sale prices as the only data this import will change. Click Confirm & Run Import.

When the import finishes, the summary shows how many products were updated and how many rows were skipped. A row is skipped when its SKU doesn’t match a product in your store, since creating new products is switched off.
The completion screen links to the import log, which notes an empty title on each row. That note comes from the price file, which doesn’t include product names, and WP All Import keeps every product’s existing title.
Before moving on, open Products › All Products and compare a few prices with the file. A product that has a sale price shows its new regular price crossed out next to it.
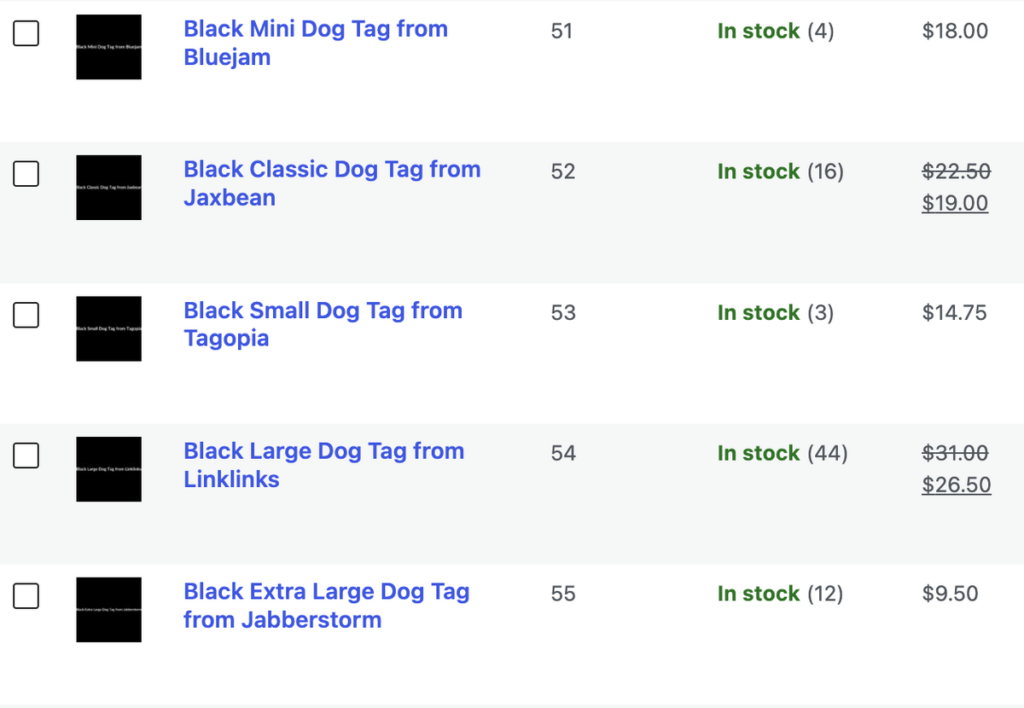
It is worth taking a second look at a skipped row because it usually means the SKU in the file differs slightly from the one in the store, such as a missing prefix or an extra space. Correct the SKU in the file and run the import again to pick up that product.
WP All Import saves every import, so the supplier’s next price list doesn’t need setting up again. Swap in the new file under All Import › Manage Imports › Settings, then click Run Import. An import that pulls its file from a URL downloads the latest version each time it runs, and our guide to importing WooCommerce products on a schedule shows how to run it automatically.
Mark Prices Up or Down During the Import
Plenty of suppliers send product cost prices, while the store sells at retail. Instead of going through the hassle of adding a markup column to the spreadsheet before every import, we set the markup once inside the import itself. WP All Import’s Adjust Prices option changes WooCommerce product prices by a percentage as the file imports, so a supplier’s cost list goes live as retail prices without a single spreadsheet formula.
When you reach the drag-and-drop screen in Step 2, open the WooCommerce Add-On’s General tab and click Adjust Prices below the Sale Price field. Enter the percentage of the file’s price that each product should sell for. To mark prices up by 40%, enter 140. To take 15% off for a clearance run, enter 85.
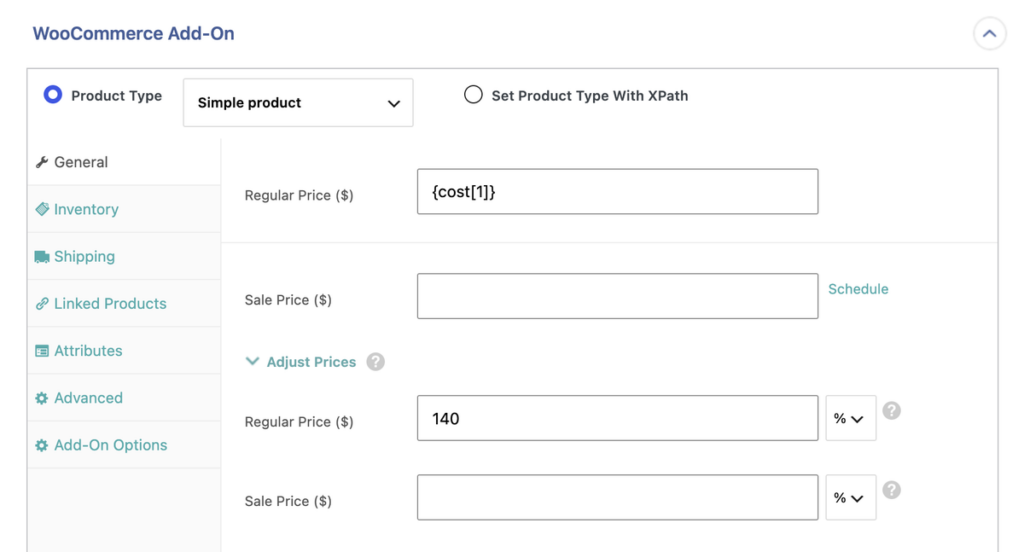
Click Preview Prices to check the new figures before continuing. WP All Import rounds each result to two decimal places, so a product that costs 9.99 updates to 13.99 in WooCommerce. The same panel can remove currency symbols and convert comma decimals to periods, which helps when a supplier formats prices for a different region.
Run a WooCommerce Sale That Ends on Its Own
It’s pretty easy to start a sale; however, a common mistake in many stores is that a discount that should have ended still works a week after the promotion was meant to end. WP All Import imports WooCommerce sale prices along with their start and end dates, so each product switches to its sale price on the start date and back to its regular price when the sale ends, without anyone having to edit products manually.
One row per product, with its SKU, the sale price, a start date and an end date. Dates in YYYY-MM-DD format import cleanly.
In the drag-and-drop screen, open the General tab, click Schedule next to the Sale Price field, and drag the start and end date columns into the two Sale Price Dates fields.
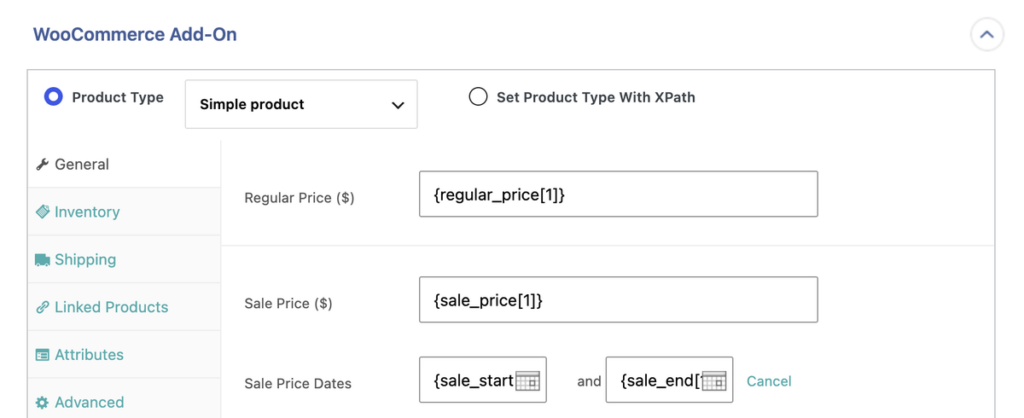
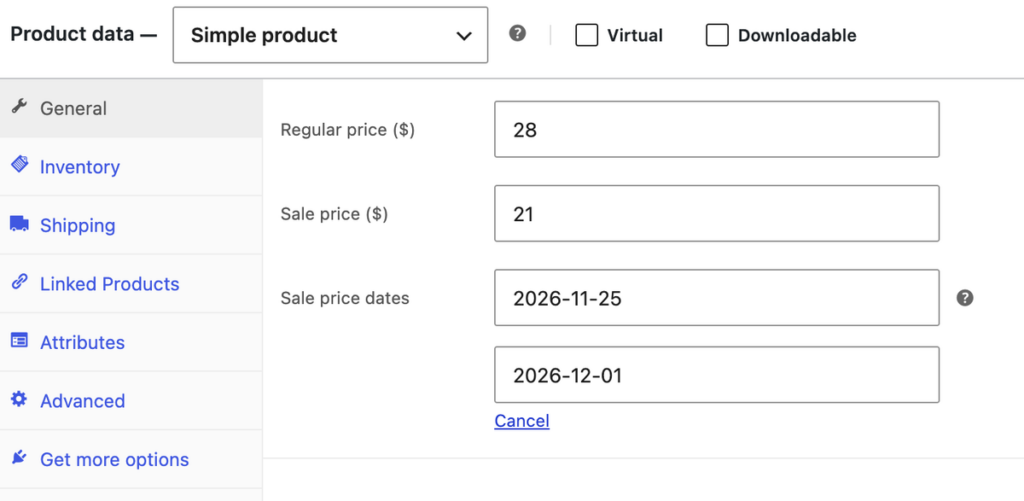
In Import Settings, tick Sale Price, Sale Price Dates From and Sale Price Dates To under Price & Stock. Once the import runs, each product’s edit screen in WooCommerce displays the sale price with its scheduled dates below, and the store continues to show the regular price until the start date arrives.
Final Thoughts
The best way to update WooCommerce product prices is to import them from the file they already come in. WP All Import matches each row to an existing product by its SKU and changes only the price fields you tick, so a supplier’s new list reaches the store without anyone opening a product manually. Automatic Setup maps the price columns for you, and WP All Import keeps the import ready for the next list.
We also like how much of the pricing work moves into the import itself. A cost list can go live at retail price with one percentage in Adjust Prices, and a promotion can carry its own end date, which cuts out the follow-up edits that often lead to incorrect prices. If your store’s prices change more than a few times a year, WP All Import is worth setting up once and reusing every time a new file arrives.
Common Questions About Updating WooCommerce Product Prices
How do I change the price of multiple products in WooCommerce?
To change the price of multiple products in WooCommerce, import a file of SKUs and new prices with WP All Import. Automatic Setup maps the price columns for you. With only Regular Price and Sale Price ticked under Choose which data to update, every matched product takes its own new price from the file, and titles, descriptions and stock stay exactly as they are.
Can WooCommerce update prices automatically?
Yes. With WP All Import, WooCommerce prices update automatically when the import pulls its file from a URL or an FTP/SFTP server and runs on a schedule. Each time the supplier replaces the file, the next run picks up the new prices. Schedules run through WP All Import’s Automatic Scheduling service or through cron jobs on your own server, and our guide to importing WooCommerce products on a schedule walks through both.
How do I add a markup to imported WooCommerce products?
WP All Import adds a markup to WooCommerce products during the import with its Adjust Prices option:
- From the Your Import Is Ready screen, click Manual Setup to open the drag-and-drop screen.
- On the WooCommerce Add-On’s General tab, open Adjust Prices.
- Enter the percentage of the file’s price each product should sell for, such as 125 for a 25% markup.
- Click Preview Prices to check the results.
- Continue to Import Settings and finish the import as usual.
How do I schedule a sale in WooCommerce?
To schedule a sale in WooCommerce for many products at once, add start and end date columns to your price file and import it with WP All Import. Click Schedule next to the Sale Price field on the General tab, drag the date columns into Sale Price Dates, and tick Sale Price Dates From and Sale Price Dates To in the import settings. WooCommerce applies each sale price on its start date and removes it once the end date passes.
How do I update variation prices in WooCommerce?
To update variation prices in WooCommerce, give each variation its own row in the price file, identified by the variation’s SKU. WP All Import updates variable products the same way it updates simple ones, so a single file can carry new prices for T-shirt sizes and standalone products together. If you want the field-by-field detail, you can follow WP All Import’s guide to updating WooCommerce product prices.