
The Best Way to Update WooCommerce Product Stock Levels
When stock levels in WooCommerce aren’t updated after a delivery arrives, products keep showing “Out of stock” while the boxes sit in the stockroom. Shoppers see that label and end up buying from another store. Changing one product’s stock number manually takes a few seconds, but a restock covering dozens of SKUs needs a faster approach.
The right route depends on how many products the restock covers and whether the new stock levels are already in a file. When they are, WP All Import updates WooCommerce stock levels from that file by matching each row to an existing product’s SKU and changing only the stock quantity. The comparison below shows where that fits next to the tools WooCommerce already includes.
What We’ll Cover
Every Way to Update WooCommerce Stock Levels, Compared
WooCommerce has four built-in ways to change a product’s stock level. The table lists them alongside WP All Import, in order of how many products each one updates in a single pass.
| Method | Products per update | Where the new numbers come from |
|---|---|---|
| Product edit screen (Inventory tab) | One | Typed in by hand |
| Quick Edit | One, from the product list | Typed in by hand |
| Bulk Edit | Selected products on the current page | One change applied to all of them: Change to, Increase existing stock by, or Decrease existing stock by |
| CSV importer (Products › Import) | Every product in the file, matched by ID or SKU | A CSV file uploaded for each run |
| WP All Import | Every product in the file, matched by SKU | A file uploaded, downloaded from a URL, or pulled over FTP/SFTP |
The first three methods depend on someone typing each number into WooCommerce. Once the new stock levels arrive as a file, the choice comes down to the two importers. WooCommerce’s importer reads CSV files and runs when someone uploads one. WP All Import updates product stock levels from CSV, XML and JSON files and repeats the same update every time the supplier sends a new version.
How to Update Product Stock Levels With WP All Import
For this walkthrough, we used a stock file with just two columns, SKU and quantity, the kind of sheet a supplier sends after a delivery. WP All Import updated the stock level of every matching product from that file in four steps, without changing any other product data.
Step 1: Load the Stock File Into Automatic Setup
Go to All Import › New Import and click Set up automatically. Add the stock file using the tab that matches where it’s stored: Upload File, Download from URL, Existing File or FTP/SFTP. The uploader accepts XML, CSV, JSON, TXT, ZIP and GZ files.
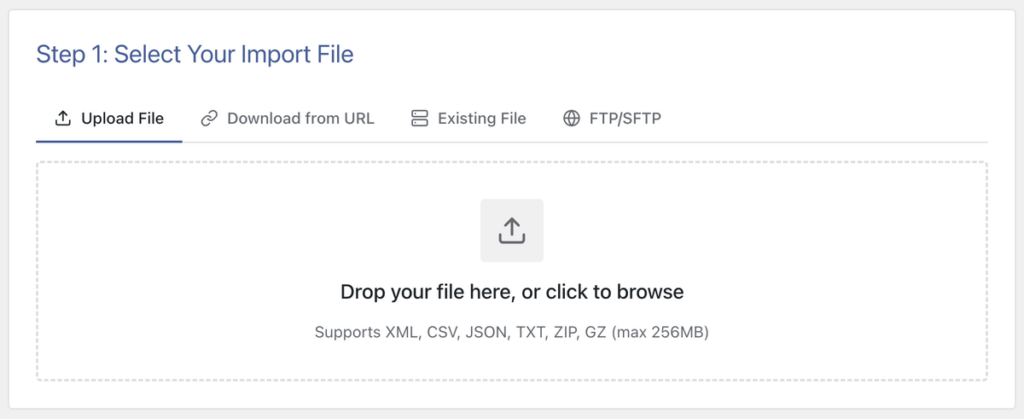
Choose WooCommerce › Products as the import target, then click Start Automatic Setup.
Step 2: Confirm the Stock Columns Landed in the Right Fields
WP All Import’s Automatic Setup reads the file’s column headers and maps each one to its WooCommerce product field. The Your Import Is Ready screen shows how many fields were mapped and how many records will be updated. Expand Field Mappings and check three rows under WooCommerce Import Add-On:
- Product SKU points to the SKU column
- Stock Quantity points to the quantity column
- Manage Stock is set to yes
A stock file doesn’t usually carry product names, so Automatic Setup notes that no title column was found. You can ignore that note here because this update leaves product titles alone.
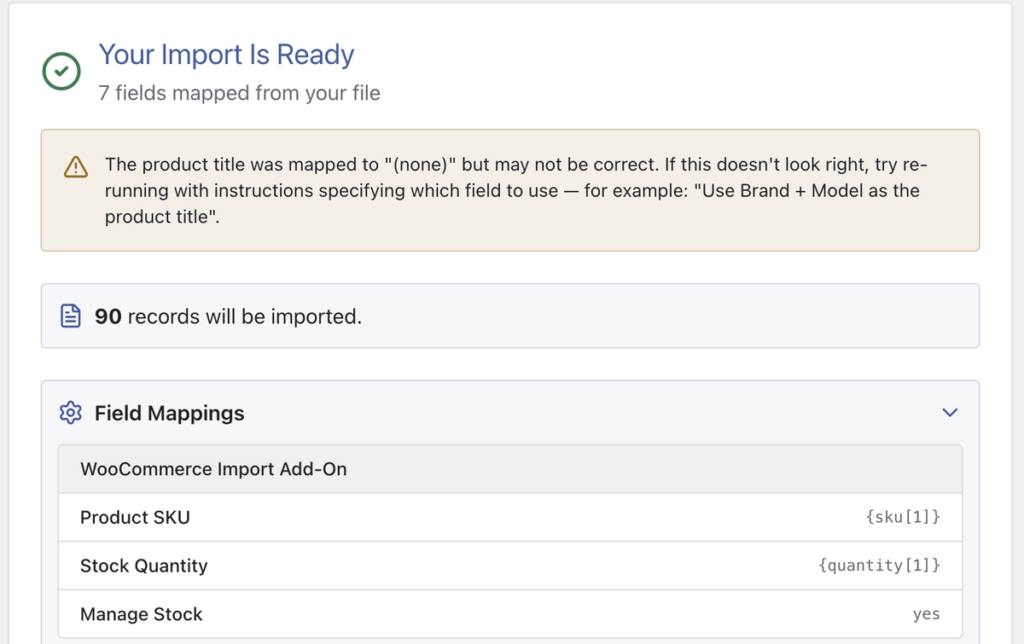
Click Manual Setup to open the import settings.
Step 3: Limit the Update to Stock
On the Import Settings screen, select Attempt to match to existing WooCommerce products before creating new ones, then choose Custom field. The Name box already shows _sku, the field WooCommerce stores SKUs in. Drag the SKU element from the file preview on the right into the Value box.
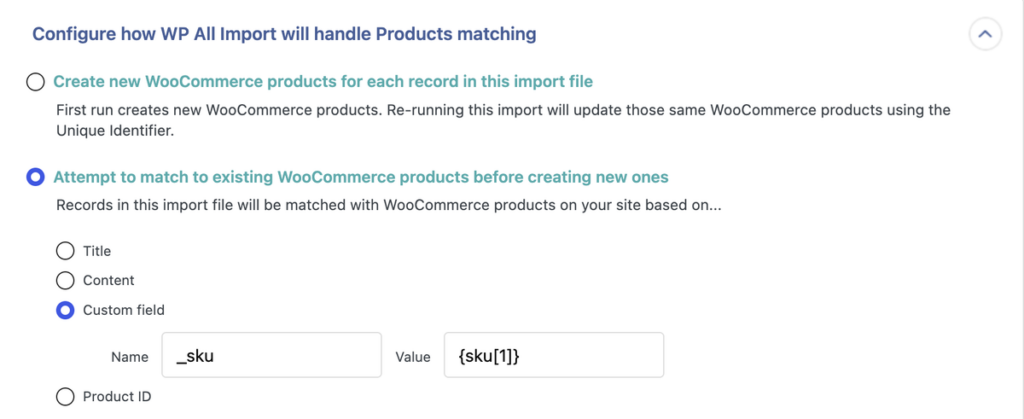
Under When WP All Import finds new or changed data…, set these options:
- Untick Create new WooCommerce products from records newly present in your file
- Keep Update existing WooCommerce products with changed data in your file ticked
- Select Choose which data to update, then tick Stock Quantity under Price & Stock
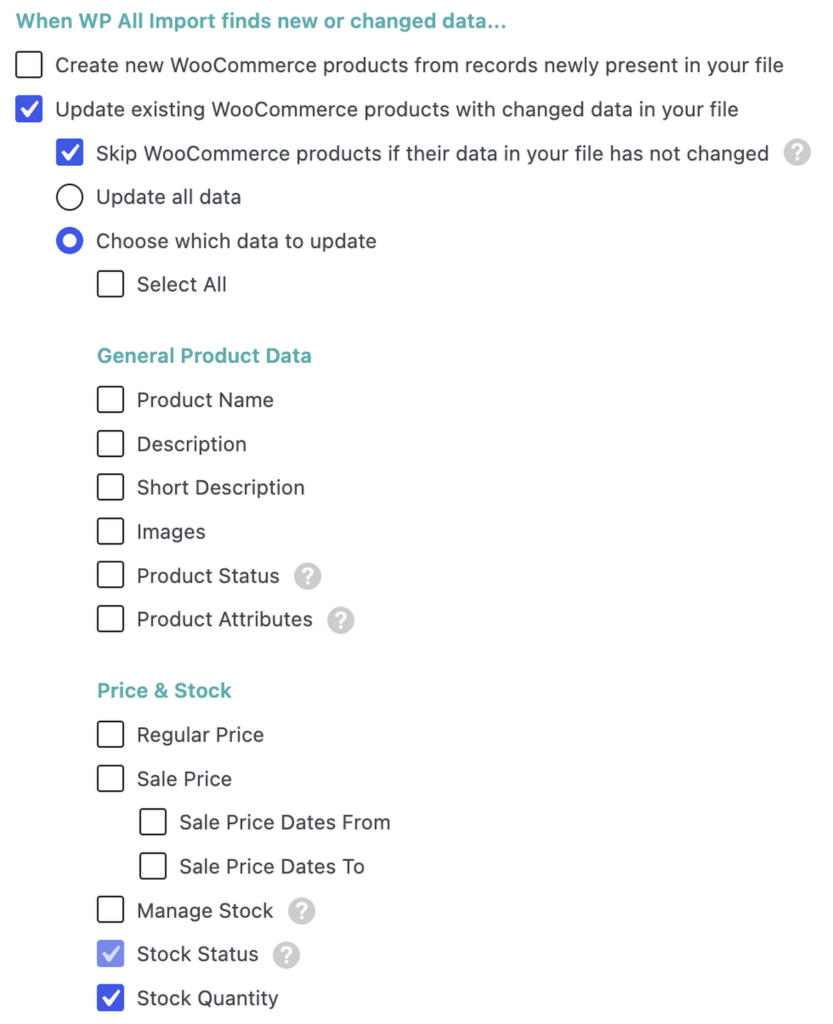
Stock Status ticks itself once Stock Quantity is selected, so WooCommerce still marks a product “Out of stock” when its quantity reaches 0. If some products in your store have stock tracking switched off, tick Manage Stock as well. When we left it unticked, a product with tracking turned off stayed untracked after the import.
WP All Import changes only the fields ticked under Choose which data to update. Prices, descriptions, images and SEO titles you’ve edited in WooCommerce stay exactly as they are.
Step 4: Run the Import and Read the Counts
The Confirm & Run screen lists the data the import will change. Ours showed Stock Quantity as the only field, followed by “all other data will be left alone.” Click Confirm & Run Import.
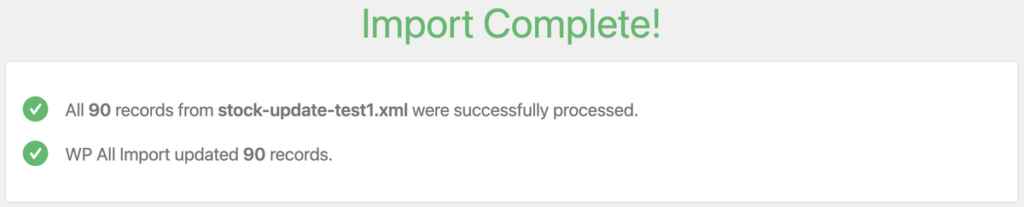
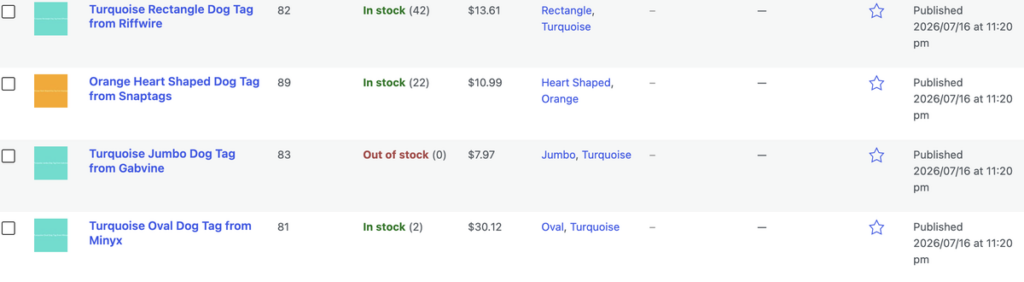
When the import finishes, the count shows how many products were updated. Our 90-row file updated all 90. Open Products › All Products and check the Stock column. Each product shows its new quantity, and products set to 0 show Out of stock.
Adjust Supplier Stock Numbers During the Import
A supplier’s file doesn’t always hold the exact number a store should show. Some suppliers split each product’s stock across two warehouse columns, and some stores hold back a couple of units as a buffer so a miscount doesn’t turn into an order they can’t fill. WP All Import runs PHP functions on values from the import file, so the stock quantity can be calculated during the import and the supplier’s file never needs editing.
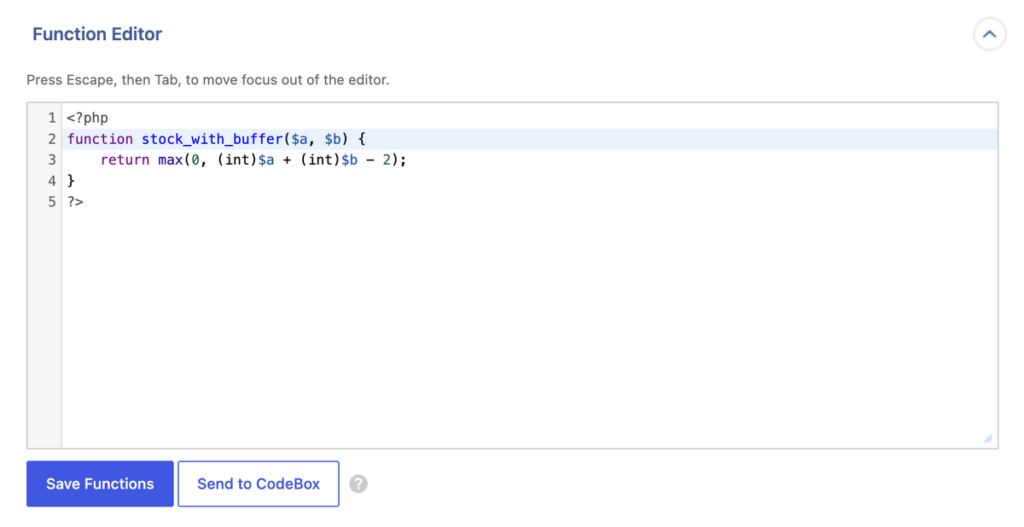
We tested this with a file that lists each product’s stock in two columns, warehouse_a and warehouse_b. The function below adds the two numbers together, subtracts a buffer of 2 units, and never returns less than 0.
function stock_with_buffer($a, $b) {
    return max(0, (int)$a + (int)$b - 2);
}
Then enter this in the Stock Qty field:
[stock_with_buffer({warehouse_a[1]},{warehouse_b[1]})]To use it in an import:
- Start the import with Set up automatically, choose WooCommerce › Products, and click Manual Setup on the Your Import Is Ready screen.
- Scroll to the Function Editor at the bottom of the template page, paste the function, and click Save Functions.
- On the Inventory tab, set Manage stock? to Yes and enter the function call in the Stock Qty field.
- Click Preview to check the stock quantity for the first record, then set up Import Settings the same way as in Step 3 above.
A product with 11 units in each warehouse came through as 20 in WooCommerce. A product with no stock in either column came through as 0 and switched to Out of stock.
Keep Stock Levels Updated Without Uploading Again
The settings from Steps 1–3 are saved with the import, so the next stock update starts from All Import › Manage Imports instead of a new import. Open the import’s Settings and, under Import File, choose Upload a file, Download a file or Use existing file. Then run it again. WP All Import matches the products by SKU and changes only their stock quantity, the same as on the first run.
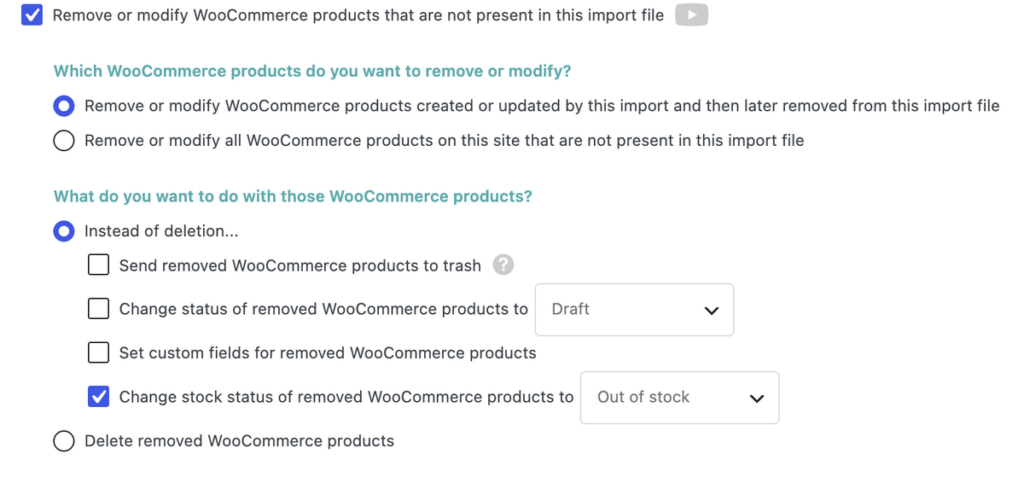
Products the supplier stops listing are handled in the same settings. Tick Remove or modify WooCommerce products that are not present in this import file, choose Instead of deletion…, and select Change stock status of removed WooCommerce products to Out of stock. By default, this applies to products the import has updated before that are missing from the latest file. WP All Import marks those products as sold out instead of deleting them, so their product pages stay live.
When the supplier’s file sits at a fixed URL or on an FTP server, WP All Import’s Automatic Scheduling service runs the stock update on the days and times you choose, for $19 a month. We cover that setup in our guide to importing WooCommerce products on a schedule
Final Thoughts
Which method you use to update WooCommerce product stock levels depends on where the new numbers come from. A correction to one or two products can be typed into WooCommerce’s product screens. However, once a supplier or a stockroom count sends the numbers as a file, WP All Import is the best way to update WooCommerce stock levels because it matches each row to a product by SKU and changes the stock quantity without touching anything else in the store.
Supplier numbers don’t always match what a store should sell, and that is where a file import does more than typing in numbers manually. WP All Import calculates stock during the import, adding warehouse columns together or holding back a buffer, so the store shows a quantity it can actually fulfill. After the first setup, each new stock file is a re-run from Manage Imports, with the same matching and stock-only settings already in place.
Common Questions About Updating WooCommerce Stock Levels
Why are my WooCommerce stock levels not updating?
Your WooCommerce stock levels are not updating if stock management is switched off, either for the whole store or for a single product. Check that Enable stock management is ticked under WooCommerce › Settings › Products › Inventory. Then open the product and confirm that Track stock quantity for this product is ticked on its Inventory tab. When you update stock with WP All Import, tick Manage Stock under Choose which data to update along with Stock Quantity. An import that updates only Stock Quantity leaves untracked products untracked.
Does updating the stock quantity change a product’s stock status?
Yes. Updating the stock quantity changes a product’s stock status when stock management is on for that product. WooCommerce marks the product Out of stock when its quantity reaches 0 and In stock when the quantity goes back above 0. In our tests, a product updated to 0 switched to Out of stock, and it showed In stock again once a later import gave it 20 units.
Can I update WooCommerce stock levels from a Google Sheet?
Yes. WP All Import updates WooCommerce stock levels from a Google Sheet through the Download from URL tab in Automatic Setup. Set the sheet’s sharing to Anyone with the link. Then change the end of the sharing link from /edit?usp=sharing to /export?format=csv so WP All Import receives the sheet as a CSV file. The rest of the setup follows the steps in this article. For a full walkthrough, see our guide to bulk importing WooCommerce products from Google Sheets.
How do I update stock levels in WooCommerce from a CSV file?
You can update stock levels in WooCommerce from a CSV file with WP All Import:
- Go to All Import › New Import, click Set up automatically and upload the CSV.
- Choose WooCommerce › Products, click Start Automatic Setup, then click Manual Setup.
- Select Attempt to match to existing WooCommerce products before creating new ones, choose Custom field, and drag the SKU element into the Value box.
- Untick Create new WooCommerce products from records newly present in your file.
- Select Choose which data to update and tick Stock Quantity.
- Click Confirm & Run Import.
How do I add a safety buffer to WooCommerce stock levels?
To add a safety buffer to WooCommerce stock levels, subtract the buffer from the supplier’s quantity while the stock file imports. In WP All Import, save a short function in the Function Editor that subtracts the buffer and never returns less than 0, then call it from the Stock Qty field. The stock_with_buffer function earlier in this article holds back 2 units. Change the 2 to set a different buffer.