
How to Import WooCommerce Product Categories
Are you looking for a reliable way to import WooCommerce product categories? We have the perfect WooCommerce product import solution for you.
Importing WooCommerce products with categories, or simply product categories in general, can be a tricky task. This is especially true when you have a complex hierarchy with thousands of products.
In this guide, we’ll cover two ways to handle category imports: creating standalone categories as WordPress taxonomies, or mapping them automatically during a full product catalog import.
Limitations of the Built-in Tool to Import WooCommerce Product Categories
WooCommerce comes with a built-in product import feature. It can come in very handy if you want to run a simple import with a few products. However, for more complex and customized imports, the built-in tool is not very convenient.
The major problem with WooCommerce’s built-in product import tool is that you need to structure the categories in a certain way for the import to be successful. This is really inconvenient, as it may take a while to structure the categories. In addition, there is no support for custom fields or complex product types.
However, there are many third-party plugins available that can easily handle complex product category hierarchies without requiring you to structure spreadsheets in a specific format. The next section covers one such plugin in detail.
Introducing WP All Import – The Best WooCommerce Import Plugin
WP All Import handles category imports through an automated setup paired with a visual template editor. When you upload a file, the plugin detects your category headers, identifies whether terms are flat or hierarchical, and builds the field mappings automatically.
Whether you need to import standalone category taxonomies or map multi-tier category structures across thousands of products, it processes the data without requiring you to reformat your spreadsheet first.
Key features for importing product categories:
- Automatic Setup to analyze incoming files and map category terms and parent hierarchies on upload.
- Supports importing product data from Excel, CSV, XML, and Google Sheets up to 256 MB.
- Features a drag-and-drop interface to select import columns.
- No fixed rule to import your product categories in a certain structure.
- Powerful filtering options to select which products and categories you want to import.
- Support for complex product category hierarchy.
- Support for all product and WooCommerce data types.
- Can handle very large files and any file structure.
- Fully compatible with custom plugins and theme fields.
- Comes with powerful import scheduling options.
- Can manipulate product field data using PHP functions.
Now that you understand what it can do, we’ll move on to how to install this plugin. Then we’ll show you two methods for importing WooCommerce product categories.
Install WP All Import and Its WooCommerce Import Add-on
To follow along, you’ll need WP All Import alongside the WooCommerce Import Add-On. The WooCommerce Import Package starts at $169/year for unlimited website activations and includes both plugins.

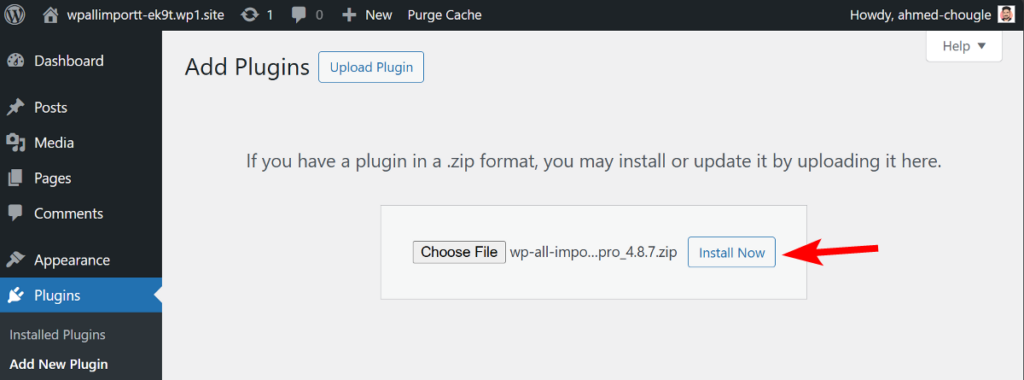
After purchasing, download the zip files from your account portal, then upload and activate them under Plugins › Add New in your WordPress dashboard.
Method 1: How to Import WooCommerce Product Categories
In this method, we are going to import WooCommerce product categories as WordPress taxonomies. Let’s take a look at the steps!
1. Start a New WooCommerce Product Categories Import
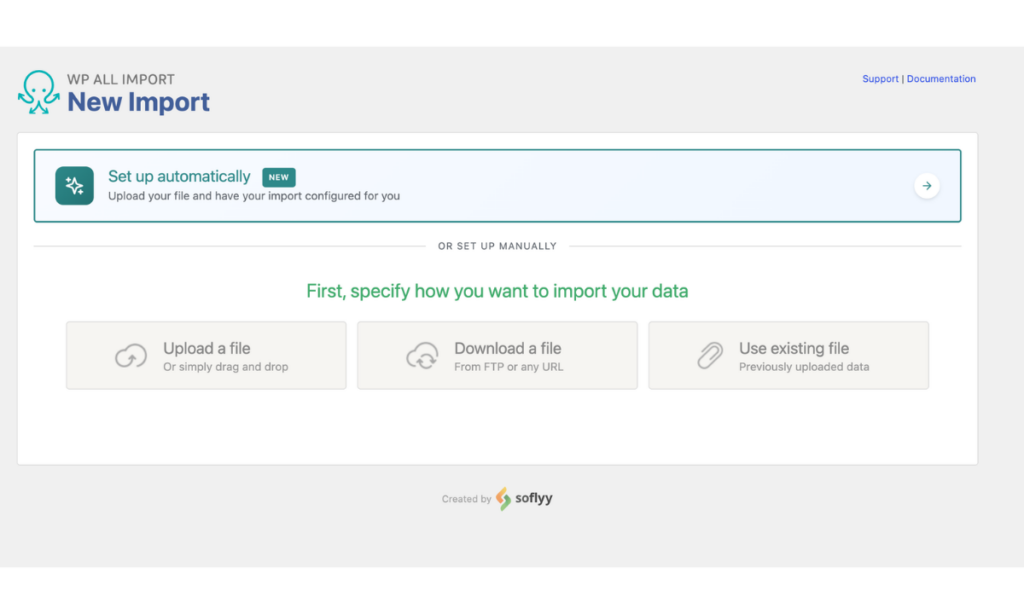
From your WordPress dashboard, navigate to All Import › New Import. At the top of the screen, click the Set up automatically banner to open the automated wizard. Then select your import file. The plugin supports CSV, XML, Excel, and Google Sheets formats.
Under Choose What to Import, select Taxonomies as the import post type, and Product Categories as the post subtype.
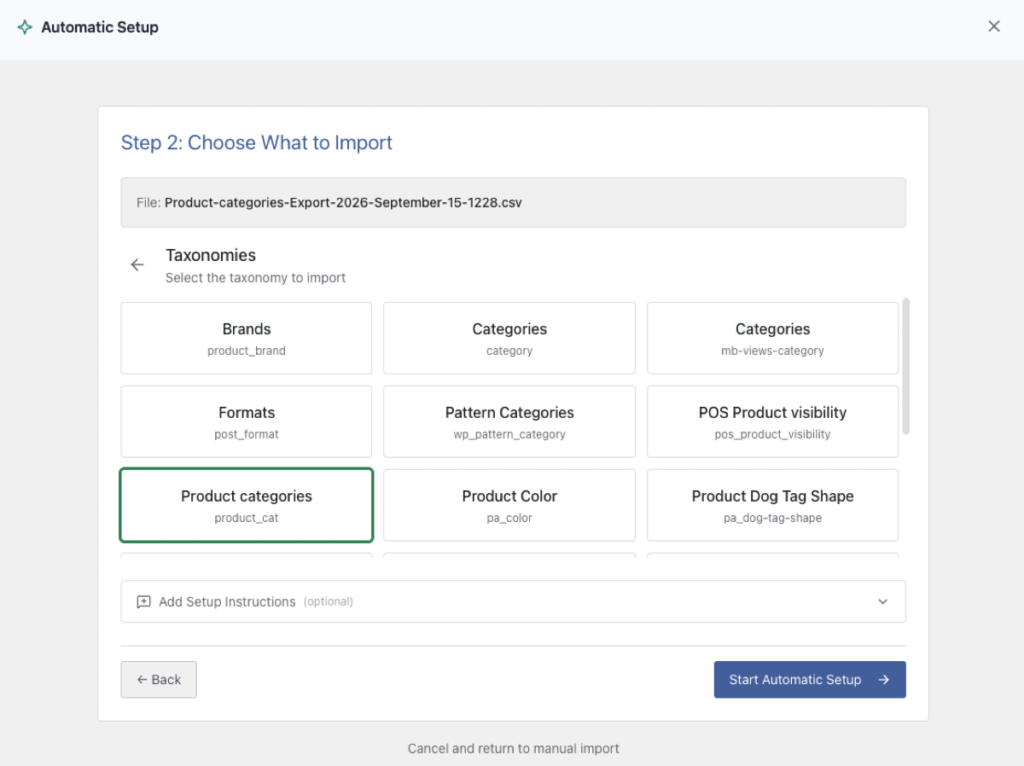
Click Start Automatic Setup to allow the plugin to inspect your category columns and configure field mappings automatically.
2. Review Uploaded WooCommerce Categories Data
When analysis finishes, the summary card displays your total category count and verified field mappings.
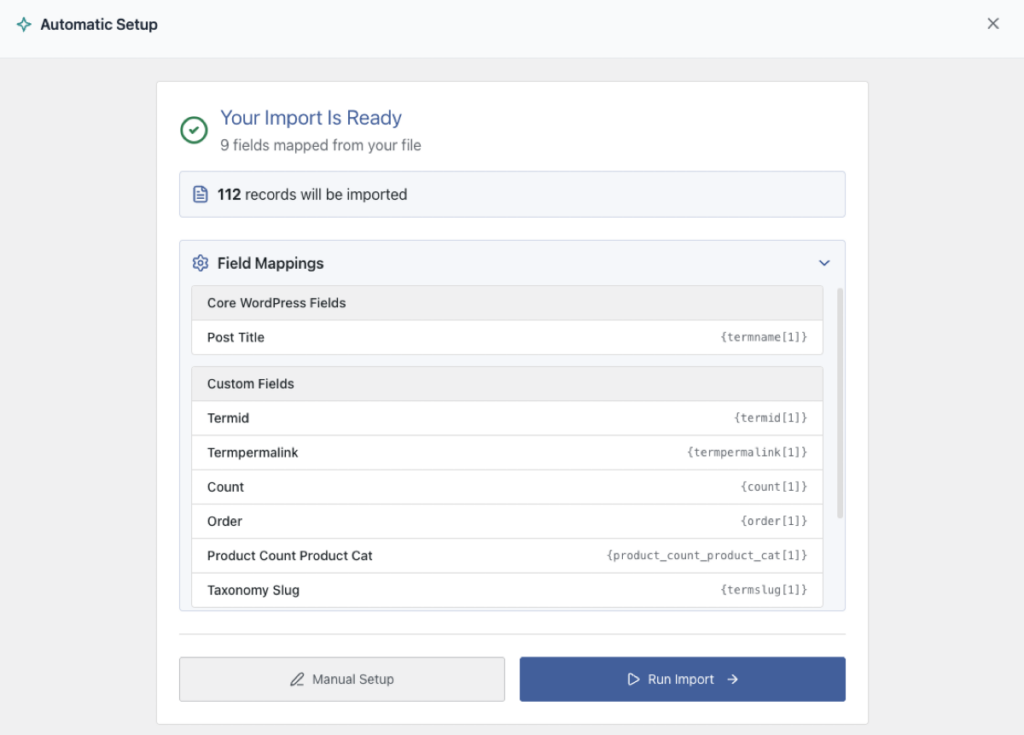
You can review the mapped categories in the Field Mappings list. If you want to run the import as-is, you can proceed directly, or click Manual Setup if you need to apply custom filter rules or inspect field settings.
To learn more, read our documentation on filtering your WooCommerce imports.
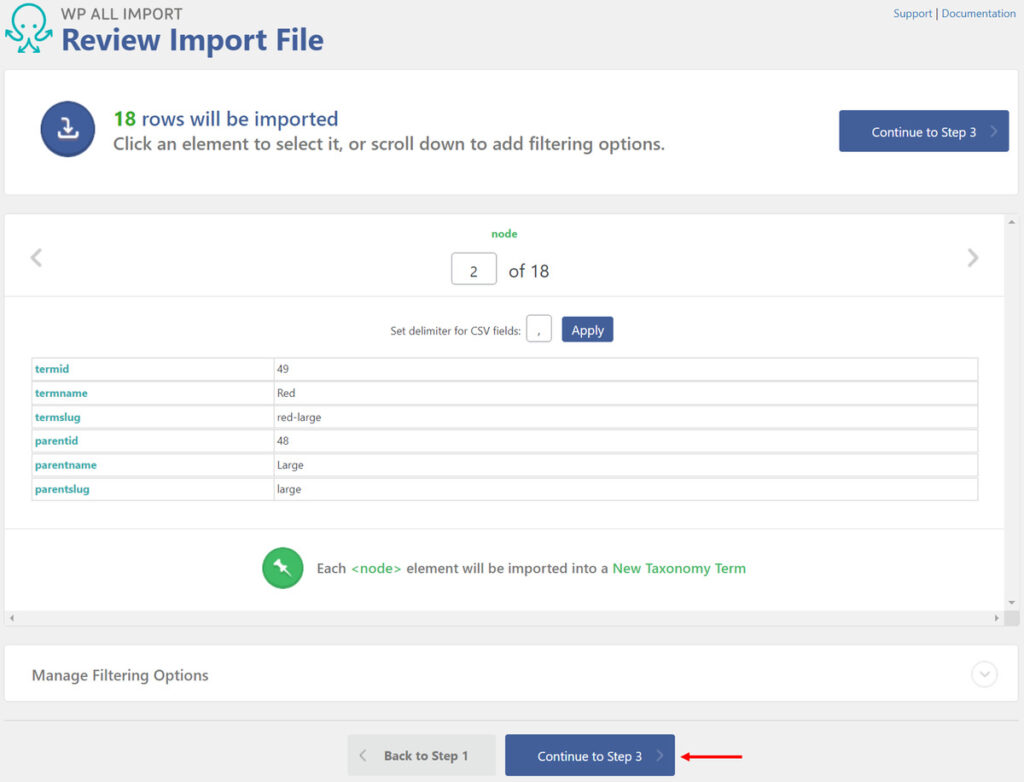
Click Continue to Set Up Import.
3. Review Auto-Mapped Categories in the Template Editor
Because Automatic Setup pairs your category columns to WooCommerce fields on upload, manual field mapping is completely optional. If you click Manual Setup, the template editor opens with all category fields pre-populated from your file.
In the Name & Description section, Automatic Setup maps your category name column directly to the Name field.

Then scroll down to the Other Category options section and expand it. The wizard automatically maps the parent term column to the Parent Term field.
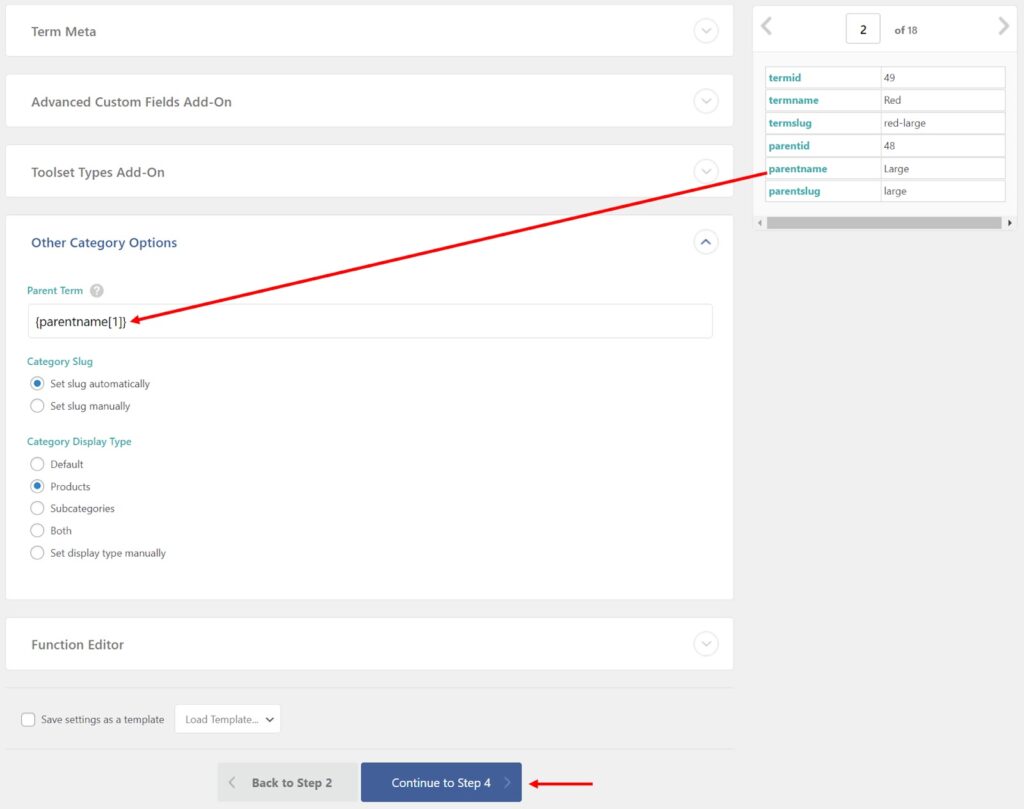
This tells WooCommerce which terms are parent categories and which are child subcategories in the taxonomy hierarchy.
Click Continue to Import Settings.
4. Run WooCommerce Categories Import and Verify the Data
Next, we’ll see the Import Settings screen. You can configure your import settings here. We’ll address the configuration process in detail when discussing the second method to import product categories to WooCommerce. For now, click Continue.
Now you’ll land on the Confirm & Run page. Here, you will see a summary of the import you are about to run. If everything looks fine, click Confirm & Run Import.
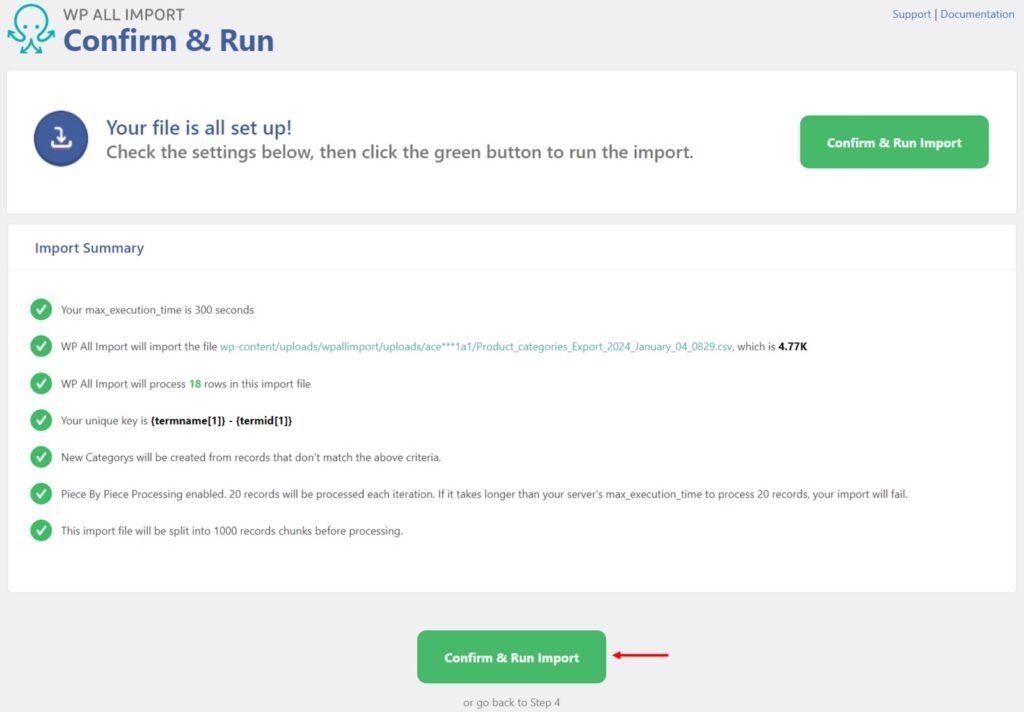
You’ll get the Import Complete message once the import is finished.
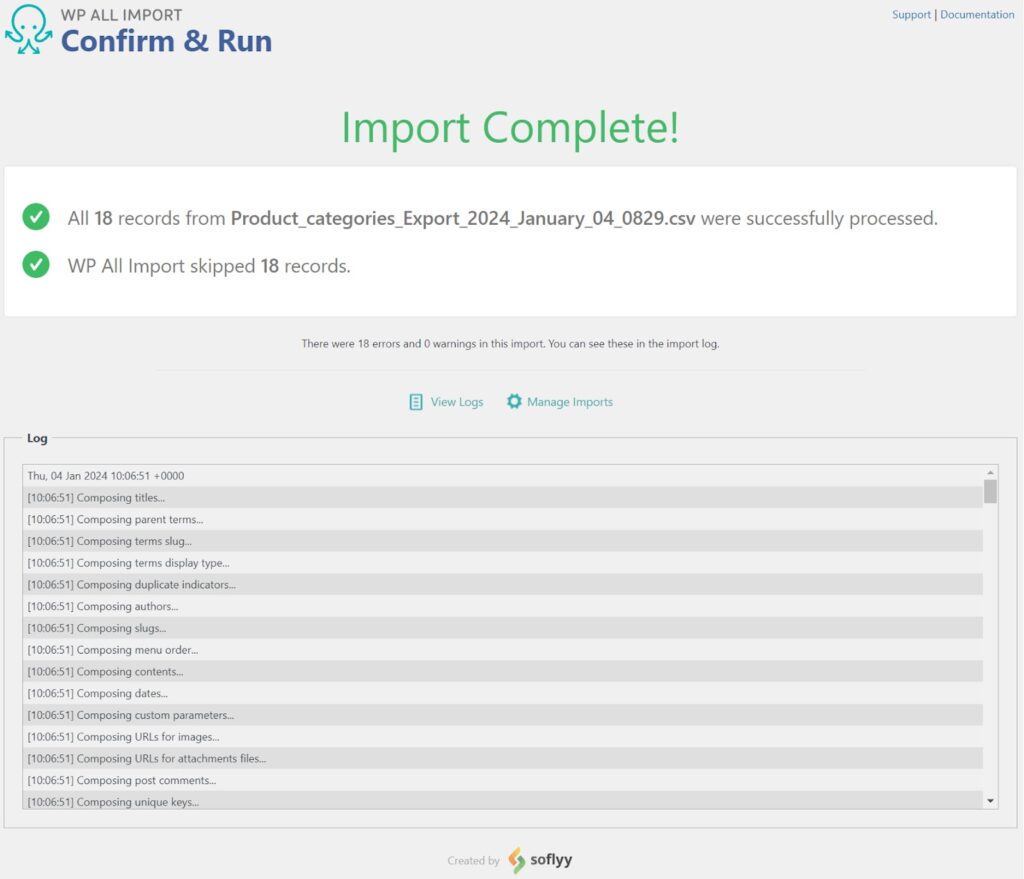
Navigate to Products › Categories in the WordPress main menu to check if your data was imported as expected.
There you go! You’ve successfully imported product categories to WooCommerce!
If you want to import WooCommerce products with categories, not just categories themselves, you need to follow a different method. We’ll discuss it in the following section.
Method 2: How to Import WooCommerce Products with Categories
If your spreadsheet contains both catalog data and category assignments, WP All Import allows you to import everything together in a single pass without splitting your file into separate spreadsheets.
Let’s take a look at how you can do that!
1. Start a New WooCommerce Product Import
Navigate to All Import › New Import from the WordPress dashboard. Click the Set up automatically banner at the top of the screen.
Choose your file source. You can upload a file directly from your computer, pull data from an external URL or Google Sheet, or connect via FTP/SFTP. The plugin accepts CSV, Excel, and XML files up to 256 MB.
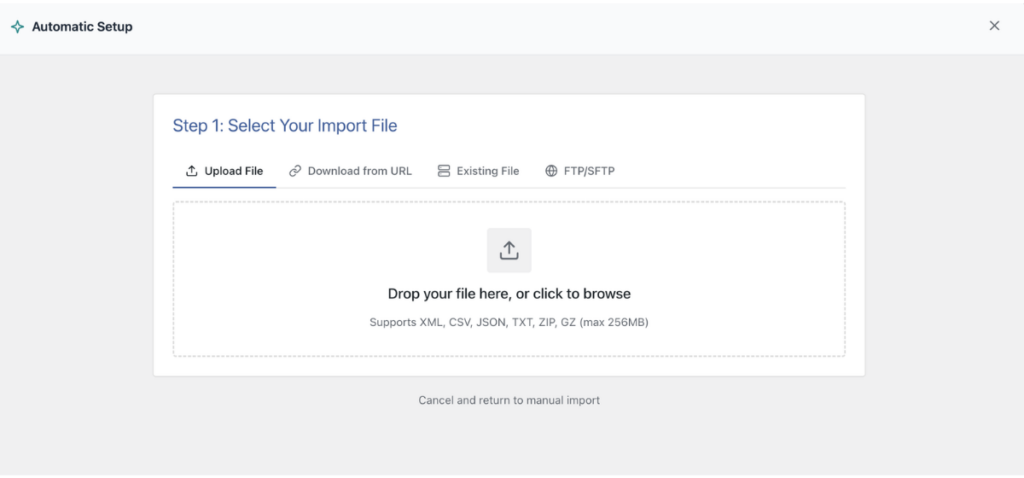
Under Choose What to Import, select WooCommerce, then choose Products.
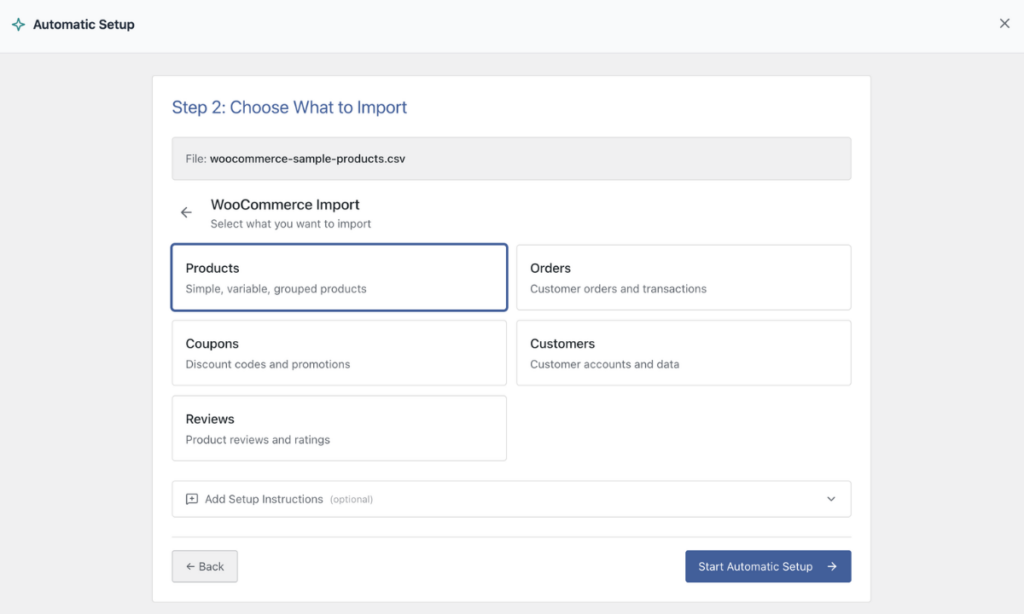
Click Start Automatic Setup to detect your product types and map category fields automatically.
2. Review Uploaded WooCommerce Product Data
Once the analysis completes, the summary card details your detected product counts. If you need to apply filters, click Manual Setup and scroll to the bottom of the template editor to click Back to Create Filters.
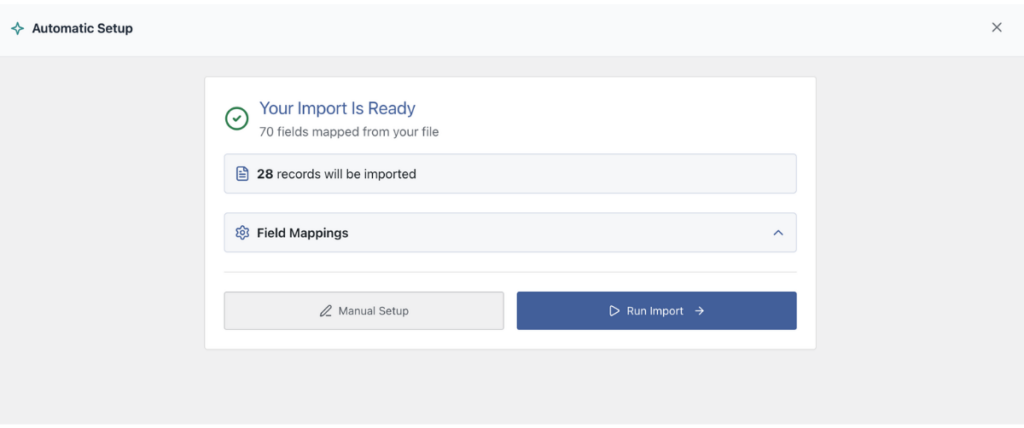
As an example, let’s filter products from a certain category.
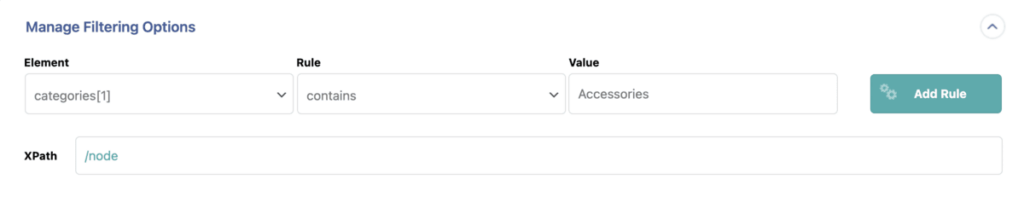
Step 1: Select an Import Element
The first step is to select the column based on which you want to filter the products. In the following example, we want to import products that fall into the Accessories category.
Step 2: Add a Filter Rule
You have to set up filtering rules in the Rule selection box to import the exact products you want. For our example, we’ll select contains. This means that we’ll import products where the Categories element contains the value Accessories.
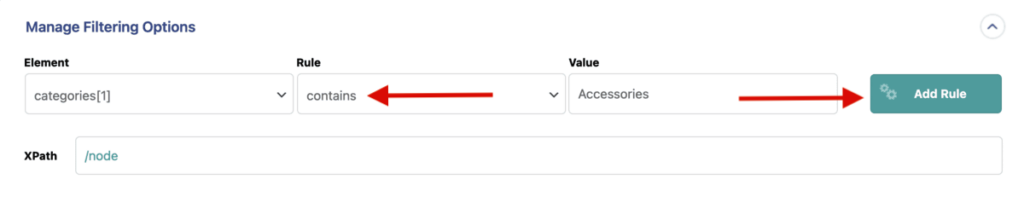
Click the Add Rule button.
Step 3: Apply Filters to XPath
The filter you created will then appear in the lower section. Click Apply Filters to XPath.
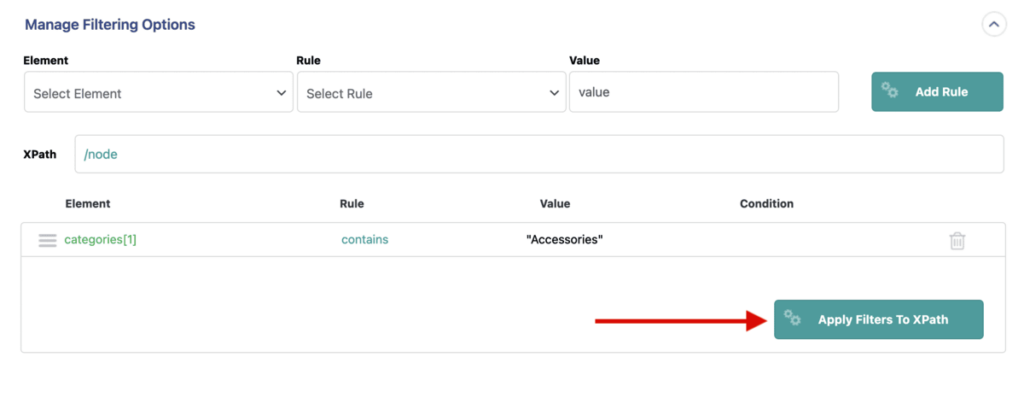
Your filter will then be applied to your import.
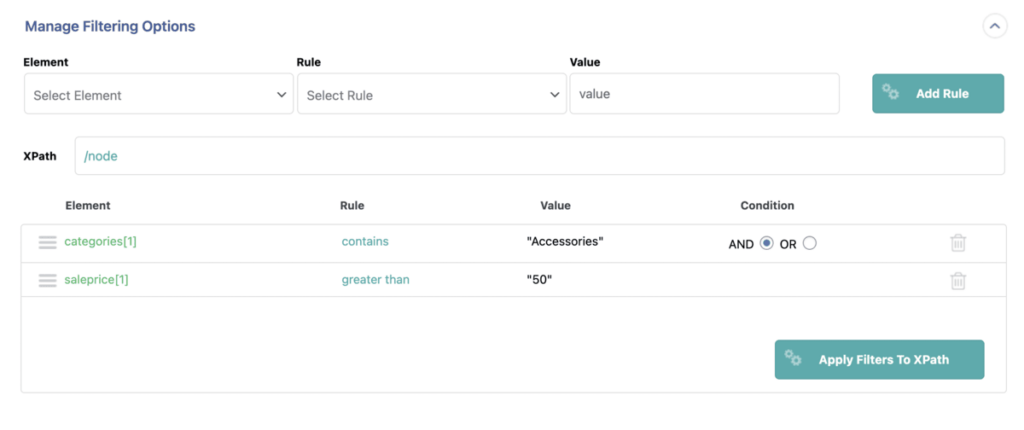
You can add more than one filter rule by connecting them using the logical operators AND(&&) and OR(||).
The AND(&&) operator filters out the products that satisfy both rules, and the OR(II) operator filters out the elements that satisfy either of the rules.
Here’s an example where we filtered products in the Accessories category that cost more than 50.
Click Continue to Step 3.
3. Review Auto-Mapped Product Data Including Categories
Automatic Setup populates all core product fields and categories for you on upload. If you open the template editor, you can inspect your auto-mapped fields across each section.
Now we’ll look at some different panels to map WooCommerce product information, including product categories.
Title and Description Section
With this section, you can map product names, descriptions, and short descriptions.
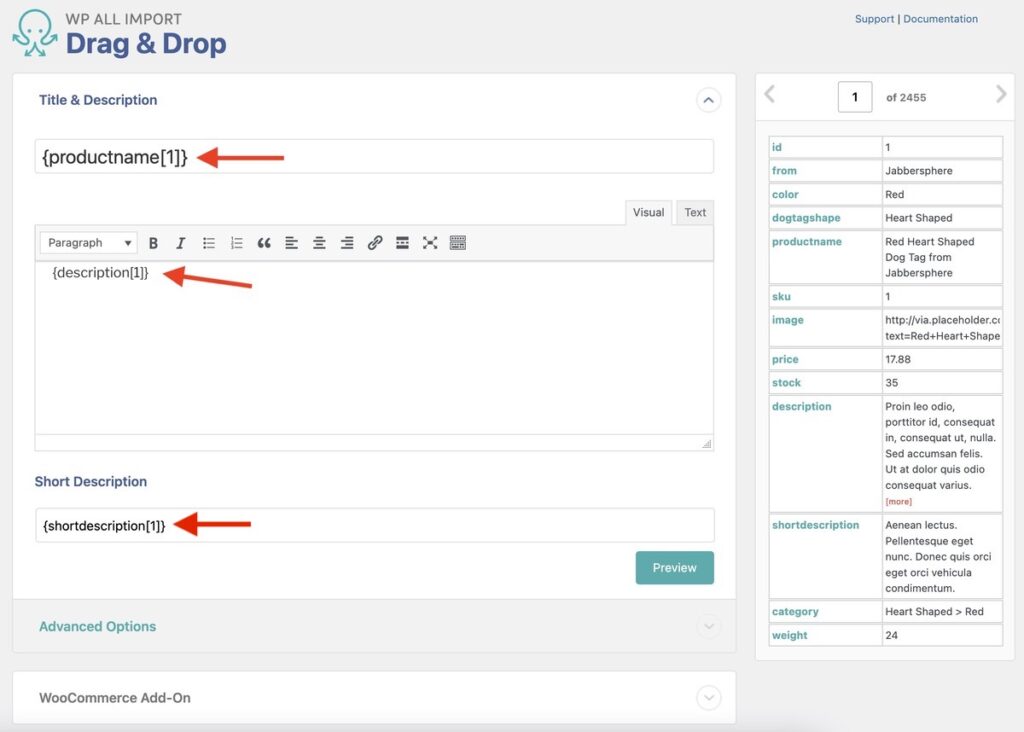
Below the Title and Description section, you’ll find the WooCommerce Add-On section.
WooCommerce Add-On Section
Expand the WooCommerce Add-On section next.
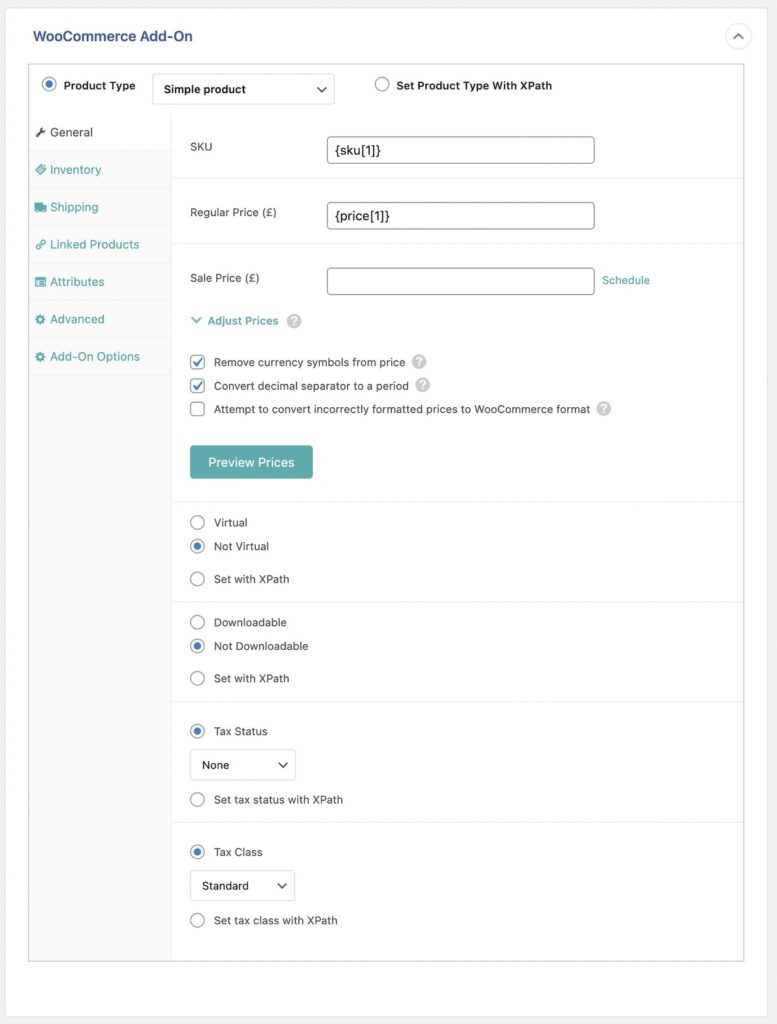
Define the Product Type first. It’s set as Simple Product by default, but you can change it to different product types, including grouped, external, and variable products.
Below Product Type, there are several tabs to configure your import. We’ll describe some of the most frequently used tabs.
The General Tab includes general product information such as SKU, sale price, regular price, tax status, and more.
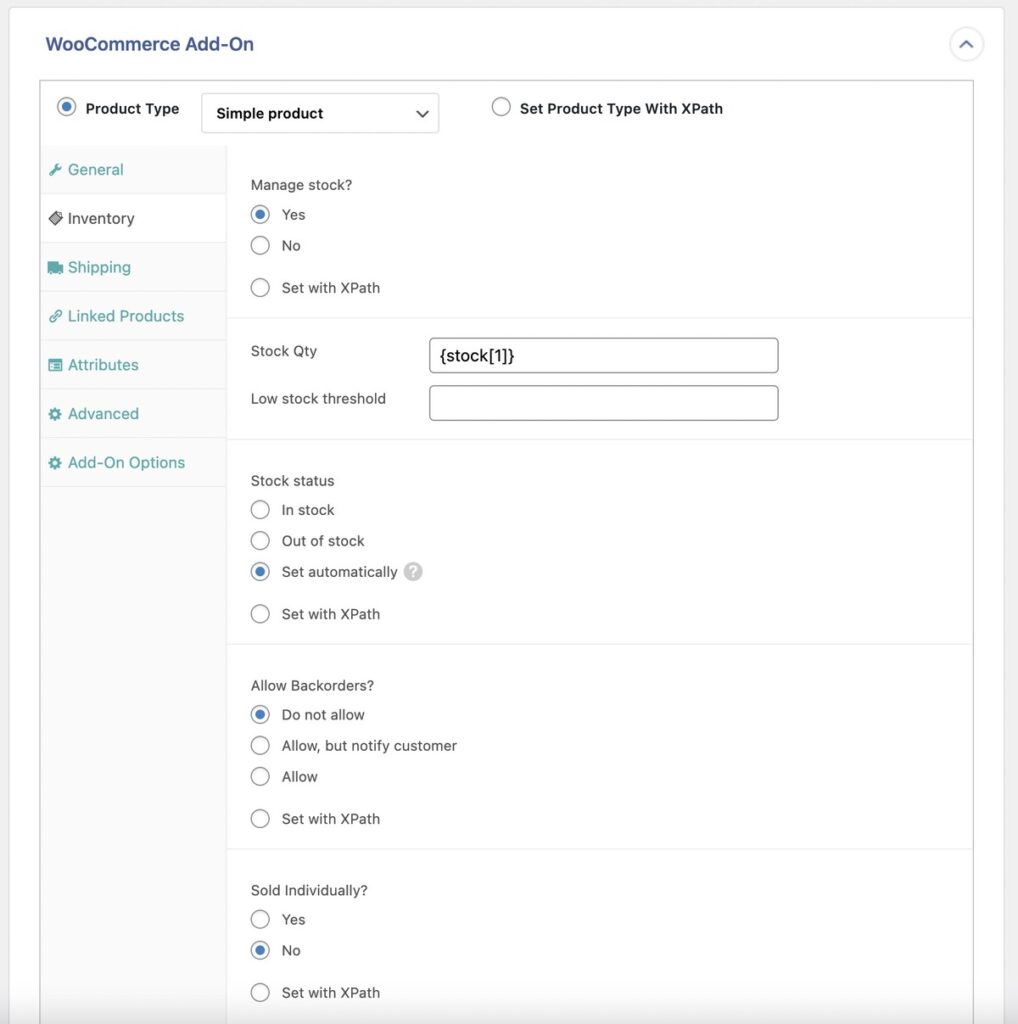
The Inventory tab includes the settings related to stock availability.
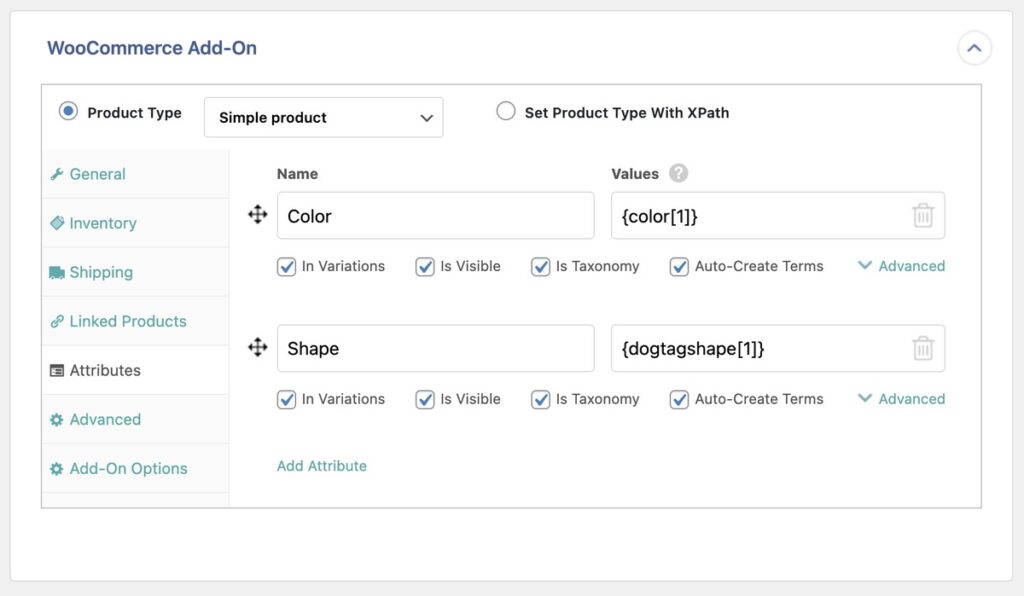
The Attributes tab lets you add different attributes like color, size, shape, etc.
The other tabs let you configure shipping, linked products, and advanced settings.
You can learn more about configuring the WooCommerce Add-On for variable products from this documentation: Import variable products to WooCommerce.
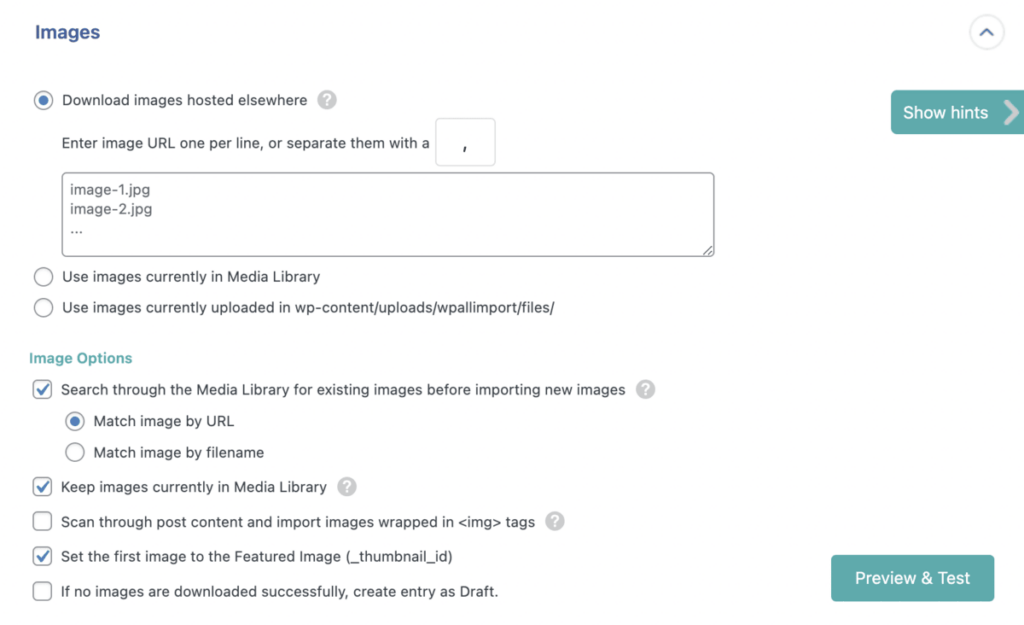
Images Section
The Images section lets you set up how you want to import the product images. You can import images from multiple sources — images hosted elsewhere, images currently in the Media Library, and images currently uploaded in wp-contents/uploads/wpallimport/files/.
Taxonomies, Categories, Tags Panel
This panel lets you map your product categories and tags. Automatic Setup automatically detects category headers and selects the appropriate hierarchy settings for your file.
Click the Product Categories checkbox, and a drop-down menu will appear. For this example, we used a simple hierarchical structure for the categories.
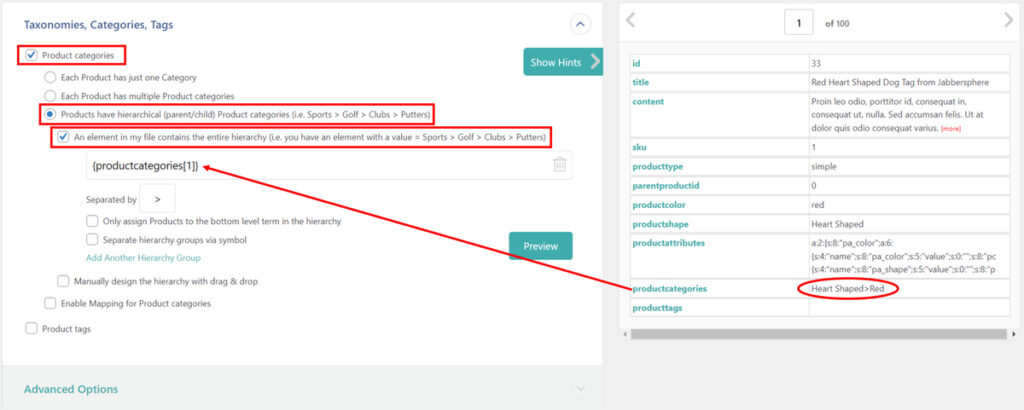
If you have hierarchical product categories, choose the Products have hierarchical (parent/child) Product Categories (i.e. Sports › Golf › Clubs › Putters) option.
Also select the An element in my file contains the entire hierarchy (i.e., you have an element with a value = Sports › Golf › Clubs › Putters) checkbox if you have an element in the import file containing the whole hierarchy. In this example, the productcategories element on the right panel contains the whole hierarchy. Simply drag & drop this element from the panel to the respective field.
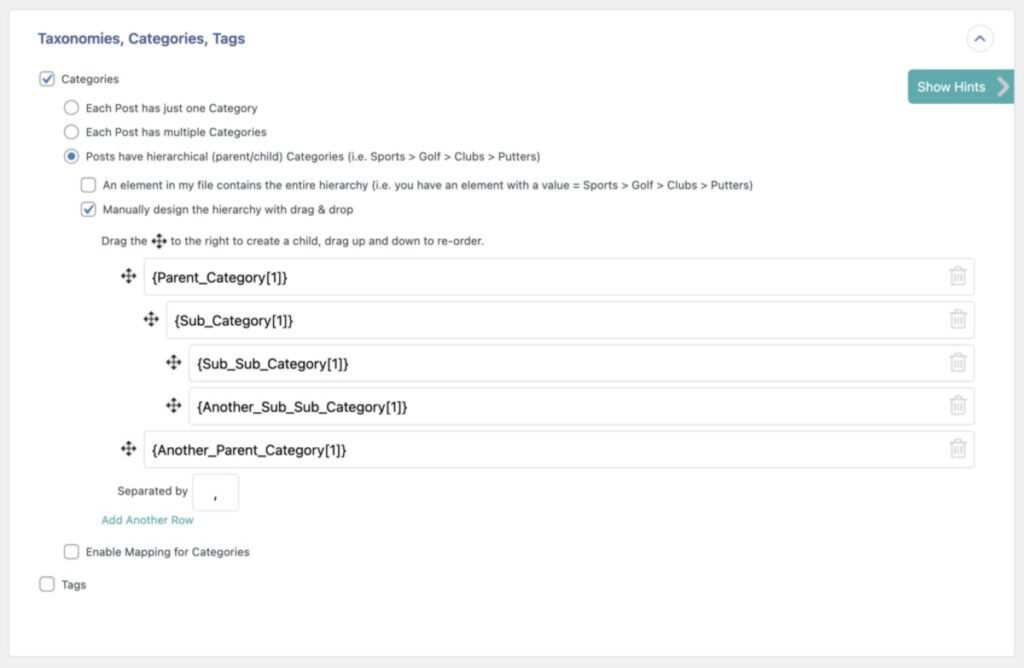
However, mapping product categories is not going to be so simple all the time, especially if you don’t have elements with the entire hierarchy. If the hierarchy data is spread across multiple columns in your import file, you need to manually identify those fields and how they relate to each other.
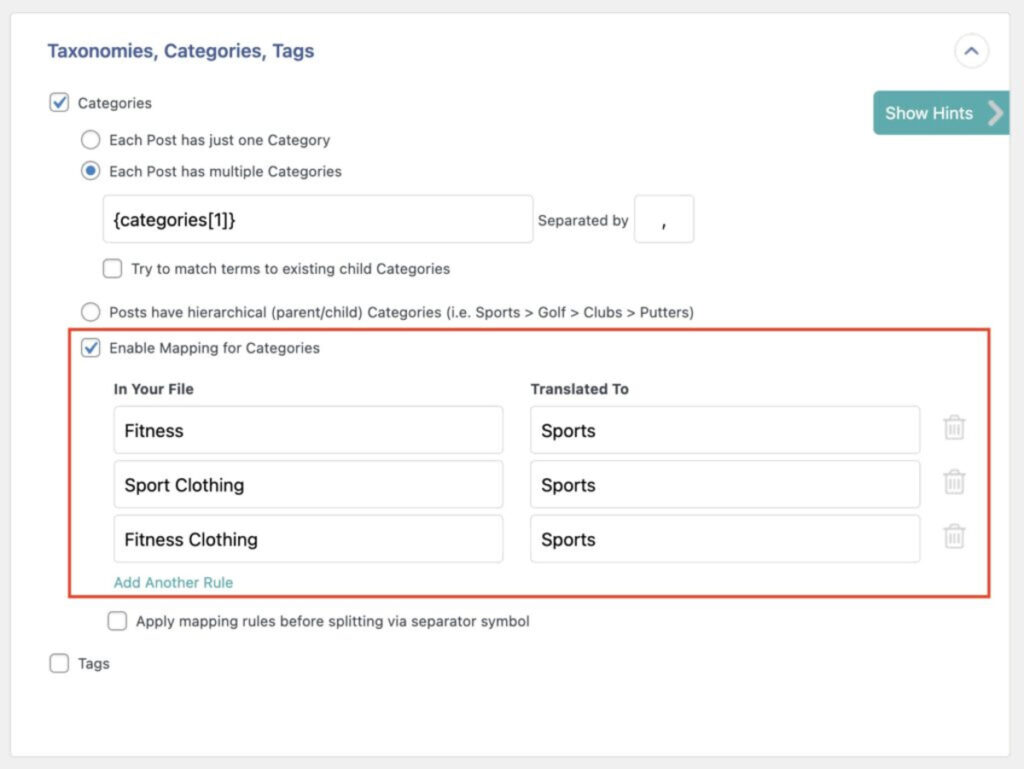
For other situations, you may map the incoming product category values to different category values in your WooCommerce store by translating them.
Once you are done setting up the template, Continue to Step 4.
4. Apply Additional Import Settings
On the Import Settings screen, set a unique identifier to prevent duplicate entries if you ever re-run this file. WP All Import can identify a unique key automatically: click the Auto-detect button to select your SKU or product ID.
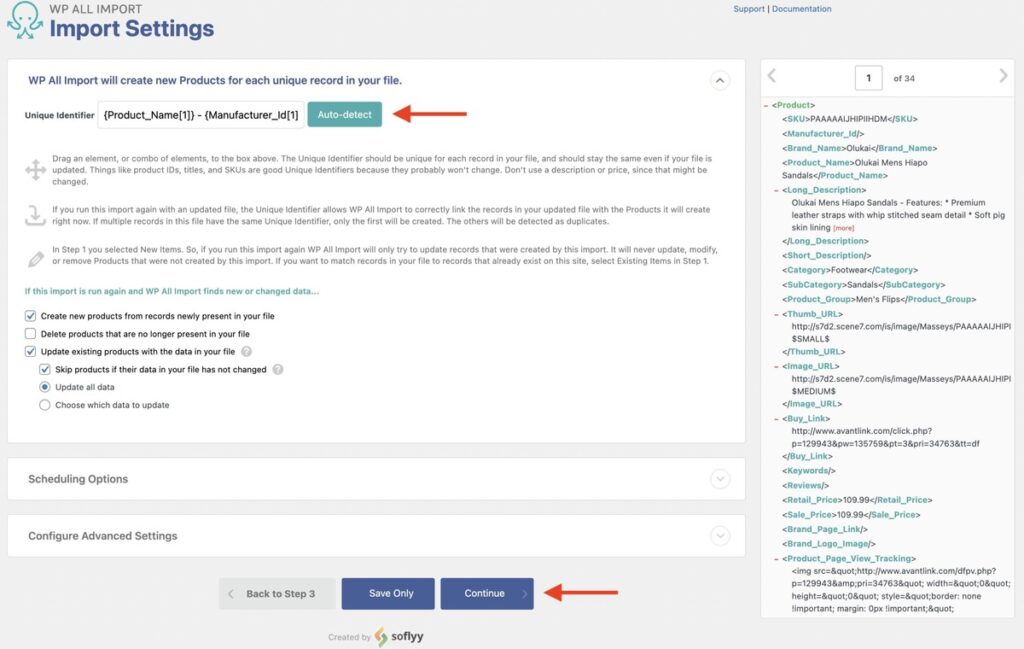
There are two more panels – Scheduling Options and Configure Advanced Settings.
Under Scheduling Options, you can automate recurring catalog updates using free server cron jobs or WP All Import’s Automatic Scheduling service ($19/month), keeping categories synchronized with vendor feeds without manual intervention.
The Configure Advanced Settings panel allows you to adjust the records-per-iteration chunk size, preventing server timeouts when importing catalogs with deep category structures.
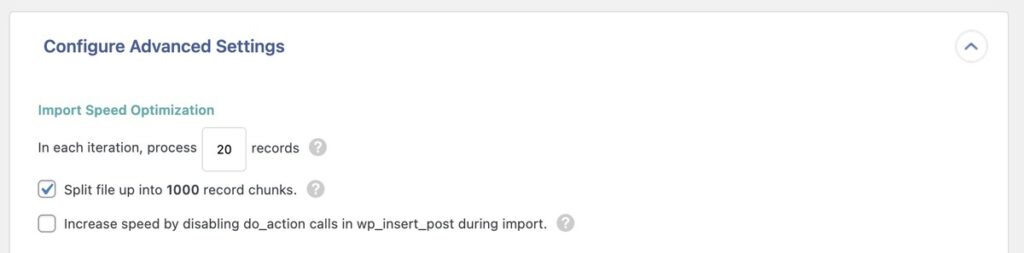
Click Continue and move to the final step.
5. Run WooCommerce Product Import and Verify the Data
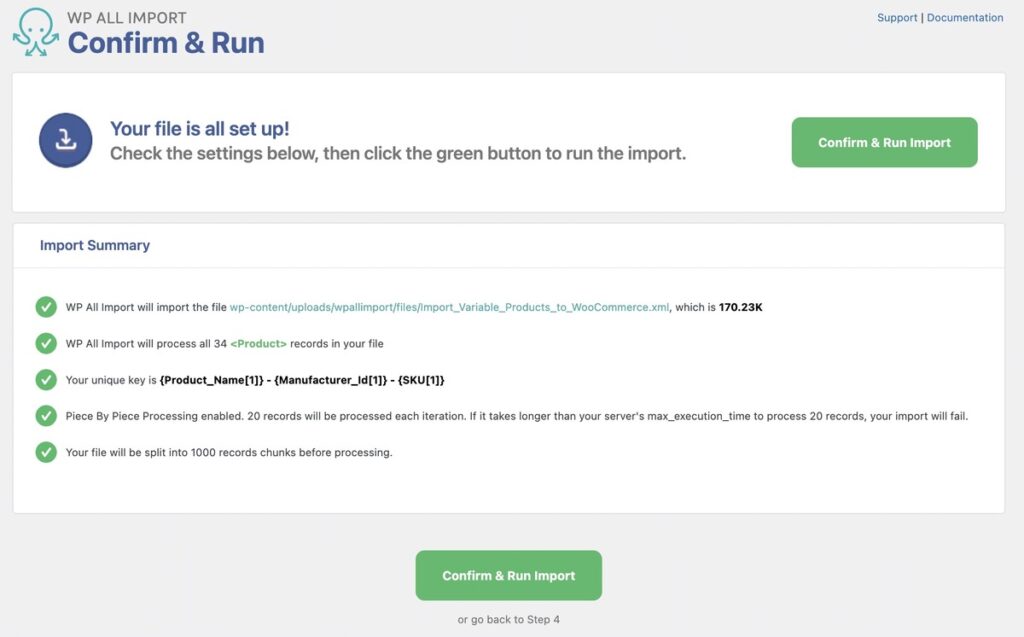
On the Confirm & Run screen, review your settings. If everything looks correct, click Confirm & Run Import.
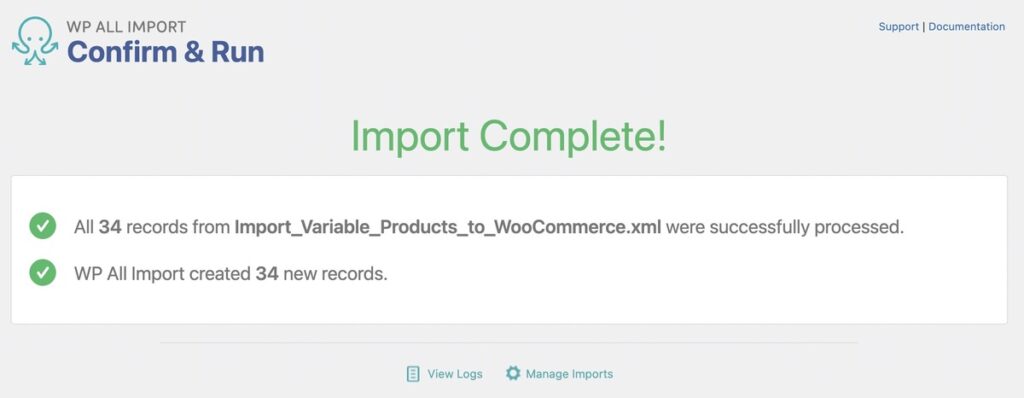
When the import finishes, WP All Import displays an Import Complete summary showing the number of products created and updated.
To finish things off, go to Products › All Products in the WordPress menu. You should check the product data tab of some products at random to confirm the import. Don’t forget to check categories by navigating to Products › Categories.
There you go! You imported products to WooCommerce with categories!
Import WooCommerce Product Categories – FAQs
How Do I Import Categories From CSV to WooCommerce?
To import categories from a CSV file to WooCommerce, use WP All Import’s standalone taxonomy workflow:
- Navigate to All Import › New Import and click the Set up automatically banner.
- Upload your CSV file, choose Taxonomies as the import type, and select Product Categories.
- Click Start Automatic Setup to detect category terms and parent relationships automatically.
- Review the summary card (or click Manual Setup to inspect fields).
- Configure your Import Settings and complete the product category import.
How To Import Categories in WordPress?
You can import categories into WordPress without products using WP All Import. Navigate to All Import › New Import, click the Set up automatically banner, and set your import type to Taxonomies. Click Start Automatic Setup to map your terms and parent hierarchies automatically, verify the summary card, and run the import.
How Do I Add Categories to All Products in WooCommerce?
To assign categories across an entire product catalog, create a new import in WP All Import and choose WooCommerce Products. Click Start Automatic Setup to analyze your spreadsheet; the plugin detects category headers and maps parent-child paths automatically before publishing items to your store.
How To Add Categories and Subcategories in WooCommerce?
WP All Import can add categories and subcategories to WooCommerce in a single pass by reading hierarchical column data. During setup, open the Taxonomies, Categories, Tags panel in the template editor, enable Products have hierarchical (parent/child) Product Categories, and select the element containing your full category path (such as Clothing > Shirts > T-Shirts).
How to export and import product categories in WooCommerce?
To export and import product categories in WooCommerce, use WP All Export to export your categories as a Bundle file. On your destination site, upload the bundle zip file into WP All Import under All Import › New Import; the plugin recognizes the template structure and executes the category import with zero manual configuration.